Преобразование базового диска в активный через diskpart
Содержание:
- Форматирование через командную строку командой FORMAT
- Ошибка №5. Запрос не был выполнен
- Копирование файлов напрямую с dvd на usb при помощи cmd
- Use Diskpart to format drive to NTFS (Command Line)
- How to format disk partition with diskpart?
- Параметр create volume raid
- diskpart in Windows Vista
- Поддержка скриптов
- Alternative to DiskPart: extend Server C drive more flexibly
- Параметр create partition logical
- Fsutil Utility
- Easiest way to extend partition with GUI AOMEI Partition Assistant
- Параметр break disk
- Extend a Hard Drive Volume
- diskpart in Windows XP
- Как работает diskpart
- Программы для разбивки диска на разделы
- Параметр retain
- Creating a partition using parted
- Troubleshooting
- Как использовать дефрагментацию для оптимизации диска из командной строки или PowerShell
- Other ways to format disk partition
Форматирование через командную строку командой FORMAT
Во всех без исключения версиях операционной системы Windows команда FORMAT позволяет удалить все данные с накопителя. С ее помощью можно полностью стереть все разделы с жесткого диска или флешки, удалив все присутствующие на них разделы.
Важно: Команда FORMAT не позволяет удалить всю информацию с накопителя, на котором установлена операционная система, если она запущена с него. Стоит отметить, что команда FORMAT выполняет форматирование выбранных пользователем разделом
То есть, если жесткий диск компьютера разделен на несколько разделов, не получится удалить данные сразу со всех из них. Для очистки каждого раздела нужно будет дать отдельную команду на удаление данных
Стоит отметить, что команда FORMAT выполняет форматирование выбранных пользователем разделом. То есть, если жесткий диск компьютера разделен на несколько разделов, не получится удалить данные сразу со всех из них. Для очистки каждого раздела нужно будет дать отдельную команду на удаление данных.
Чтобы форматировать через командную строку диски командой FORMAT потребуется:
- Запустить командную строку от имени администратора;
- Ввести команду на удаление информации из одного раздела, в примере в качестве раздела для форматирования указан раздел под буквой E: format f: /fs:fat32 /q.
Обратите внимание на указание некоторых параметров:
- /q — указывает, что форматирование раздела будет выполнено в быстром режиме (чаще всего этого достаточно, если с диском не имеется проблем). В случае, когда нужно провести полное форматирование, данный параметр не указывается в команде;
- fat32 — указывает, что форматирование будет выполнено в формате FAT32. Если требуется отформатировать раздел жесткого диска или флешку в NTFS, это можно указать вместо fat32.
Обратите внимание: Если при форматировании в командной строке появится сообщение “Вставьте новый диск в дисковод F”, нужно нажать Enter, чтобы продолжилось выполнение действий. В процессе форматирования потребуется ввести новую метку тома
Можно сохранить прежнюю, либо выбрать новую. Метка тома может содержать в себе до 11 символов
В процессе форматирования потребуется ввести новую метку тома. Можно сохранить прежнюю, либо выбрать новую. Метка тома может содержать в себе до 11 символов.
Ошибка №5. Запрос не был выполнен
Обычно означает аппаратные проблемы с самим накопителем.
Решение
- Если у вас возникли такие проблемы с флеш-накопителем, тогда перейдите в Диспетчер устройств (нажмите на кнопку «Пуск», в строке поиска введите devmgmt.msc и нажмите ввод).
- Найдите там «Контроллеры USB», откройте подраздел кликнув на него, и деинсталлируйте всё его содержимое (кликайте на первое в очереди субустройство, жмёте правую клавишу мыши – Удалить, и так пока не удалите всё содержимое «Контроллеры USB»).
- Затем перегрузите компьютер, и вновь попытайтесь запустить «DiskPart» и выполнить намеченное.
- Если не помогло – то скорее всего ваш флеш-накопитель аппаратно неисправен.
Копирование файлов напрямую с dvd на usb при помощи cmd
Предположим, что буква вашей флешки — F: и, по совпадению, буква DVD-установщика тоже оказалась F:. По-умолчанию активный каталог командной строки находится по пути C:WindowsSystem32 и мы будем оперировать им, работая с DVD (F:). Обязательным условием является установленный DVD инсталлер.
1. Введите F: и нажмите Enter. Активная директория будет изменена на F.
2. Введите cd boot и нажмите Enter. Активный каталог изменится на F:boot>.
3. Введите bootsect /nt60 g: и нажмите Enter. Это действие создаст загрузочный сектор на диске G: (USB-накопитель). В нашем случае, со скриншотов, диск E:.
4. Введите exit, нажмите Enter и закройте командную строку.
Чтобы приступить к установке Windows, остается лишь скопировать все установочные файлы, с DVD на USB-носитель.
- Откройте командную строку, как это было описано в предыдущих шагах.
- Введите copy e:*.* /s/e/f g: и нажмите Enter. Дождитесь, пока все файлы не будут перемещены. Дважды проверьте буквы USB и DVD. Здесь E: — буква DVD-диска, а G: — буква USB-накопителя.
Теперь ваш USB-накопитель стал загрузочной флешкой и готов к полноценному использованию.
На всякий случай, если загрузочная флешка не помогла реанимировать вашу Windows и требуется восстановление информации с жесткого диска, вам помогут инструменты Starus Recovery. Cкачать и опробовать программы для восстановления удаленных данных можно совершенно бесплатно!
Use Diskpart to format drive to NTFS (Command Line)
Generally speaking, when Windows users fail to format hard drive to NTFS via Disk management or File Explorer and get various formatting errors like “Windows was unable to complete the format” “The format did not complete successfully” or some else, Diskpart will be an alternative. How to format disk to NTFS using Diskpart Command? Below are elaborate steps you can refer to.
Warning: formatting operation will erase everything on the drive you select. It is crucial that you correctly choose the drive you decide to format. It is always advised to back up data before proceeding.
1. Press the “Windows key + X” on your keyboard to open the Power User menu and select “Command Prompt (Admin)” to launch Command Prompt.
In Windows 7, you need to launch it in a different way: click “Start” button, input “cmd” in the “Search” box, right click the Command Prompt icon and select “Run as administrator”.
2. Type “Diskpart” in the Command Prompt and press “Enter”.
3. Then execute the following commands in sequence:
-
list disk: list all disks recognized by OS.
-
select disk 1: select the disk which contains the partition you need to format to NTFS using CMD. Here we select disk 1.
-
list partition: list all partitions on the selected disk.
-
select partition 1: select the target partition. Here we select partition 1.
-
format fs=ntfs quick: format partition to NTFS file system.
When the formatting process is completed, you can run the “exit” command to close DiskPart.
Notes:▸If the hard drive is now of FAT32, and you want to format it to NTFS, you can enter Command Prompt and directly run «convert : /fs:ntfs” (ex: convert e: /fs:ntfs) to convert FAT32 to NTFS without formatting/losing data.▸If you want to format C drive in Command Prompt, you have to boot your computer from the installation media and perform the formatting task in WinPE mode.
How to format disk partition with diskpart?
To format disk partition, you can use the Disk Management tool, or right-click on a drive in Windows Explorer and select the “Format…”. If you would rather use a command line to format the drive, DiskPart would be the first choice, and it does have many advantages.
For example, if you would like to reformat a drive which had an operating system on the drive, you can find there are system partitions on the drive which cannot be formatted by Disk Management and cannot be seen in Windows Explorer. But, how to format disk using DiskPart?
Diskpart is an amazing tool that can manage disks by typing the relative syntax. You can format a local drive or an external hard drive for the use of file storage in your Windows OS environment. And here, you can see how to format hard disk using CMD step by step.
Tip: Format disk partition will erase everything on it. It is necessary to make a full backup before formatting.
Параметр create volume raid
Создание тома RAID-5 на указанных динамических дисках. После создания тома фокус автоматически перемещается на этот том.Синтаксис:
- – Размер дискового пространства в мегабайтах (Мбайт), который том будет занимать на каждом диске. Если размер не указан, создается том RAID-5 максимального возможного размера. Размер тома RAID-5 определяется диском с наименьшим размером непрерывного свободного места. Объем того же размера выделяется на каждом диске. Фактический объем доступного дискового пространства на томе RAID-5 меньше суммы всего занятого дискового пространства, поскольку некоторая его часть требуется для четности
- – Динамические диски, на которых создается том. Объем, равный значению size=n, выделяется на каждом диске
- – Только для сценариев. Если задан этот параметр, при возникновении ошибки программа DiskPart продолжает обрабатывать команды, как если бы ошибки не было. Если параметр noerr не задан, при возникновении ошибки работа программы DiskPart завершается и выдается код ошибки
diskpart in Windows Vista
You need to run these steps as an Administrator on Windows Vista systems.
If you can boot into Windows Vista with no errors, . Otherwise, follow .
If you can boot into Windows Vista
You simply need to open Command Prompt, if you can boot into Windows Vista:
- Boot into Windows Vista
- Click Start
- Type
- Click Command Prompt from the search results list. You may need to right-click Command Prompt > Run as Administrator, if you are not logged in as Administrator already
- Type
- Press Enter
For the full list of diskpart commands and paremeters, go to .
If you can’t boot into Windows Vista
If you can’t boot into your system, you have the following options:
- Use the installation disc to access System Recovery Options
- Access System Recovery Options without the installation disc (if installed)
- Use Easy Recovery Essentials and access Command Line
If you have the installation disc:
If you can’t boot into Windows Vista, but you have the Windows Vista disc, follow these steps to open diskpart:
- Insert the original CD/DVD in the optical drive
- Boot your computer
- Press any key to boot from the CD/DVD
- Select your language, time and keyboard
- Click Next
- Click Repair your computer
- Select the operating system
- Click Next
- When the System Recovery Options screen appears, click Command Prompt
- Type :
diskpart
- Press Enter
For the full list of diskpart commands and paremeters, go to .
If you don’t have the installation disc:
If your Windows Vista has the System Recovery Options installed and is available at the Advanced Boot Options menu, you can run Command Prompt from there. Otherwise, see the “If you use Easy Recovery Essentials” set of instructions below.
Follow these steps below to access diskpart without the installation disc:
-
- Reboot the computer
- Press F8 as your computer starts to boot, but before the Windows Vista logo appears
- Select Repair Your Computer, at the Advanced Boot Options menu
If a “Repair Your Computer” option isn’t listed, System Recovery Options is not installed on your computer. Use the original installation disc or go to the “If you use Easy Recovery Essentials”set of instructions below .
- Select Command Prompt at the System Recovery Options menu
- Type
- Press Enter
For the full list of diskpart commands and paremeters, go to .
If you use Easy Recovery Essentials:
If you don’t have the installation disc available, can’t boot into Windows Vista or you don’t have the “Repair Your Computer” option listed at the Advanced Boot Options menu, you can use Easy Recovery Essentials to access Command Prompt and load diskpart.
Follow these steps:
- Download Easy Recovery Essentials
- Burn the ISO Image. Follow our instructions on how to burn a bootable ISO image. If you’d like to have a recovery USB instead, follow our instructions on how to make a recovery USB.
- Boot Easy Recovery Essentials from the CD, DVD or USB
- Select Launch Command Line
Поддержка скриптов
В самом простом варианте выбрать раздел в DiskPart команда позволяет достаточно просто. Для разбиения выбранного раздела используется строка create partition logical size=XXXXXX
, где XXXXX
— размер создаваемого логического диска в мегабайтах.

Естественно, система должна видеть раздел, помеченный определенной литерой в файловом менеджере. Для этого применяется команда assign letter=Х
, где Х
является незадействованной литерой. Имеется в виду, что если вы присвоите новому разделу, например, букву F
или E
, под которыми ОС распознает съемный USB-носитель и DVD/CD-дисковод, то либо они потом работать не будут, либо созданный раздел окажется неактивным.
Alternative to DiskPart: extend Server C drive more flexibly
Because there are some restrictions to use DiskPart to extend C drive in Server, you might need an alternative to perform this task more flexibly and easily. AOMEI Partition Assistant Server is worth your trying. This partition manager is compatible with Server 2003, 2008 (R2), 2012 (R2), 2016, 2019, and SBS 2003, 2011.
As for extending Sever C drive, it breaks the limitations of DiskPart Service and extends C drive more flexibly. For example, when the unallocated space is not adjacent to C drive, it allows you to move the partition between the unallocated space and C partition to the right side, making them contiguous, and then extend C partition successfully. Or you can use the “Merge Partition” feature to directly add non-adjacent unallocated space into C drive, which requires fewer steps and time. Moreover, it is able to extend both FA32 and NTFS partition.
Below are detailed steps to extend C drive by merging unallocated space into it:
Download Free Demo Server 2019/2016/2012/2008
Secure Download
Step 1. You can download the Demo Version for a free trial. Launch AOMEI Partition Assistant Server. Right-click the C drive and choose “Merge Partitions”.
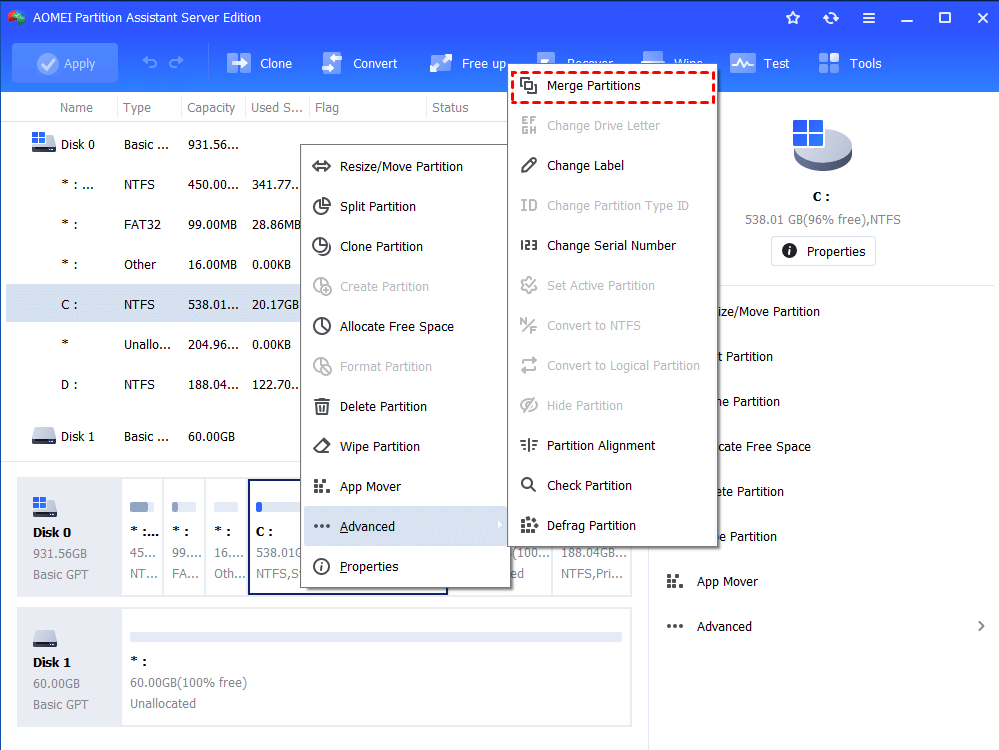
Step 2. Tick the unallocated space which is not right adjacent to C partition and click “OK”.
Step 3. Back to the main interface, click “Apply” and “Proceed” to commit the pending operation.
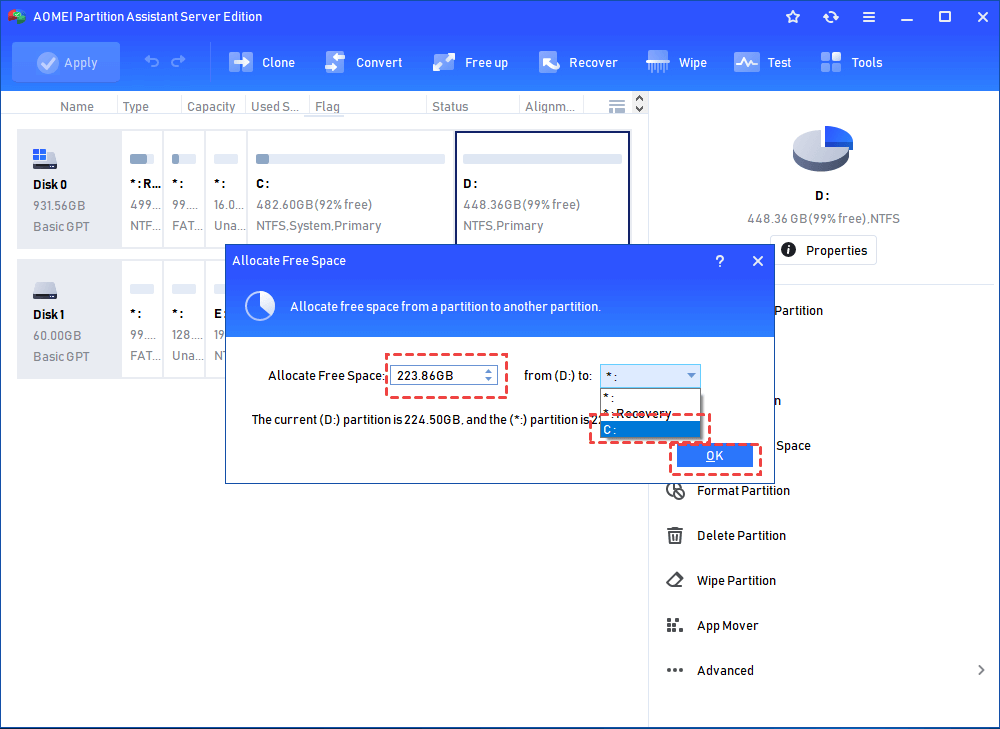
Wait for a while, the Server C drive will be extended with the unallocated space. Moreover, if there is no unallocated space, you can try the “Allocate Free Space” feature to directly assign some free space from one partition to another.
Параметр create partition logical
Создание логического диска в дополнительном разделе. После создания раздела фокус автоматически переносится на новый логический диск.Синтаксис:
- – Размер логического диска в мегабайтах (Мбайт). Если размер не указан, раздел занимает все свободное пространство в текущей области
- – Применяется только к дискам, содержащим основную загрузочную запись (MBR). Смещение в байтах для начала нового логического диска. Смещение зависит от цилиндров (т. е. смещение округляется до размера определенного цилиндра). Если смещение не указано, раздел помещается в первое пространство на диске, достаточно большое, чтобы уместить его. Размер раздела в байтах должен быть не меньше числа, указанного в параметре size=n. Если указывается размер логического диска, то он должен быть меньше, чем дополнительный раздел
- – Только для сценариев. Если задан этот параметр, при возникновении ошибки программа DiskPart продолжает обрабатывать команды, как если бы ошибки не было. Если параметр noerr не задан, при возникновении ошибки работа программы DiskPart завершается и выдается код ошибки
Fsutil Utility
Windows also includes an additional command-line tool for file, system, and disk management, called Fsutil. This utility helps you to change the short name of a file, find files by SID’s (Security Identifier) and perform other complex tasks.
FSUtil and Diskpart are powerful, but not for inexperienced Windows user. So do be careful, please.
There is not enough space available on the disk(s) to complete this operation
What do you do if you get the message – There is not enough space available on the disk(s) to complete this operation?
Most new computers with OEM Windows pre-installs come with 4 partitions. Hard disks configured as basic disks are limited to 4 primary partitions or 3 primary partitions and 1 extended partition and multiple logical drives. And as such, if you try to shrink the OS partition, you may find that you cannot create a 5th partition due to this limit.
There could be two possible solutions for this issue:
- As the disk pre-configured by OEM may have conflicts with the disk management tool in Windows, you should try some 3rd party tool to re-partition the disk.
- You may try to delete a less important partition created already and merge the space to create a new partition with a proper drive letter.
Deleting the partitions created by the OEM is often not possible due to the way the OEMs configure the partitions. Therefore the option then is to extend the operating system partition back to the original size to regain use of the unallocated space. If additional storage is needed, consider adding an external USB hard disk.
Easiest way to extend partition with GUI AOMEI Partition Assistant
Not everyone can use CMD well. Employing Diskpart to extend partition is more suitable for people who know it deeply. It cannot be any wrong while operating. Once there is a wrong step, it may cause a big damage. Fortunately, the AOMEI Partition Assistant also has the GUI version, allowing you to extend the partition within a few clicks.
Step1.Launch AOMEI Partition Assistant Professional. It will display its main interface. To extend partition, here you can make use of “Resize Partition”, «Move Partition”, “Merge Partitions”, and“Allocate Free Space”features.
1> If there is unallocated partition adjacent to the partition you want to extend, you can right click the partition, selectResize Partitionto extend the partition with the unallocated space.
Then, drag the bar towards the right to extend partition with the unallocated space.
2> If the unallocated space is not adjacent to the partition you want to extend, you can right click the partition near to the unallocated space, select Move Partition to move the unallocated space to the partition you want to extend. Then, use the Resize Partition to extend the partition.
Then, drag the partition to the left, and it will be moved.
3> The most effective way is using Merge Partitions to extend the partition. No matter there is unallocated space or not, you can right click the partition you want to extend, select Merge Partitions.
Then, you can select the unallocated space or other existing partition to extend the partition you want to extend.
4>If there is no unallocated space, you can use the “Allocate Free Space” feature.
Note: Each operation needs to click «Apply» at the toolbar and then it will be executed.
Параметр break disk
Применяется только к динамическим дискам. Разбивает зеркальный том, имеющий фокус, на два простых тома. Один простой диск сохраняет букву диска и все точки подключения зеркального тома, а на другой перемещается фокус, таким образом для него можно назначить букву диска.
По умолчанию содержимое обоих половин зеркала сохраняется. Каждая половина становится простым томом. Если задан параметр nokeep, только одна половина зеркала сохраняется как простой том, а другая половина удаляется и преобразуется в свободное пространство. Ни один из томов не получает фокус.Синтаксис:
- – Задание диска, на котором будет создан отраженный том
- – Задание сохранения только одного из отраженных томов. Второй простой том удаляется и преобразуется в свободное пространство. Ни том, ни свободное пространство не получают фокус
- – Только для сценариев. Если задан этот параметр, при возникновении ошибки программа DiskPart продолжает обрабатывать команды, как если бы ошибки не было. Если параметр noerr не задан, при возникновении ошибки работа программы DiskPart завершается и выдается код ошибки.
Extend a Hard Drive Volume
If you have an existing hard drive volume that doesn’t take up all of the free space on a drive, and you wish to enlarge it, Diskpart commands allow you to do that.
Start by selecting your chosen disk with select disk #, replacing # with your disk number (and using list disk to find your disk number, if you don’t know.)
- Type list volume to list all the available volumes on your PC, then type select volume #, replacing # with the volume you’re looking to extend.
- Type extend to expand it to the maximum size available. Diskpart will confirm whether or not the extend command has worked correctly. Confirm the size of the volume has increased by typing list volume for a second time afterward.
Diskpart has other options available, as the help command briefly explains. If you need further information on how to use Diskpart, Microsoft has further Diskpart support information available.
diskpart in Windows XP
Note that the fdisk utility found in pre-Windows XP systems is now known as diskpart on Windows XP systems.
If you can boot into Windows XP
If you can boot into your computer, you simply need to open Command Prompt to access diskpart:
- Boot into Windows XP
- Click Start
- Click Run
- Type
- Press Enter or click OK
- At the Command Prompt window, type
- Press Enter
If you can’t boot into Windows XP
If you can’t boot into Windows XP to access diskpart, you have 2 options:
- Use the original CD to access Recovery Console
- Use Easy Recovery Essentials to launch Command Line
If you have the original CD:
If you can’t boot into Windows XP, but you have the original CD, you can access the Recovery Console:
- Insert the Windows XP CD
- Reboot the computer
- Press any key to boot from the CD
- At the Microsoft Setup menu, press R
- Select the operating system and enter the Administrator password, if requested
- When Command Line appears, type
- Press Enter
If you use Easy Recovery Essentials:
- Download Easy Recovery Essentials
- Burn the ISO Image. Follow our instructions on how to burn a bootable ISO image. If you’d like to have a recovery USB instead, follow our instructions on how to make a recovery USB.
- Boot Easy Recovery Essentials from the CD, DVD or USB
- Select Launch Command Line
Как работает diskpart
Создание загрузочного флеш-накопителя через консольную утилиту diskpart
является быстрым и доступным способ. Благодаря тому, что данная утилита работает в текстовом режиме, каждый пользователь персонального компьютера с легкостью справится с такой задачей.
С быстрым развитием технологий, каждому человеку доступен выход в Интернет, где можно найти бесплатные версии различных программ по созданию загрузочного флеш-накопителя
Однако случается и такое, что доступ к Интернету отсутствует в силу каких-либо обстоятельств, поэтому важно знать несколько простых альтернативных способов создания загрузочного флеш-накопителя
Один из них — описанный метод, применяющий командную строку. Такой ручной способ пригодится каждому пользователю ПК. Эта консольная утилита входит в перечень стандартных программ
. Нет необходимости дополнительно искать и устанавливать какие-либо другие программы по настройке загрузочного флеш-накопителя. Через десять минут использования diskpart готова загрузочная флешка с установочным файлом Windows.
Программы для разбивки диска на разделы
Разделение диска домашнего компьютера на разделы можно отнести к редкой процедуре и поэтому нет смысла покупать для этих целей платное программное обеспечение с мощным функционалом.
Ниже представлены бесплатные версии программ коммерческих проектов, но для домашнего использования они бесплатны. При желании их можно расширить до профессиональных версий.
AOMEI Partition Assistant
AOMEI Partition Assistant — простой и функциональный менеджер дисков, который может не только разделить диск или объединить разделы, но и выполнить множество прочих востребованных операций: копирование диска, клонирование раздела, конвертер NTFS в FAT, преобразования диска из MBR в GPT, перенос ОС с одного диска на другой.
Официальная страница программы: https://www.aomeitech.com/aomei-partition-assistant.html.
Недостатки программы: быстрое и удобное разделение диска доступно только в платной версии AOMEI Partition Assistant, а в бесплатной придется сначала уменьшить один раздел, а затем на освободившемся пространстве диска создать новый раздел.
1. Запустите программу и кликните правой клавишей мыши по разделу или логическому диску, который хотите разделить. Выберите пункт меню «Разделение раздела».
2. Перетащите ползунок для изменения размера нового раздела или уменьшите размер раздела явно в Гигабайтах, в соответствующем окошке и нажмите кнопку .
3. Среди разделов диска появится свободное пространство. Кликните по нему правой клавишей мыши и выберите пункт «Создание раздела»
4. Укажите размер диска, букву и файловую систему и нажмите кнопку .
5. Для применения выполненных манипуляций нажмите кнопку в основном меню программы.
В случае разделения системного диска C:, на котором установлена операционная система, потребуется перезагрузка компьютера.
Компьютер будет перезагружен программой в среду Windows PE, в которой будут выполнены все необходимые операции по работе с разделами диска и по завершении загрузится операционная система Windows с измененными разделами дисков.
Minitool Partition Wizard Free
Minitool Partition Wizard Free — бесплатная версия весьма функционального и удобного менеджера разделов диска. Помимо основного функционала, работающего с разделами и файловыми системами диска, программа радует дополнительными бесплатными инструментами такими как «Анализатор пространства диска» и «Тест скорости диска»
Официальная страница программы: https://www.partitionwizard.com/free-partition-manager.html.
Недостатки программы: отсутствие русского языка.
Разбить диск на разделы с помощью Minitool Partition Wizard можно с помощью пары кликов.
1. Укажите раздел на диске, который хотите поделить и кликните в боковом меню «Split Partition».
2. Перетащите ползунок или введите число, чтобы задать размер нового раздела и нажмите кнопку .
3. Для применения заданных изменений нажмите кнопку , которая находится в левом нижнем углу.
4. Для работы программы настоятельно рекомендуется закрыть все прочие приложения и программы. После выполнения рекомендации нажмите кнопку .
Если вы планируете разделить системный диск, то для выполнения операции программа потребует перезагрузить компьютер. Нажмите кнопку .
После перезагрузки запустится консольная версия программы и выполнит все необходимые операции. Для разделения системного диска, содержащего операционную систему, потребуется подождать несколько минут. Дождитесь выполнения операций с разделами диска и проверьте результаты.
Как видите, способов разделить диск на несколько разделов вполне достаточно и каждый может выбрать для себя наиболее подходящий. Главное помните: при работе с разделами диска всегда есть риск потерять хранящуюся на нем информацию, если в этот момент произойдет какой-то сбой в работе компьютера.
Параметр retain
Подготовка существующего динамического простого тома к использованию в качестве загрузочного или системного тома.В компьютерах на базе процессоров x86 — создание записи раздела в основной загрузочной записи (MBR) на динамическом простом томе, имеющем фокус.
Для создания раздела MBR динамический простой том должен начинаться со смещения, выровненного по цилиндру, а его размер должен равняться целому числу цилиндров.В компьютерах на базе процессоров Itanium — создание записи раздела в таблице разделов GUID (GPT) на динамическом простом томе, имеющем фокус.
Команда retain предназначена для использования во время установки в автоматическом режиме или изготовителями вычислительной техники (ИВТ)
Синтаксис:
Creating a partition using parted
1. Select the hard disk to be partitioned
Select the disk on which the partition is being created, in the below example /dev/sdb is being partitioned. You can select the disk in below given two ways.
# parted /dev/sdb
GNU Parted 3.1
Using /dev/sdb
Welcome to GNU Parted! Type 'help' to view a list of commands.
(parted)
or
# parted
GNU Parted 3.1
Using /dev/sda
Welcome to GNU Parted! Type 'help' to view a list of commands.
(parted) select /dev/sdb
Using /dev/sdb
(parted)
It is possible to execute “help” to see the various options provided in parted command
2. Set partition table type
The following example creates a new partition table by using the mklabel command. The disk label type must be one of the following: aix, amiga, bsd, dvh, gpt, mac, msdos, pc98, sun, or loop.
(parted) help mklabel
  mklabel,mktable LABEL-TYPE               create a new disklabel (partition table)

	LABEL-TYPE is one of: aix, amiga, bsd, dvh, gpt, mac, msdos, pc98, sun, loop
In the above output, it is possible to see that different LABEL-TYPEs are supported in parted. It is important to note that one will require to use msdos as LABEL-TYPE for generic Linux.
(parted) mklabel msdos
Warning: The existing disk label on /dev/sdb will be destroyed and all data on this disk will
be lost. Do you want to continue?
Yes/No? Yes
3. Check free space and existing partitions
To check free space and any existing partitions on the disk use the print sub-command. As you can see 21.5GB space is free on the disk and no partition is created yet on the disk.
(parted) print free
Model: VMware, VMware Virtual S (scsi)
Disk /dev/sdb: 21.5GB
Sector size (logical/physical): 512B/512B
Partition Table: msdos
Disk Flags:

Number  Start   End     Size    Type  File system  Flags
        32.3kB  21.5GB  21.5GB        Free Space
(parted) print
Model: VMware, VMware Virtual S (scsi)
Disk /dev/sdb: 21.5GB
Sector size (logical/physical): 512B/512B
Partition Table: msdos
Disk Flags:

Number  Start  End  Size  Type  File system  Flags

(parted)
4. Creating Primary or Logical Partition in Selected Disk Using mkpart
One can create either Primary or Logical partitions using mkpart command. Options can be primary and logical respectively. Example for both options are shown as below (we will create 2 partitions of 200MB each as primary and logical partition) :a. Creating primary partition
(parted) mkpart primary
File system type?  ? ext4
Start? 0
End? 200MB
Warning: The resulting partition is not properly aligned for best performance.
Ignore/Cancel? I
(parted) print
Model: VMware, VMware Virtual S (scsi)
Disk /dev/sdb: 21.5GB
Sector size (logical/physical): 512B/512B
Partition Table: msdos
Disk Flags:

Number  Start  End    Size   Type     File system  Flags
 1      512B   200MB  200MB  primary
b. Creating logical partition
(parted) mkpart logical
parted: invalid token: logical
Partition type?  primary/extended? extended
Start? 201M
End? 402M
(parted) print
Model: VMware, VMware Virtual S (scsi)
Disk /dev/sdb: 21.5GB
Sector size (logical/physical): 512B/512B
Partition Table: msdos
Disk Flags:

Number  Start  End    Size   Type      File system  Flags
 1      512B   200MB  200MB  primary
 2      201MB  402MB  200MB  extended               lba
NOTE: Parted asks for the FS-Type while creating primary partition unless a logical partition is to be created.
Troubleshooting
Download diskpart
You can not download diskpart utility. This utility is a command line utility part of Windows.
To access diskpart, you have the following options:
- Use the original CD/DVD or USB of your Windows to access Recovery Console (for Windows XP) or System Recovery Options (for Windows Vista-8)
- Boot into the recovery mode of your Windows
- Use Easy Recovery Essentials, our recovery and repair disk, and open Command Line to access diskpart
Instructions on how to access diskpart if you use Easy Recovery Essentials:
- Download Easy Recovery Essentials
- Burn the ISO Image. Follow our instructions on how to burn a bootable ISO image. If you’d like to have a recovery USB instead, follow our instructions on how to make a recovery USB.
- Boot Easy Recovery Essentials from the CD, DVD or USB
- Select Launch Command Line
Instructions on how to access diskpart if you have the installation disc:
Instructions on how to access diskpart if you don’t have the installation disc:
Format USB with diskpart
To format a USB flash drive with diskpart, follow these steps:
- Open the utility by typing in Command Prompt
- Press Enter
- Once loaded, type :
list disk
- Press Enter
- Determine which of the disks listed is your USB flash drive, e.g. Disk 2.
- Type , if #2 is the USB flash drive presented by the list disk command
- Press Enter
- Type to clean the USB flash drive:
clean
- Press Enter
- Type this command:
create partition primary
- Press Enter
- Type :
active
- Press Enter
- You should now receive this confirmation message:
DiskPart marked the current partition as active.
- Type this command to format the USB flash drive:
format fs=ntfs label="MY USB DRIVE"
where is the NTFS file system (you can also use fs=fat32) and “MY USB DRIVE” is the label given to the USB drive.
- Type :
assign
- Press Enter
- Quit diskpart by typing :
exit
- Press Enter
Bootable USB with diskpart
To create a bootable USB using diskpart, follow the steps from .
Once successfully formatted the drive, simply copy the files to the USB drive.
USB not showing in diskpart
diskpart will not list external media, e.g. USB flash drive, if you’re using Windows XP.
Windows Vista to Windows 8 systems will show the USB flash drives in diskpart.
Как использовать дефрагментацию для оптимизации диска из командной строки или PowerShell
Командная строка и PowerShell также позволяют оптимизировать (обрезать или дефрагментировать) раздел. Все, что вам нужно сделать, это ввести команду defrag, за которой следует буква диска. Например, если вы хотите оптимизировать раздел R :, вы должны использовать «defrag r:» . Если все работало хорошо, вы должны получить отчет, подобный приведенному ниже, после оптимизации выбранного тома (обрезка, если это SSD, или дефрагментация, если это жесткий диск).
Отчет содержит информацию до и после процесса оптимизации, такую как размер тома, свободное пространство, общее фрагментированное пространство и самый большой размер свободного пространства.
Other ways to format disk partition
DiskPart should be the best way to format disk partition, and it is widely used in Windows Vista/7/8/8.1/10/11, however, it doesn’t support Windows XP. If you are using XP, how do you manage disks with command line? Besides, if you use DiskPart to format partition installed with system files, you may be failed and receive a Windows error code 0x80070057, what would you do?
Fortunately, there are many other ways to instead of DiskPart format disk partition.
Format disk partition with AOMEI Partition Assistant command line
AOMEI Partition Assistant Professional is a great tool that can help you format partition with command line in a quick way. First, you need to open the command prompt by clicking Start->type cmd, right click the program->select Run as Administrator. If you work with Windows 10/11, pressWin+X, select Command Prompt (Admin). Then, you can follow the next content to format a drive with AOMEI Partition Assistant.
1). Type cd C:\Program Files\AOMEI Partition Assistant Pro Edition 6.3, press Enter. The path is your AOMEI Partition Assistant installation directory. Then, type partassist.exe /list, press Enter.
2). It will skip to the AOMEI Partition Assistant command Prompt, and list all disks on your computer.
3). Typepartassist.exe /list:0, the 0 refers to the disk you want to list volumes on it. Press Enter.
4). It will show you a new window to list the volumes on the disk 0.
5). Type partassist.exe /fmt:E /fs:ntfs /label:Play to format the FAT32 to NTFS. Press Enter.
6). Wait till the task done.
Notes:
-
«/fmt» followed by partition number or drive letter, and the partition number starts with 0. If the specified value is drive letter, disk number can be ignored.
-
«/fs» means file system, whose value can be fat16, fat32 or ntfs.
-
«/label» means you can add any name of the partition.
Format disk partition with GUI
The truth is that not everybody likes to use command prompt to format disk partition. For those people, format partition with GUI instead of DiskPart format is a greater choice. The AOMEI Partition Assistant Standard provides the easiest UI to format the partition free. With it, you can format disk partition with only a few clicks. Here you can do as following steps:
Step1. Free download AOMEI Partition Assistant Standard, install and launch it, and you can see the main interface of your disk(s). Select the partition you want to format, right-click on it, select «Format Partition» in the pop-up menu.
Step2. Here you can give a partition label and format the partition to what kind of file systems. Click OK.
Step3. Finally, click Apply at the toolbar to execute all operations.
You can format every partition on your hard drive. Or you can initialize disk directly. Both of them will delete the data on the hard drive, so if there are some important data stored on your hard drive, please backup them first. You also can create a WinPE bootable usb to format disk partition with AOMEI Partition Assistant. It should be the best way to replace DiskPart format disk partition.