Html таблицы основы
Содержание:
- More Examples
- Как создать таблицу CSS
- HTML Ссылки
- HTML Теги
- Table With Vertical & Horizontal Highlight
- Property Values
- Examples
- Цвет фона и текста
- HTML Учебник
- CSS для таблиц
- Diamond Pricing Table
- Знакомство с семантической вёрсткой
- Simple Pricing Table
- Строки и ячейки таблицы
- HTML Упражнения
- HTML Теги таблицы
- Pink Pricing Table
- Angular JS Filter Table
- Definition and Usage
- ШАГ 2: изменяем цвета
- Cell Properties
- Pricing Table UI
- HTML Reference
- HTML Tags
- HTML Теги
- Flip Pricing Table
More Examples
How to add collapsed borders to a table (with CSS):
<html><head><style>table, th, td { border: 1px solid
black; border-collapse: collapse;}</style></head><body><table> <tr>
<th>Month</th> <th>Savings</th> </tr>
<tr> <td>January</td>
<td>$100</td> </tr> <tr>
<td>February</td> <td>$80</td> </tr>
</table></body></html>
How to right-align a table (with CSS):
<table style=»float:right»> <tr>
<th>Month</th> <th>Savings</th> </tr>
<tr> <td>January</td>
<td>$100</td> </tr> <tr>
<td>February</td> <td>$80</td> </tr>
</table>
How to center-align a table (with CSS):
<html><head><style>table, th, td { border: 1px solid
black;}table.center { margin-left: auto;
margin-right: auto;}</style></head><body><table
class=»center»> <tr>
<th>Month</th> <th>Savings</th> </tr>
<tr> <td>January</td>
<td>$100</td> </tr> <tr>
<td>February</td> <td>$80</td> </tr>
</table>
How to add background-color to a table (with CSS):
<table style=»background-color:#00FF00″> <tr>
<th>Month</th> <th>Savings</th> </tr>
<tr> <td>January</td>
<td>$100</td> </tr> <tr>
<td>February</td> <td>$80</td> </tr>
</table>
How to add padding to a table (with CSS):
<html><head><style>table, th, td { border: 1px solid
black;}th, td { padding: 10px;}</style></head><body><table> <tr>
<th>Month</th> <th>Savings</th> </tr>
<tr> <td>January</td>
<td>$100</td> </tr> <tr>
<td>February</td> <td>$80</td> </tr>
</table></body></html>
How to set table width (with CSS):
<table style=»width:400px»> <tr>
<th>Month</th> <th>Savings</th> </tr>
<tr> <td>January</td>
<td>$100</td> </tr> <tr>
<td>February</td> <td>$80</td> </tr>
</table>
How to create table headers:
How to create a table with a caption:
<table>
<caption>Monthly savings</caption> <tr>
<th>Month</th> <th>Savings</th> </tr>
<tr> <td>January</td>
<td>$100</td> </tr> <tr>
<td>February</td> <td>$80</td> </tr>
</table>
Как создать таблицу CSS
Модель CSS таблиц основана на модели таблиц HTML4 и хорошо поддерживается браузерами. В обеих моделях структура таблицы существует параллельно визуальному представлению.
Основными элементами структуры являются строки. Строка определяется явно, а столбцы зависят от того, как заданы строки и ячейки.
Наверняка вы работали с таблицами HTML раньше. Если да, то у вас не будет проблем с созданием таблиц CSS.
Каждый элемент таблицы HTML имеет эквивалент в CSS. Единственное отличие заключается в отсутствии отличий между и в варианте CSS.
Ниже приводится список элементов таблиц HTML и соответствующие им значения CSS.
table     { display: table }

tr        { display: table-row }

thead     { display: table-header-group }

tbody     { display: table-row-group }

tfoot     { display: table-footer-group }

col       { display: table-column }

colgroup  { display: table-column-group }

td, th    { display: table-cell }

caption   { display: table-caption }
Подписи могут быть размещены сверху или снизу таблицы с помощью свойства :
#caption {caption-side: top}

#caption {caption-side: bottom}
Несложно догадаться, как создать таблицу CSS опираясь на приведенный список. Вот пример таблицы.
<div id="table">

  <div class="row">

    <span class="cell"></span>

    <span class="cell"></span>

     <span class="cell"></span>

  </div>

  <div class="row">

    <span class="cell"></span>

    <span class="cell"></span>

     <span class="cell"></span>

  </div>

  <div class="row">

    <span class="cell"></span>

    <span class="cell"></span>

     <span class="cell"></span>

  </div>

</div>
#table {display: table;}

.row {display: table-row;}

.cell {display: table-cell;}
Если посмотреть на код HTML примера, то можно легко различить структуру таблицы (используются элементы и с классами и ID вместо , и ).
Совсем небольшой код CSS представляет элементы и в виде таблицы.
В дополнение к выше приведенным свойствам модель таблицы CSS включает значение inline-table, которая определяет новую таблицу как и display: table, но в рамках контекста встроенного в HTML код формата .
HTML Ссылки
HTML по АлфавитуHTML по КатегориямHTML Атрибуты ТеговHTML Атрибуты ГлобалHTML Атрибуты СобытийHTML ЦветаHTML ХолстыHTML Аудио / ВидеоHTML Наборы символовHTML DOCTYPEsHTML Кодирование URLHTML Языковые кодыHTML Коды странHTTP Ответы сервераHTTP МетодыPX в EM конвертерГорячие клавиши
HTML Теги
<!—>
<!DOCTYPE>
<a>
<abbr>
<acronym>
<address>
<applet>
<area>
<article>
<aside>
<audio>
<b>
<base>
<basefont>
<bdi>
<bdo>
<big>
<blockquote>
<body>
<br>
<button>
<canvas>
<caption>
<center>
<cite>
<code>
<col>
<colgroup>
<data>
<datalist>
<dd>
<del>
<details>
<dfn>
<dialog>
<dir>
<div>
<dl>
<dt>
<em>
<embed>
<fieldset>
<figcaption>
<figure>
<font>
<footer>
<form>
<frame>
<frameset>
<h1> — <h6>
<head>
<header>
<hr>
<html>
<i>
<iframe>
<img>
<input>
<ins>
<kbd>
<label>
<legend>
<li>
<link>
<main>
<map>
<mark>
<menu>
<menuitem>
<meta>
<meter>
<nav>
<noframes>
<noscript>
<object>
<ol>
<optgroup>
<option>
<output>
<p>
<param>
<picture>
<pre>
<progress>
<q>
<rp>
<rt>
<ruby>
<s>
<samp>
<script>
<section>
<select>
<small>
<source>
<span>
<strike>
<strong>
<style>
<sub>
<summary>
<sup>
<svg>
<table>
<tbody>
<td>
<template>
<textarea>
<tfoot>
<th>
<thead>
<time>
<title>
<tr>
<track>
<tt>
<u>
<ul>
<var>
<video>
<wbr>
Table With Vertical & Horizontal Highlight
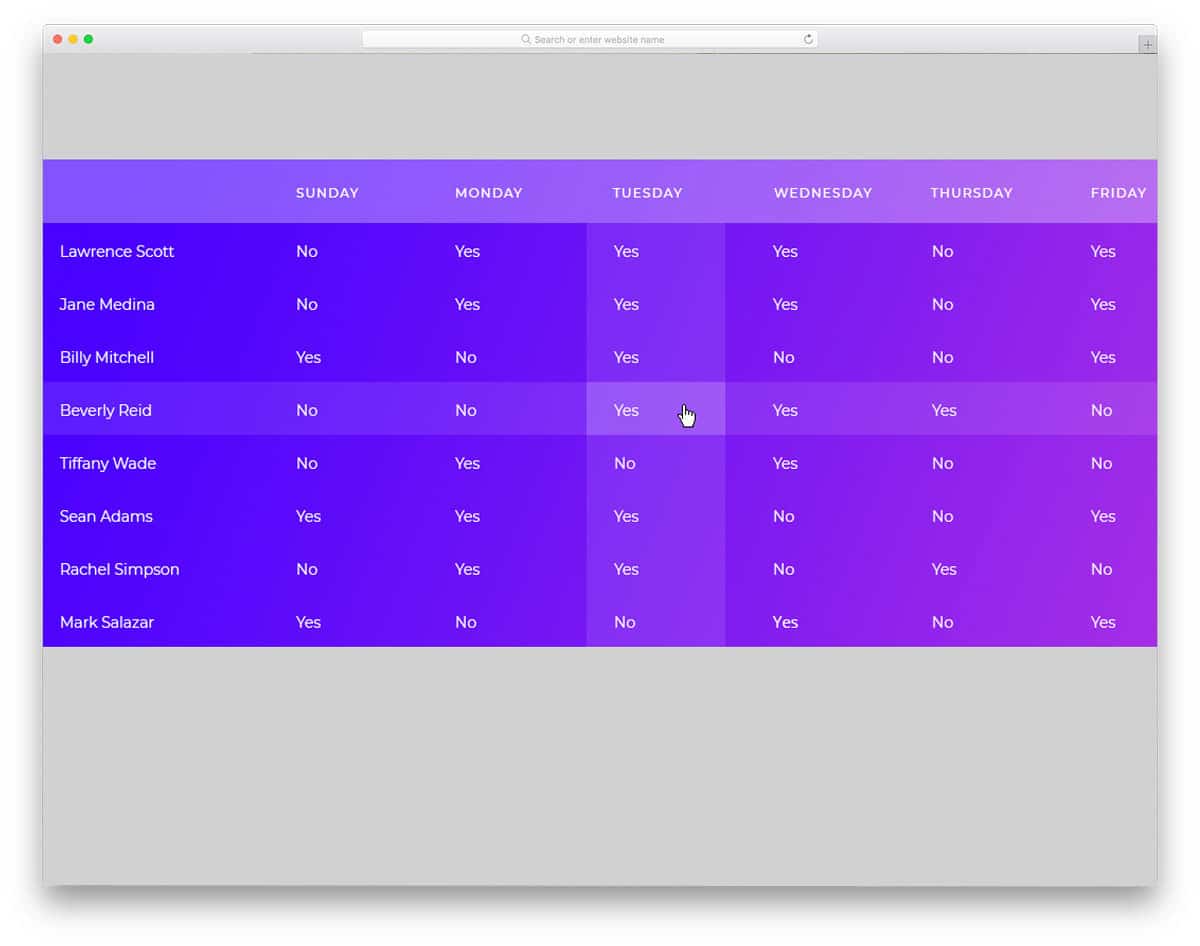
When there is a cluster of data, it is always difficult to pinpoint a value. If you are a data analyst who spends most of your time in excel sheets, you will know the difficulty of finding a value, you have to recheck the rows and columns quite often. The developer of this table template given us a solution for this issue using the interface design. This template highlights the column and the row you are hovering, so you can easily cross-check the value you want. It is a minor thing, but when you do lots of excel work, this highlighting option will save a lot of your time.
As a package, the developer gives you six table templates, all six have different designs. Since this template uses the latest HTML5 and CSS3 frameworks you get more modern-looking templates, even you get a table template with a gradient color scheme in this package.
Info / Download Demo
Property Values
| Value | Description | Play it |
|---|---|---|
| auto | Browsers use an automatic table layout algorithm. The column width is set by the widest unbreakable content in the cells. The content will dictate the layout |
Play it » |
| fixed | Sets a fixed table layout algorithm. The table and column widths are set by the widths of table and col or by the width of the first row of cells. Cells in other rows do not affect column widths. If no widths are present on the first row, the column widths are divided equally across the table, regardless of content inside the cells |
Play it » |
| initial | Sets this property to its default value. Read about initial | Play it » |
| inherit | Inherits this property from its parent element. Read about inherit |
Examples
Example 1
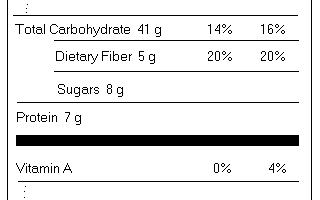
For a challenging table style, look at the «Nutrition Facts»
table included with every cereal packet in the USA. I haven’t had time
to draw or scan one of these fully yet so reach for the cereals …
On familia muesli boxes, the legend «Cereal with 1/2 cup Vitamin A and
D Fortified Skim Milk» is typeset with the text running vertical up the
table. Most cereal packets give this horizontally though. This raises the
issue of being able to alter the text direction in the style sheet,
e.g. «run: up», «down» or «right».
The other notable feature is how «Dietary Fiber» and «Sugars» are
indented along with the horizontal rule above these two rows. This
could perhaps be achieved by «TR {padding-left: 3em}». One would then
have to draw the border above «Dietary Fiber» and above «Sugars»
on these cells, while setting the bottom border for «Total Carbohydrate»
to none. Its not obvious how to do this with the rules properties
because of the asymetry between «Total Carbohydrate» / «Dietary Fiber»
and «Protein» / «Sugars». This may motivate using border properties on
TR elements, though.
Example 2
<STYLE>
  table {border: thick outset; padding 3px}
  td {border: thin inset; margin: 3px}
</STYLE>

<TABLE>
<TR><TD>foo<TD>bar
<TR><TD>foo<TD>bar
</TABLE>
Example 3
<STYLE>
  table {border: thick outset; padding: 1px;
         rules: rows; rule-style: groove}
</STYLE>

<TABLE>
<TR><TD>foo<TD>bar
<TR><TD>foo<TD>bar
</TABLE>
Example 4

<STYLE>
  table {border: thick solid; padding none;
         rules: all thin solid}
</STYLE>

<TABLE>
<TR><TD>foo<TD>bar
<TR><TD>foo<TD>bar
</TABLE>
or perhaps as:
<STYLE>
  table {border: thick solid; padding: none}
  td {border: thin solid; margin: none}
</STYLE>
Цвет фона и текста
Для того чтобы указать фон ячейки таблицы HTML, строки или отдельной ячейки, к тегам <table>, <td> и <tr> можно применить следующие параметры:
- background — в качестве фона используется изображение. Указать можно либо имя файла, либо путь к нему;
- bgcolor — фоном является определённый цвет. Указать можно как название интересующего оттенка, так и шестнадцатеричный код.
Для того чтобы изменить цвет текста в таблице HTML, необходимо использовать тег <font>.
Например:
<table border="1" bgcolor="green">
<tr height="40" bgcolor="blue">
    <td><font color="white">Ячейка 1</font></td>
    <td bgcolor="red"></td>
</tr>
<tr>
    <td background="http://t2.gstatic.com/images?q=tbn:ANd9GcRfByY7DCMopoeaahCdF4Yi7HWMo89lEYTZVJb4GAew7ZlZNiPW">Ячейка 3</td>
    <td>Ячейка 4</td>
</tr>
</table>

Отступы таблицы в HTML
В HTML отступы в таблице задаются с помощью тега <table>:
- cellspacing — расстояние между границами соседних ячеек;
- cellpading — расстояние между содержимым и границей ячейки.
Например:
<table border="1" bgcolor="green" cellspacing="20" cellpadding="20">
<tr height="40" bgcolor="blue">
    <td><font color="white">Ячейка 1</font></td>
    <td bgcolor="red"></td>
</tr>
<tr>
    <td>
 background="http://t2.gstatic.com/images?q=tbn:ANd9GcRfByY7DCMopoeaahCdF4Yi7HWMo89lEYTZVJb4GAew7ZlZNiPW">Ячейка 3</td>
    <td>Ячейка 4</td>
</tr>
</table>
Визуальное отображение данного кода в браузере таково:

Выравнивание таблицы в HTML
Вы можете для каждой отдельной ячейки или строки задать два параметра, которые выполняют горизонтальное (align) и вертикальное (valign) выравнивание текста в таблице HTML.
Параметр align может иметь следующие значения:
- left — выравнивание по левой границе;
- right — выравнивание по правой границе;
- center — выравнивание по центру.
Параметр valign может иметь такие значения:
- bottom — выравнивание по нижней границе;
- top — выравнивание по верхней границы;
- middle — выравнивание посередине.
Пример:
<table border= "1">
 <td width="300" height="200">Текст 1</td>
   <td width="300" height="200" align="right" valign="top">Текст 2</td>
</table>

Как сделать таблицу по центру в HTML? С помощью упомянутого значения center.
Например:
<table cellpadding="0" cellspacing="0" width="100%" height="100%">
  <tr>
    <td align="center">
      <table cellpadding="60" cellspacing="4" border="1">
        <tr>
          <td>
            Текст таблицы
          </td>
        </tr>
      </table>
    </td>
  </tr>
</table>

Вставка изображения в HTML таблицу
У вебмастеров часто возникает вопрос о том, как вставить картинку в HTML таблицу? Для того чтобы это осуществить, необходимо прописать адрес или имя изображения в соответствующей ячейке после тега <td>.
Например:
<table border= "1">
<tr align="left">
   <td><img src="http://amadeya.users.photofile.ru/photo/amadeya/1288508/xlarge/42642197.jpg"></td>
   <td> Содержимое 2 ячейки </td> </tr>
<tr align="right">
   <td> Содержимое 3 ячейки </td>
    <td> Содержимое 4 ячейки </td> </tr>
</table>

Дополнительными атрибутами в данном случае являются:
- width — ширина;
- height — высота;
- alt — альтернативный текст, который отображается в браузере при отключенной функции отображения изображений;
- title — подпись к картинке;
- align — горизонтальное выравнивание;
- valign — вертикальное выравнивание.
Кроме того, облачив изображение в специальный тег <a href=»страница, на которую ведёт ссылка»><img src=»имя файла.jpg»></a>, его можно использовать в качестве ссылки.
Объединение ячеек в HTML таблице
Соседствующие ячейки внутри одного столбца или строки можно объединить с помощью параметров rowspan и colspan тега <td>.
Объединение столбцов одной строчки выглядит так:
<table border="1">
<tr>
   <td colspan="3">Текст 2</td>
</tr>
<tr>
   <td>Текст 2</td>
   <td>Текст 3</td>
   <td>Текст 4</td>
</tr>
</table>

У HTML таблицы объединение ячеек одного столбца выглядит следующим образом:
<table border="1">
<tr>
   <td rowspan="3">Текст 1</td>
   <td>Текст 2</td>
</tr>
<tr>
   <td>Текст 3</td>
</tr>
<tr>
   <td>Текст 4</td>
</tr>
</table>

HTML Учебник
HTML ГлавнаяHTML ВведениеHTML РедакторHTML ОсновныеHTML ЭлементыHTML АтрибутыHTML ЗаголовкиHTML ПараграфыHTML СтилиHTML ФорматированиеHTML ЦитированиеHTML КомментарииHTML Цвет
Цвет
RGB
HEX
HSL
HTML с CSSHTML Ссылки
Ссылки
Ссылки цветные
Ссылки закладки
HTML Изображение
Изображение
Изображение карта
Изображение фон
Элемент картинки
HTML ТаблицыHTML Списки
Списки
Неупорядоченный список
Упорядоченный список
Другие списки
HTML БлокиHTML КлассыHTML ИдентификаторыHTML ФреймыHTML с JavaScriptHTML Путь к файлуHTML Мета тегиHTML Методы версткиHTML Адаптивный дизайнHTML Компьютерный кодHTML5 СемантикаHTML5 СинтаксисHTML СущностьHTML СимволыHTML ЭмодзиHTML КодировкаHTML URL КодировкаHTML в XHTML
CSS для таблиц
Чтобы оформить таблицу, необходимо задать для тега <table>, как минимум, свойство border:
Table CSS
table { border: 2px solid #124480; }
| 1 | table{border2pxsolid#124480; } |
Вид рамки вы можете выбрать по собственному усмотрению, равно как и ее цвет.
Для тегов <td>, как правило, нужно задавать внутренние отступы и рамки:
td,
th { border: 1px solid #185eb2;
padding: 10px; }
|
1 |
td, th{border1pxsolid#185eb2; padding10px;} |
Да, и если у вас есть теги <th>, про них тоже не стоит забывать.
Что получилось:
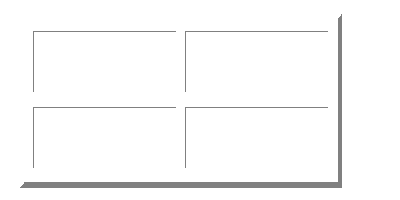
В примере видно, что между всеми ячейками и границами таблицы и ячейками есть пустое пространство. Раньше оно определялось атрибутом для тега <table>. Но сейчас он считается устаревшим и заменяется css-свойством border-spacing:
Свойство border-spacing
table {
border: 2px solid #124480;
border-spacing: 10px;
}
|
1 |
table{ border2pxsolid#124480; border-spacing10px; } |
Прямо скажем, используют его нечасто, т.к. вид таблицы с border-spacing: 10px будет таким:
Поэтому значительно чаще для таблиц используют свойство со значением . В этом случае пустое пространство между ячейками «сплющивается», мы получаем привычный вид таблицы, а свойство с любым значением просто игнорируется.
table {
border: 2px solid #124480;
border-collapse: collapse;
}
|
1 |
table{ border2pxsolid#124480; border-collapsecollapse; } |
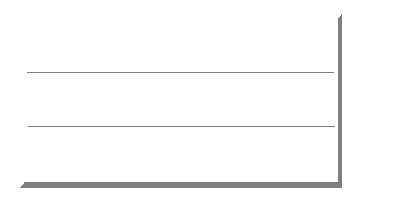
Если хочется получить таблицу с разделителями между строк, стоит задать такое правило:
Разделители для строк
tr { border: 1px solid #3f7ec9; }
| 1 | tr{border1pxsolid#3f7ec9; } |
Если необходимо «раскрасить» строки через одну, необходимо использовать следующие селекторы и свойства:
/* Для четных строк */
tr:nth-child(even){ background-color: #cde; }
/* Для нечетных строк */
tr:nth-child(odd){ background-color: #d3f5f4; }
|
1 |
/* Для четных строк */ trnth-child(even){background-color#cde; } /* Для нечетных строк */ trnth-child(odd){background-color#d3f5f4; } |
В последнем примере, чтобы расположить 2 таблицы рядом, для тега было использовано свойство:
table { display: inline-table }
| 1 | table{displayinline-table} |
В этом случае таблицы ведут себя аналогично элементам с .
Естественно, вы можете вместо использовать свойство :
tr:nth-child(even) {
background-image: url(img/diagonal-noise.png);
}
tr:nth-child(odd) {
background-image: url(img/tetr.gif);
}
|
1 |
trnth-child(even){ background-imageurl(imgdiagonal-noise.png); } trnth-child(odd){ background-imageurl(imgtetr.gif); } |
Для разнообразного управления ячейками таблицы можно использовать селекторы псевдоклассов типа или :
table {
border: 2px solid #124480;
border-collapse: collapse;
<strong>width: 500px;</strong>
}
td:first-child{
text-align: right;
}
td:last-child{
width: 30%;
text-align: right;
}
td:last-child:after{
content: ‘ грн.’;
}
|
1 |
table{ border2pxsolid#124480; border-collapsecollapse; <strong>width500px;<strong> } tdfirst-child{ text-alignright; } tdlast-child{ width30%; text-alignright; } tdlast-childafter{ content’ грн.’; } |
Так, с помощью правил выше мы задали width для , а также выравнивание текста по правому краю для первой и последней колонки. А с помощью псевдоэлемента для последней колонки добавили еще единицу для цены — ‘грн’. В результате получилась такая таблица:
О том, как создавать сложные таблицы, читайте в статье Объединение ячеек и строк в таблице.
Просмотров:
552
Diamond Pricing Table

Diamond is a perfect table template for startups and modern websites. With the neat transparent content blocks, this template improves the readability of the texts without spoiling the visual aesthetics of the design. Another unique feature of this pricing table is it has star rating in each pricing table. Ratings and reviews will help the user to choose the better plan, if you are running a restaurant website you must know how an online review will boost your business. Bold texts are used to highlight important points and call to action buttons are provided at the end of each table to take the users to the checkout page easily.
Info / Download Demo
Знакомство с семантической вёрсткой
Семантический подход к вёрстке подразумевает использование HTML-тегов в соответствии с их семантикой (предназначением), а его суть заключается в верности выбора тегов и их взаимного расположения.
Семантические теги передают смысл (или обозначают важность) содержащегося в них контента. Семантический подход — противоположность визуальному, при котором важно только то, как HTML-страница выглядит
Семантический подход — противоположность визуальному, при котором важно только то, как HTML-страница выглядит. Почему семантика так важна
Почему семантика так важна
Она повышает доступность контента. Тогда его лучше понимают:
- поисковые роботы (чем понятнее для них контент сайта, тем корректнее он представлен в поисковой выдаче и тем проще его найти пользователям);
- браузеры и помощники для пользователей с ограниченными возможностями (например, программы, которые читают информацию с экрана, — скринридеры).
Семантически верно размеченный контент может выглядеть абсолютно так же, как и свёрстанный без учёта семантики. Это касается любых элементов на HTML-странице.
Так, можно использовать для всех них тег <div>, но он не обладает семантикой, никак не обозначает смысл своего содержимого. Поэтому мы применяем для заголовков теги H1… H6, для таблицы — <table>, <caption>, <thead>, <tbody>, <tfoot>, <th>. И так далее.
Для оформления страниц при семантической вёрстке применяют каскадные таблицы стилей (CSS).
Рассмотрим, какие теги отвечают за вёрстку таблиц, когда и зачем нужен каждый.
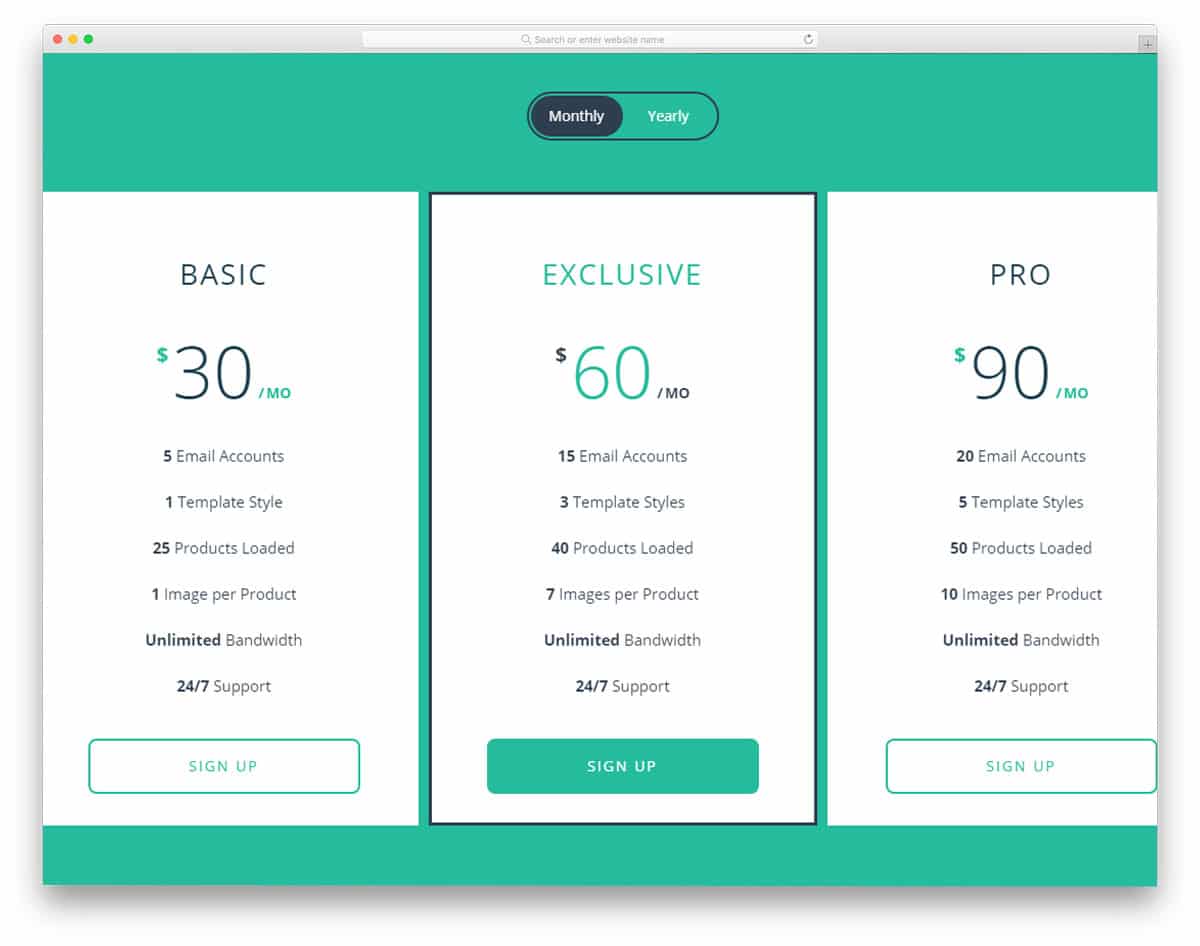
Simple Pricing Table

Simple Pricing Table is a clean looking table template. The creator of this template follows a more artistic approach. The pricing table you have seen above is full of colors, this pricing table has a simple design with neat white background and line vectors. The line vectors used are customized to meet the overall design of this template. On the clean white background, the light blue color scheme of the template looks professional and also made readability easier. Each row in the table is separated by lines with light stroke weight. Bold texts are used to highlight the important points.
Info / Download Demo
Строки и ячейки таблицы
Каждая таблица состоит из строк и ячеек, а задаётся тегом <table> — это контейнер для остальных тегов таблицы.
Тег <tr> образует контейнер для создания строки таблицы. Каждая ячейка в такой строке устанавливается с помощью тега <td> (хотя первая может быть задана и тегом <th>).
Важно понимать. Дочерними элементами строки могут быть только ячейки (и заголовочная ячейка
)
А сама строка
Рассмотрим пример:
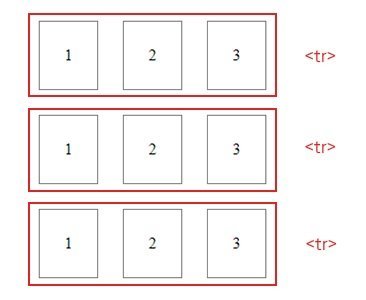
Мы видим три строки (элементы <tr>). В каждой из строк по три ячейки (<td>). Представим это HTML-кодом:
Объединение ячеек
Ячейки можно объединять (растягивать по горизонтали и вертикали) с помощью специальных атрибутов. При этом поглощаемые ячейки задавать своими тегами уже не придётся.
Столбцы таблицы объединяются атрибутом colspan, а строки — атрибутом rowspan.
И тут важно не запутаться:
Атрибут colspan тегов <td> и <th> объединяет ячейки по горизонтали (то есть ячейки одной строки). Значение colspan указывает, сколько столбцов пересекает ячейка.
Атрибут rowspan тегов <td> и <th> объединяет ячейки по вертикали (то есть ячейки разных строк). Значение rowspan задаёт, через сколько строк проходит ячейка.
Рассмотрим пару примеров:
| 1 | 2 | |
|---|---|---|
| 1 | 2 | |
| 1 | 2 | 3 |
| 1 | 2 |
Вторая ячейка первой строки пересекает два столбца. То есть она растянулась по горизонтали и приняла в себя третью ячейку первой строки. Третья ячейка второй строки пересекает две строки, то есть растянулась по вертикали, заняв и третью ячейку третьей строки.
Поэтому третьи ячейки для первой и третьей строк задавать не нужно. Они уже поглощены другими. Теперь к коду:
Ещё один пример:
| 1 | 2 | 3 |
|---|---|---|
| 1 | 2 | 3 |
| 1 | 2 | |
| 1 |
Как такое сверстать:
HTML Упражнения
HTML Теги таблицы
| Тег | Описание |
|---|---|
| <table> | Определяет таблицу |
| <th> | Определяет ячейку заголовка в таблице |
| <tr> | Определяет строку в таблице |
| <td> | Определяет ячейку в таблице |
| <caption> | Определяет подпись таблицы |
| <colgroup> | Определяет группу из одного или нескольких столбцов в таблице для форматирования |
| <col> | Определяет свойства столбца для каждого столбца в элементе <colgroup> |
| <thead> | Группирует содержимое заголовка в таблице |
| <tbody> | Группирует содержимое body в таблице |
| <tfoot> | Группирует содержимое footer в таблице |
Для получения полного списка всех доступных тегов HTML, посетите наш HTML Справочник тегов.
Вопросы для самоконтроля
- Для чего нужны HTML-таблицы?
- Какой тег определяет HTML-таблицу?
- Каким тегом определяется каждая строка HTML-таблицы?
- Каким тегом определяется каждый заголовок HTML-таблицы?
- Каким тегом определяется каждая ячейка с данными HTML-таблицы?
- Какие элементы могут содержать ячейки с данными HTML-таблицы?
- С помощью какого CSS-свойства можно добавить границу к HTML-таблице?
- С помощью какого CSS-свойства можно свернуть границы HTML-таблицы в одну линию?
- Как добавить внутренний отступ в ячейках HTML-таблицы?
- Как выровнять заголовки HTML-таблицы по левому краю?
- Как добавить интервал между границами HTML-таблицы?
- Как сделать ячейку, которая охватывает более одного столбца HTML-таблицы?
- Как сделать ячейку, которая охватывает более одной строки HTML-таблицы?
- Как добавить подпись к HTML-таблице?
- Где нужно вставить тег HTML-таблицы?
- Как определить специальный стиль для одной конкретной HTML-таблицы?
Pink Pricing Table
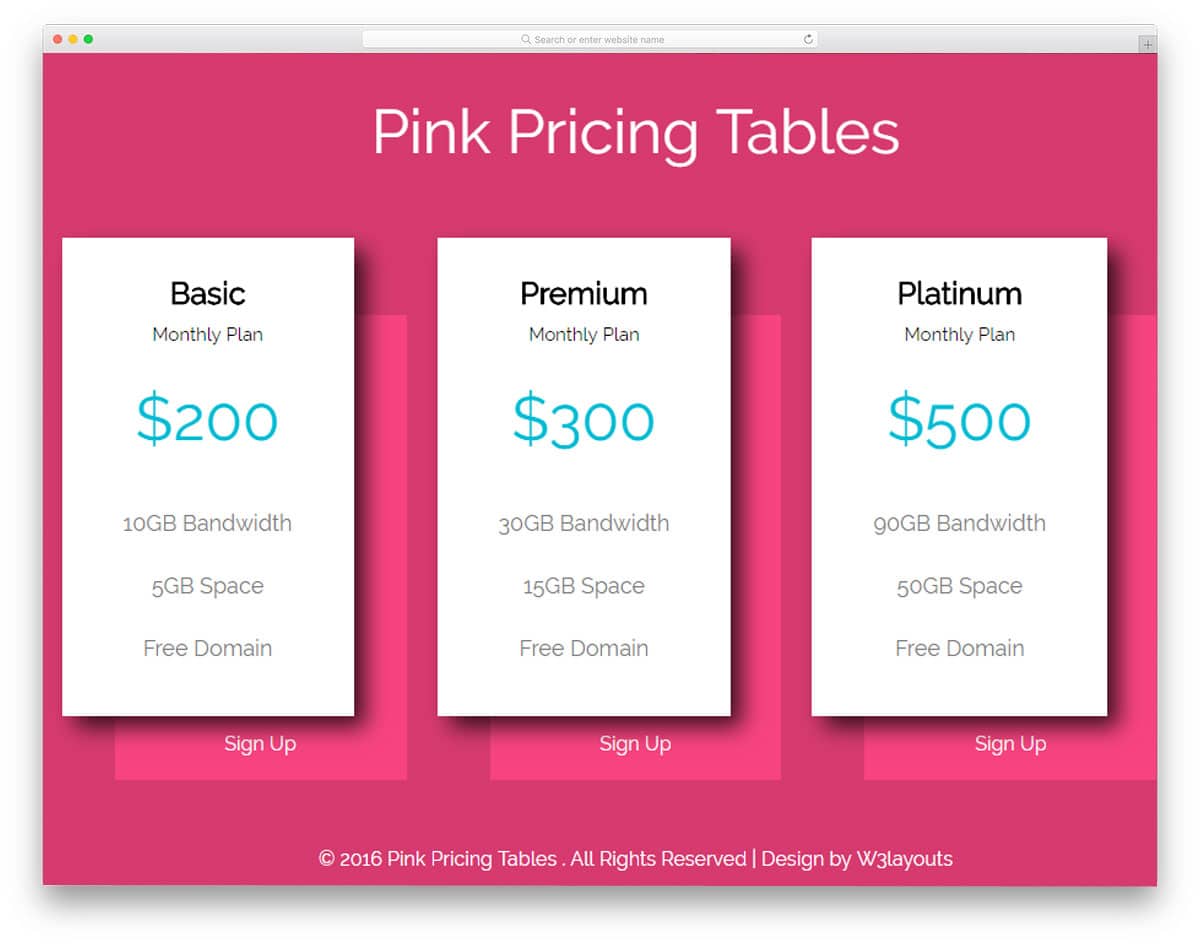
Pink Pricing table is another simple looking CSS pricing table template. This is a very basic template which gives you only the framework or outer skeleton of your design. You have to develop your own custom table by keeping this template as a base. As the name implies this template uses pink color as the default color scheme, which gives a pretty look to this template. Shadow effects are used to highlight and show the pricing table from the background and rest of the design. Below the pricing table the call to action text is given as just a text link, if you are about to use this template for professional sites, you might need to work on this text link alone. Other than that it is properly developed and a complete HTML and CSS table outline.
Info / Download Demo
Angular JS Filter Table
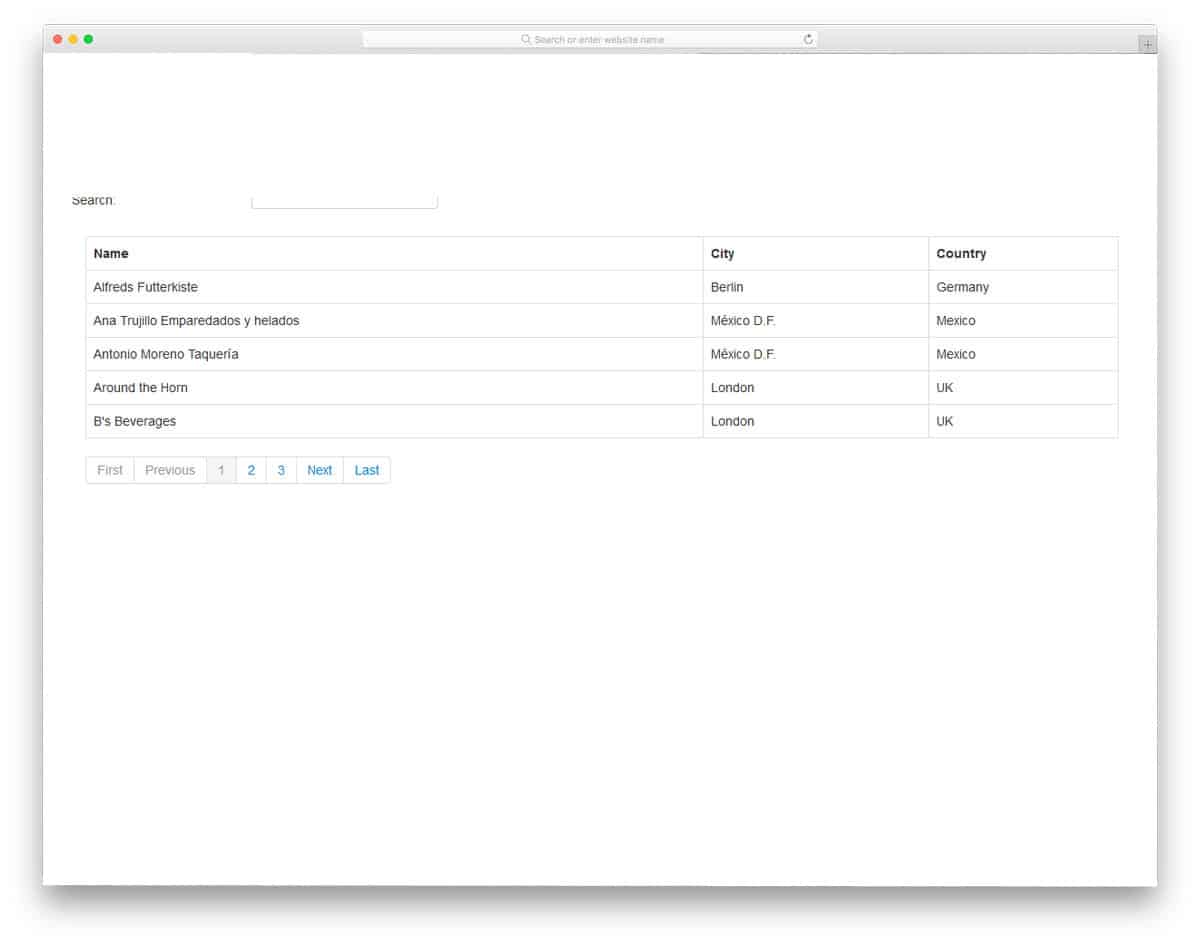
This table design is also almost similar to the Angular Material table design template mentioned above. But, this one is very simple and doesn’t have colorful vibrant colors of the material design. In this template also you get an active search bar that shows relative contents rapidly as you type in the words. For more search bar designs, take a look at our Bootstrap search box design collection. All the basics are done properly in this template so you can concentrate on other features you need in your table. The entire code structure used to create this design is shared with you on the CodePen editor. Hence you can customize and see your work in the editor before implementing it on your website.
Info / Download Demo
Definition and Usage
The property defines the algorithm
used to lay out table cells, rows, and columns.
Tip: The main benefit of table-layout: fixed; is that the
table renders much faster. On large tables, users will not see any part of the
table until the browser has rendered the whole table. So, if you use
table-layout: fixed, users will see the top of the table while the browser loads
and renders rest of the table. This gives the impression that the page loads a
lot quicker!
| Default value: | auto |
|---|---|
| Inherited: | no |
| Animatable: | no. Read about animatable |
| Version: | CSS2 |
| JavaScript syntax: |
object.style.tableLayout=»fixed» Try it |
ШАГ 2: изменяем цвета
Возможно, вы видите некоторый черный текст на белом фоне, но это
зависит от конфигурации браузера. Для того чтобы страница выглядела
более стильно, мы можем сделать очень легко одну простую вещь —
добавить цвета. (Оставьте окно браузера открытым — мы к нему еще
вернемся)
Мы начнем со стилей, встроенных в HTML файл. Позже, мы положим
CSS стили и HTML разметку в разные файлы. Раздельное хранение
хорошо тем, что легче использовать те же самые стили для множества
HTML файлов: Вам нужно написать CSS стили только один раз. Но на
этом шаге мы оставим все в одном файле.
Нам нужно добавить элемент <style> к HTML файлу.
Определения стилей будут внутри этого тэга. Возвращаемся к
редактору и добавляем следующие пять строчек в заголовок HTML кода
между тэгами <head> и </head>. Строки, которые надо
добавить выделены красным (с 5-й по 9-ю).
<!DOCTYPE html PUBLIC "-//W3C//DTD HTML 4.01//EN">
<html>
<head>
  <title>My first styled page</title>
  <style type="text/css">
  body {
    color: purple;
    background-color: #d8da3d }
  </style>
</head>

<body>
Первая строка говорит браузеру о том, что это таблица стилей и
что она написана на CSS (“text/css”). Вторая строка говорит, что мы
применяем стиль к элементу “body”. Третья устанавливает цвет текста
в пурпурный, а следующая устанавливает цвет фона в желто-зеленый
оттенок.
Таблицы стилей CSS создаются согласно правилам. Каждое
правило состоит из трех частей:
-
селектор (в нашем примере: “body”), которые
говорит о том, к какой части документа применить правило; -
свойство (в нашем примере свойствами являются
‘color’ и ‘background-color’), которое указывает что именно мы
устанавливаем у данного элемента, выбранного селектором; - и значение (‘purple’ и ‘#d8da3d’), которое
устанавливает значение атрибута.
Наш пример показывает что правила могут быть скомбинированы. Мы
установили два свойства, так же мы могли задать их раздельно:
body { color: purple }
body { background-color: #d8da3d }
но поскольку оба правила относятся к body мы записали “body”
один раз и поместили свойства и значения вместе. Для получения
большей информации о селекторах смотрите главу 2 из Lie & Bos.
Фон элемента body так же является фоном целого документа. Мы
явно не назначили другим элементам (p, li, address…) фона, так что
по умолчанию у них его нет (или он прозрачный). Свойство ‘color’
устанавливает цвет текста элемента body, но все остальные элементы
внутри body наследуют этот цвет, пока для них не задан другой в
виде другого правила. (Мы добавим другие цвета позже.)
Теперь сохраните этот файл (используйте команду “Сохранить” или
“Save” из файлового меню) и переключитесь обратно в браузер. Если
вы нажмете кнопку “обновить” , то изображение сменится со “скучной”
страницы на разукрашенную (но все еще однообразную) страницу. Кроме
ссылок сверху, весь текст должен быть пурпурный на желто-зеленом
фоне.
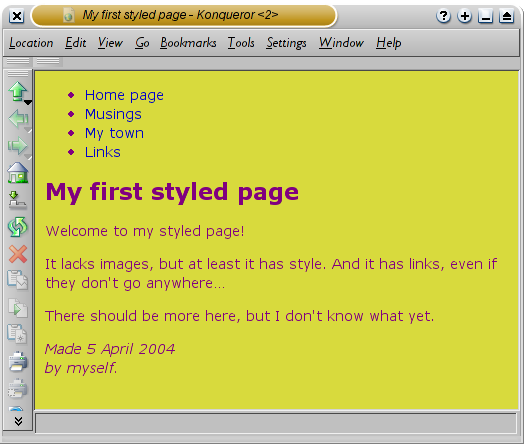
Теперь браузер показывает страницу к которой мы добавили цвет.
Cell Properties
These properties apply to cell elements (TH and TD).
Margin
This sets the margins for cells, and accepts one to four length value
allowing you to set the margins for each of the four sides
independently. In place of a length value, you can substitute the
keyword «none«. This causes adjacent cell borders to coincide.
Note that using the margin property for cells necessitates a
search process for the largest margin in each row or column. See for a cheaper alternative, which can
be used to set a default for the table.
Padding
This sets the internal padding for cells, and accepts one to four
length value allowing you to set the padding for each of the four sides
independently. can be used to set
the default for the table.
If cells on the same row or column use differing border widths, the
user agent gets into the same difficulties as with differing cell
margins, necessitating a search for the largest cell in the row or
column. Note that this cannot be done in advance of parsing the table
content as authors may have set border widths or cell margins with the
style attribute on individual cells in the HTML markup. The style for
each cell may also be dependent on the cell’s class or id attributes.
Implementors may wish to take a gambol on this for tables the author
indicates can be rendered incrementally, and be prepared to repaint the
table if this turns out to be needed when all of the table’s data has
been parsed.
Pricing Table UI
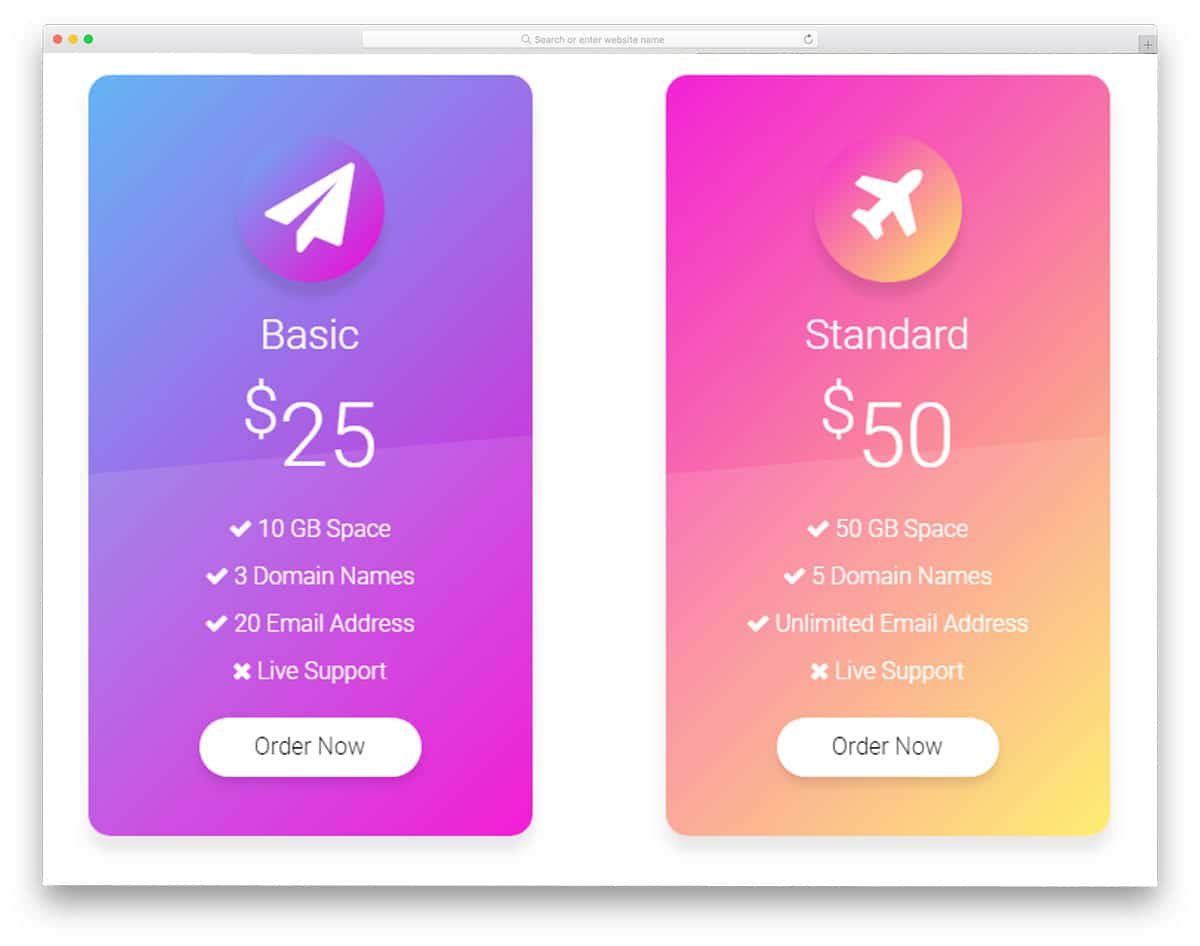
As the name implies this template is actually designed for the pricing table. Instead of following a traditional grid layout, the creators of this template choose a card design approach. With trendy gradient colors and icons, this table fits in well with many modern websites template for travel agencies, startups and other online service providing websites. The developer had made use of the latest HTML5 and CSS3 framework to create a visually attractive table template. Colors and the animation effects used in this table template are more natural and will meet the modern user expectations. Overall the Pricing table UI is a perfectly working template from the front end. If you are an app developer and constantly seeks modern UI elements, check out our UI kit collection.
Info / Download Demo
HTML Reference
HTML by AlphabetHTML by CategoryHTML Browser SupportHTML AttributesHTML Global AttributesHTML EventsHTML ColorsHTML CanvasHTML Audio/VideoHTML Character SetsHTML DoctypesHTML URL EncodeHTML Language CodesHTML Country CodesHTTP MessagesHTTP MethodsPX to EM ConverterKeyboard Shortcuts
HTML Tags
<!—>
<!DOCTYPE>
<a>
<abbr>
<acronym>
<address>
<applet>
<area>
<article>
<aside>
<audio>
<b>
<base>
<basefont>
<bdi>
<bdo>
<big>
<blockquote>
<body>
<br>
<button>
<canvas>
<caption>
<center>
<cite>
<code>
<col>
<colgroup>
<data>
<datalist>
<dd>
<del>
<details>
<dfn>
<dialog>
<dir>
<div>
<dl>
<dt>
<em>
<embed>
<fieldset>
<figcaption>
<figure>
<font>
<footer>
<form>
<frame>
<frameset>
<h1> — <h6>
<head>
<header>
<hr>
<html>
<i>
<iframe>
<img>
<input>
<ins>
<kbd>
<label>
<legend>
<li>
<link>
<main>
<map>
<mark>
<meta>
<meter>
<nav>
<noframes>
<noscript>
<object>
<ol>
<optgroup>
<option>
<output>
<p>
<param>
<picture>
<pre>
<progress>
<q>
<rp>
<rt>
<ruby>
<s>
<samp>
<script>
<section>
<select>
<small>
<source>
<span>
<strike>
<strong>
<style>
<sub>
<summary>
<sup>
<svg>
<table>
<tbody>
<td>
<template>
<textarea>
<tfoot>
<th>
<thead>
<time>
<title>
<tr>
<track>
<tt>
<u>
<ul>
<var>
<video>
<wbr>
HTML Теги
<!—><!DOCTYPE><a><abbr><acronym><address><applet><area><article><aside><audio><b><base><basefont><bdi><bdo><big><blockquote><body><br><button><canvas><caption><center><cite><code><col><colgroup><data><datalist><dd><del><details><dfn><dialog><dir><div><dl><dt><em><embed><fieldset><figcaption><figure><font><footer><form><frame><frameset><h1> — <h6><head><header><hr><html><i><iframe><img><input><ins><kbd><label><legend><li><link><main><map><mark><menu><menuitem><meta><meter><nav><noframes><noscript><object><ol><optgroup><option><output><p><param><picture><pre><progress><q><rp><rt><ruby><s><samp><script><section><select><small><source><span><strike><strong><style><sub><summary><sup><svg><table><tbody><td><template><textarea><tfoot><th><thead><time><title><tr><track><tt><u><ul><var><video>
Flip Pricing Table
This table is almost similar to the Codyhouse template mentioned above, but, this one is a more simplified version. It has only one table variation in its design. Visual effects and the transition effects are almost similar to the Codyhouse. This kit will be more useful for beginners and small projects. If you are a beginner, take a look at our free simple CSS website template collection for easier customizations. The designer of this pricing table has used the latest HTML5, CSS3, and a few lines of Javascript. The whole coding is shared with you directly, you can change it in the editor and can visualize the results directly.
Info / Download Demo