Метод numpy arange() в python
Содержание:
- Арифметические операции с матрицей
- Python numpy random seed
- Python numpy empty 3d array
- Python numpy shape 1
- Python numpy np.asarray shape
- Python reverse array sort reverse
- Python numpy.where() функция с несколькими условиями
- Пример
- Добавить столбец
- 1.4.1.2. Creating arrays
- Python numpy empty array
- Работа функции numpy.where()
- Python numpy random shuffle
- Python numpy arange shape
- 1.4.1.3. Basic data types
- Attributes of a NumPy array
- Python numpy random
- Трансляция с помощью numpy.where()
- Создание массивов с помощью функции array
- Преобразование Fourier
- Python numpy random number generator
Арифметические операции с матрицей
Вы можете выполнять арифметические операции, такие как сложение, вычитание, умножение и деление между матрицами. В следующем примере вы можете увидеть несколько примеров арифметических операций.
import numpy


# initialize two array
x = numpy.array(, ], dtype=numpy.float64)
y = numpy.array(, ], dtype=numpy.float64)

print('Print the two matrices')
print('X = \n', x)
print('Y = \n', y)

# Elementwise sum; both produce the array
print('\nElementwise addition of two matrices: ( X + Y of Matlab )')
print('Add using add operator: \n', x + y)
print('Add using add function: \n', numpy.add(x, y))

# Elementwise difference; both produce the array
print('\nElementwise subtraction of two matrices: ( X - Y of Matlab )')
print('Subtract using operator: \n', x - y)
print('Subtract using function: \n', numpy.subtract(x, y))

# Elementwise product; both produce the array
print('\nElementwise Multiplication of two matrices: ( X .* Y of Matlab )')
print('Multiply using operator: \n', x * y)
print('Multiply using function: \n', numpy.multiply(x, y))

# Elementwise division; both produce the array
print('\nElementwise division of two matrices: ( X ./ Y of Matlab )')
print('Division using operator: \n', x / y)
print('Division using function: \n', numpy.divide(x, y))

# Elementwise square root; produces the array
print('\nSquare root each element of X matrix\n', numpy.sqrt(x))

# Matrix Multiplication
print('\nMatrix Multiplication of two matrices: ( X * Y of Matlab )')
print(x.dot(y))
Ниже приведен результат работы вышеуказанной программы матрицы numpy.
X =

 ]
Y =

 ]

Elementwise addition of two matrices: ( X + Y of Matlab )
Add using add operator:

 ]
Add using add function:

 ]

Elementwise subtraction of two matrices: ( X - Y of Matlab )
Subtract using operator:

 ]
Subtract using function:

 ]

Elementwise Multiplication of two matrices: ( X .* Y of Matlab )
Multiply using operator:

 ]
Multiply using function:

 ]

Elementwise division of two matrices: ( X ./ Y of Matlab )
Division using operator:

 ]
Division using function:

 ]

Square root each element of X matrix

 ]

Matrix Multiplication of two matrices: ( X * Y of Matlab )

 ]
Python numpy random seed
- Let us see how to use the numpy random seed in Python.
- Numpy random seed is used to set the seed and to generate pseudo-random numbers. A pseudo-random number is a number that sorts random, but they are not really random.
- In Python, the seed value is the previous value number implement by the generator. If there is no previous value for the first time then it uses working system time.
- The main logic behind the random seed is to get the same set of random numbers for the given seed.
Syntax:
Here is the Syntax of numpy random seed
Examples:
Here we will see how to execute the random number with the same seed value
In this example, we use the random. seed() function and pass ‘5‘ as an argument. After that, I generate a random number between 2 to 6.
Here is the implementation of the following given code

Python numpy random seed
Python numpy empty 3d array
- In this section, we will discuss Python numpy empty 3d array.
- To create an empty 3Dimension array we can pass the shape of the 3Dimension array as an open bracket to the empty() function.
- In this example, we can easily use the function np.empty() to get the empty 3dimension array.
- Let’s create an empty 3Dimension array with a matrix of 3 rows and 3 columns.
- In this function, we didn’t provide any data type as an argument. But all the values in the 3Dimension array were not initialized.
Example:
In the above example code, we will import a library and create an empty numpy array in which we assign a parameter as the length of the matrix which is 1, and a number of rows and columns.
Here is the Screenshot of the following given code
![]()
Python numpy empty 3d array
This is an example of a Python NumPy empty 3d array.
Read Python NumPy square with examples
Python numpy shape 1
- In this section, we will discuss Python NumPy shape 1
- In numpy, some of the functions return in shape(R,1) but some return (R,).
- This will make matrix multiplication more complex since an explicit reshape is required.
- Shape is n.shape is a tuple that always gives dimensions of the array. The shape function is a tuple that gives you an arrangement of the number of dimensions in the array.
- If Y has w rows and z columns, then Y.shape is (w,z). So Y.shape is z.
Example:
Let’s take an example to check how to implement Python NumPy shape 1
In the above code, we will import a NumPy library and create an array using the function numpy. array. Now we can easily use the function np. shape and pass the value 1 as a parameter. The output will display the columns in an array.
Here is the Screenshot of the following given code

Python numpy shape 1
Python numpy np.asarray shape
- In this section, we will discuss the Python NumPy np.asarray function.
- The asarray()function is used when we want to convert an input to an array. The input could be a list, tuple, ndarray, etc.
- The input data can be in the form of Lists, Tuples, lists of tuples, tuples of lists, etc.
- This function is always available in the numpy module present in the standard library of python.
Syntax:
Here is the Syntax of numpy.asarray() function.
- It consists of few parameters
- arr: The Input data, in any form that can be converted to an array. This includes lists, tuples, tuples of tuples, tuples of lists, and numpy dimension arrays.
- dtype: It is a dtype argument that is optional in the syntax. If we do not declare it in the syntax, it is defined by default from the input data.
- Order: This is also an optional parameter in the syntax. It also decides whether to use row or column-major memory representation.
- Return: if the input is already a numpy dimension array with equating dtype and order. If the array is a subclass of numpy dimension array, then a base class numpy dimension array is returned.
Example:
Let’s take an example to check how to implement np.asarray shape
In the above code, we will import a NumPy library and create an array using the numpy. array function. Now create a variable and assign a function that is numpy. asarray. The Input data, in any form that can be converted to a numpy array.
Here is the Screenshot of the following given code

Python numpy np. asarray shape
Read Python NumPy absolute value with examples
Python reverse array sort reverse
- In this section, we will discuss Python reverse array sort reverse.
- In Numpy, the np.sort() function does not allow us to sort an array in the largest number order. Instead, that we can reverse an array providing list slicing in Python after it has been sorted in ascending order.
- The slicing method notation with default start and stop indices and negative step size -1 reverses a given list.
- Use slicing method s to access every step-the element starting from index start (included) and ending in index stop.
Example:
- In the above code, we will import a numpy library and create an array using the numpy.array function. Now create a variable and arrange the elements using the np.sort() function.
- Reverse sorted array using the slicing method and print the output.
Here is the Screenshot of the following given code

Python reverse numpy array reverse method
Python numpy.where() функция с несколькими условиями
Несколько условий могут быть применены вместе с функцией для управления элементами массива в соответствии с несколькими условиями.
Синтаксис:
numpy.where((condition1)&(condition2))
                  OR
numpy.where((condition1)|(condition2))
Пример 1:
import numpy as np

data = np.array(, , ])

data_set = np.where((data!=20)&(data<40))

print(data)
В этом примере мы отобразили все элементы массива, значения данных которых меньше 40 и не равны 20.
Выход:
Пример 2:
import numpy as np

data = np.array(, , ])

data_set = np.where((data<20)|(data>40))

print(data)
В приведенном выше фрагменте кода отображаются все значения данных, удовлетворяющие любому из указанных условий, т. Е. отображаются элементы массива менее 20, а также элементы массива более 40.
Вывод :
Пример
Давайте теперь объединим все это в простой пример, чтобы продемонстрировать линейность последовательностей, генерируемых numpy.arange().
Следующий код отображает 2 линейные последовательности между и с помощью numpy.arange(), чтобы показать, что последовательность генерирует единообразие, поэтому результирующие массивы являются линейными.
import numpy as np
import matplotlib.pyplot as plt

y = np.zeros(5)

# Construct two linear sequences
# First one has a step size of 4 units
x1 = np.arange(0, 20, 4)

# Second one has a step size of 2 units
x2 = np.arange(0, 10, 2)

# Plot (x1, )
plt.plot(x1, y, 'o')

# Plot (x2, )
plt.plot(x2, y + 0.5, 'o')

# Set limit for y on the plot
plt.ylim()

plt.show()
Вывод
Как вы можете видеть, оранжевые точки представляют линейную последовательность от 0 до 10 с размером шага 2 единицы, но поскольку 10 не включено, последовательность равна . Точно так же синие точки представляют последовательность .
Добавить столбец
Мы можем использовать метод append() NumPy для вставки столбца.
Рассмотрим пример ниже, где мы создали 2-мерный массив и вставили два столбца:
a = numpy.array(, ])

b = numpy.array(, ])

newArray = numpy.append(a, b, axis = 1)
Если атрибут оси не используется, вывод будет выглядеть следующим образом:
Именно так структура массива выравнивается.
В NumPy мы также можем использовать метод insert() для вставки элемента или столбца. Разница между методом insert() и методом append() заключается в том, что мы можем указать, по какому индексу мы хотим добавить элемент при использовании метода insert (), но метод append() добавляет значение в конец массива.
Рассмотрим пример ниже:
a = numpy.array()

newArray = numpy.insert(a, 1, 90)
Здесь метод insert() добавляет элемент с индексом 1. Помните, что индекс массива начинается с 0.
1.4.1.2. Creating arrays
Manual construction of arrays
-
1-D:
>>> a = np.array()
>>> a
array()
>>> a.ndim
1
>>> a.shape
(4,)
>>> len(a)
4
-
2-D, 3-D, …:
>>> b = np.array(, 3, 4, 5]])    # 2 x 3 array
>>> b
array(,
       ])
>>> b.ndim
2
>>> b.shape
(2, 3)
>>> len(b)     # returns the size of the first dimension
2

>>> c = np.array(, 2]], , 4]]])
>>> c
array(,
        ],

       ,
        ]])
>>> c.shape
(2, 2, 1)
Exercise: Simple arrays
- Create a simple two dimensional array. First, redo the examples
from above. And then create your own: how about odd numbers
counting backwards on the first row, and even numbers on the second? - Use the functions , on these arrays.
How do they relate to each other? And to the attribute of
the arrays?
Python numpy empty array
- In this section, we will discuss Python numpy empty array, specially how to create an empty array using Python NumPy.
- In this method we can easily use the function np.empty().
- The NumPy empty() function is used to create an array of given shapes and types, without initializing values.
- To work with arrays, python provides a numpy empty array function. It is used to create an empty array as per user condition means given data type and shape of the array without initializing values.
- It allows only shape and data type as arguments. If the datatype parameter is not provided then the default data type of all Values in the returned array will be float.
Syntax:
Here is the Syntax of numpy.empty()
- It Consists of few parameters.
- Shape: Shape of the empty array, e.g:(4,3)
- dtype: its an optional parameter by default value is float.
- order: Whether to store multi-dimensional numpy array data in row and column-wise.
Example:
- Let’s take an example to check how to implement a numpy empty array
- Basically there are two ways to check numpy empty array.
- Using numpy empty array function.
- Using numpy zero’s array function
Работа функции numpy.where()
Модуль Python NumPy содержит множество встроенных функций для создания и управления элементами массива в целом.
Функция используется для возврата элементов массива на основе определенного условия s.
Синтаксис:
numpy.where(condition,a,b)
- : Условие манипуляции, которое должно быть применено к массиву, должно быть упомянуто.
- : Если условие выполнено, т. Е. условие оказывается истинным, то функция дает a.
- : Если условие не выполнено, это значение возвращается функцией.
Пример 1:
import numpy as np

data = np.array(, , ])

print(np.where(data<20,True,False))
В приведенном выше примере для всех элементов массива, значение данных которых < 20 , эти значения данных заменяются на True . И для всех элементов массива, значения данных которых > 20 , т. е. значения, которые не удовлетворяют условию, заменяются на False .
Выход:
]
Пример 2:
import numpy as np


data = np.array(, , ])

data_set = np.where(data<20)
print("Data elements less than 20:\n")

print(data)
В приведенном выше примере мы отобразили все элементы массива, которые меньше 20 .
Выход:
Data elements less than 20:
Python numpy random shuffle
- Here we can see how to use of numpy random shuffle in Python.
- In Python the shuffle means to arrange the objects and this method will help the user to modify the position of elements in a Numpy array.
- In this example, we will shuffle all the values in an array randomly.
Syntax:
Here is the Syntax of numpy random shuffle
Note: Here X is the array or modifies sequence and it will return the shuffled array.
Source Code:
In this example, we have used the numpy function np.arange(). In Python, the np.arange() method creates a ndarray with spaced values within the interval or given limit. After that, we use the random shuffle function and pass the ‘new_array’ variable as an argument and print the result.
Output:

Python numpy random shuffle
Python numpy arange shape
- In this section, we will discuss the Python NumPy arange shape.
- In this example we can easily use the function numpy.arange() and numpy.shape().
- The numpy.arange() is a Numpy method that returns the numpy dimension array object containing evenly spaced values within the given range. The np. arange() function takes a few arguments that include start step stop and dtype and returns evenly spaced values within a given interval.
Syntax:
- It consists of few parameters.
- start: Its an optional parameter. Start of an interval.
- Stop: end of an interval
- step: Its an optional parameter.
Example:
Here is the Screenshot of the following given code

Python NumPy arange shape
You may like the following Python tutorials:
- Python NumPy to list with examples
- Python dictionary filter + Examples
- Python NumPy round + 13 Examples
- What is python Django
- Python Numpy unique
- Python NumPy 2d array
- Python NumPy Normalize
- Python dictionary length
In this Python tutorial, we learned Python NumPy shape with a few examples.
- Python numpy shape dimensions
- Python numpy shape 0
- Python numpy shape function
- Python numpy shape 1
- Python numpy shape vs reshape
- Python numpy shape vs size
- Python numpy np.asarray shape
- Python numpy change array shape
- Python numpy shape tuple
- Python numpy arange shape
1.4.1.3. Basic data types
You may have noticed that, in some instances, array elements are displayed with
a trailing dot (e.g. vs ). This is due to a difference in the
data-type used:
>>> a = np.array()
>>> a.dtype
dtype('int64')

>>> b = np.array()
>>> b.dtype
dtype('float64')
Tip
Different data-types allow us to store data more compactly in memory,
but most of the time we simply work with floating point numbers.
Note that, in the example above, NumPy auto-detects the data-type
from the input.
You can explicitly specify which data-type you want:
>>> c = np.array(, dtype=float)
>>> c.dtype
dtype('float64')
The default data type is floating point:
>>> a = np.ones((3, 3))
>>> a.dtype
dtype('float64')
There are also other types:
Attributes of a NumPy array
NumPy arrays have a set of attributes that you can access. These attributes include things like the array’s size, shape, number of dimensions, and data type.
Here’s an abbreviated list of attributes of NumPy arrays:
| Attribute | What it records |
|---|---|
| The dimensions of the NumPy array | |
| The total number of elements in the NumPy array | |
| The number of dimensions of the array | |
| The data type of the elements in the array | |
| The length of a single array element in bytes |
I want to show you a few of these. To illustrate them, let’s make a NumPy array and then investigate a few of its attributes.
Here, we’ll once again create a simple NumPy array using .
np.random.seed(72)
simple_array = np.random.randint(low = 0, high = 100, size=5)
is a NumPy array, and like all NumPy arrays, it has attributes.
You can access those attributes by using a dot after the name of the array, followed by the attribute you want to retrieve.
Here are some examples:
ndim
is the number of dimensions.
simple_array.ndim
Which produces the output:
1
What this means is that is a 1-dimensional array.
shape
The attribute tells us the number of elements along each dimension.
simple_array.shape
With the output:
(5,)
What this is telling us is that has 5 elements along the first axis. (And that’s the only information provided, because is 1-dimensional.)
size
The attribute tells you the total number of elements in a NumPy array.
simple_array.size
With the output:
5
This is telling us that has 5 total elements.
dtype (i.e., data type)
tells you the type of data stored in the NumPy array.
Let’s take a look. We can access the parameter like this:
simple_array.dtype
Which produces the output:
dtype('int64')
This is telling us that contains integers.
Also remember: NumPy arrays contain data that are all of the same type.
Although we constructed to contain integers, but we could have created an array with floats or other numeric data types.
For example, we can create a NumPy array with decimal values (i.e., floats):
array_float = np.array( )
array_float.dtype
Which gives the output:
dtype('float64')
When we construct the array with the above input values, you can see that contains data of the datatype (i.e., numbers with decimals).
Now that I’ve explained attributes, let’s examine how to index NumPy arrays.
Python numpy random
- In Python random is a module that is available in the NumPy library. This module returns an array of specified shapes and fills it with random floats and integers.
- It is based on pseudo-random number generation that means it is a mathematical way that generates a sequence of nearly random numbers
- Basically, it is a combination of a bit generator and a generator. In Python, the random values are produced by the generator and originate in a Bit generator.
Syntax:
Here is the Syntax of NumPy random
- It consists of only one parameter
- Size: Default is None
- Return: In Python it will always returns a random integer or float numbers between the lower and higher limits.
Examples:
Let’s take an example and check how to implement random numbers in Python
In the above code first, we will import a random module from the NumPy library. After that, I create a variable that is ‘result’ and assign an np. random() function, and generate an integer number ‘4’. Now use a print statement to check which number will be shown in the output.
Here is the execution of the following given code

Python numpy random
Трансляция с помощью numpy.where()
Если мы предоставим все массивы condition, x и y, numpy будет транслировать их вместе.
import numpy as np

a = np.arange(12).reshape(3, 4)

b = np.arange(4).reshape(1, 4)

print(a)
print(b)

# Broadcasts (a < 5, a, and b * 10)
# of shape (3, 4), (3, 4) and (1, 4)
c = np.where(a < 5, a, b * 10)

print(c)
Вывод
 ]
`0 1 2 3`


 ]
Опять же, здесь вывод выбирается на основе условия, поэтому все элементы, но здесь b, транслируются в форму a. (Одно из его измерений имеет только один элемент, поэтому при трансляции ошибок не будет).
Итак, b теперь станет ], и теперь мы можем выбирать элементы даже из этого транслируемого массива. Таким образом, форма вывода такая же, как у файла.
Создание массивов с помощью функции array
Теперь, когда мы
знаем основные типы данных, как их указывать и использовать, вернемся к функции
array() и подробнее
рассмотрим ее работу.
Как я уже
отмечал, первым параметром следует указывать итерированный объект в виде списка
или кортежа. Например, так:
np.array( (1, 2, 3) )
Или можно
сформировать список с использованием инструмента listcomprehensions:
def getList():
    for i in range(10):
        yield i

a = np.array( x for x in getList() )
print(a)
Здесь в качестве
итератора используется функция-итератор getList(). Но если
передать строку:
np.array( "Hello" )
то получим массив
из одного элемента:
array(‘Hello’,
dtype='<U5′)
Строки не
разбиваются на символы, так как элементами массива выступают только элементы
списка или кортежа.
Объявление многомерных массивов
Теперь давайте
посмотрим, как можно создавать массивы больших размерностей. И начнем с
двумерных. Предположим, требуется определить матрицу, размерностью 3×2 элемента. Это
можно сделать так:
a = np.array(1, 2, 3, 4, 5, 6)
То есть, мы
передали двумерный список и он был преобразован в двумерный массив. В консоли
увидим следующее его отображение:
array(,
,
])
Но, если указать
не прямоугольный двумерный список, например, так:
a = np.array(1, 2, 3, 4, 5, 6, 7)
то при создании
двумерной матрицы будет выдана ошибка. Матрицы должны содержать определенное
число столбцов и строк, то есть, быть прямоугольной таблицей чисел. Здесь же мы
передаем третьей строкой список из трех элементов и это приводит к ошибке.
Далее, если
требуется объявить трехмерную матрицу, то это будет выглядеть уже так:
b = np.array(1, 2, 3, 4, 5, 6, 7, 8, 9, 10, 11, 12)
И при ее выводе
в консоли увидим следующее:
array(,
],
,
],
,
]])
То есть, у нас
здесь в основном списке перечислены двумерные списки и все это преобразуется в
трехмерный массив.
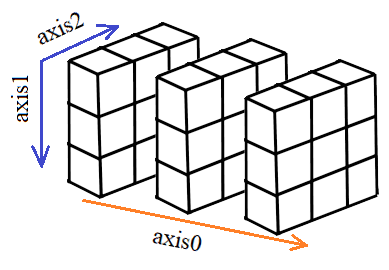
Расположение осей многомерного массива
И здесь главный
вопрос: как располагаются оси многомерных массивов?Ответ вполне очевиден. Вдоль
первой оси (axis0) для
трехмерного массива будут располагаться двумерные срезы (матрицы), а остальные
две оси (axis1 и axis2) будут
определять строки и столбцы этих двумерных матриц:
Например, выполнив
в консоли команду
b
увидим первый
двумерный срез трехмерного массива:
array(,
])
Если указать
первые два индекса:
b,
то увидим первую
строку первого среза:
array()
Наконец, указав
все три индекса:
b, ,
получим первый
элемент трехмерной матрицы:
1
Из этих примеров
хорошо видно, что первый индекс отвечает за первую ось, второй – за вторую, ну
а третий – за третью. Что вполне логично. Если размерность массива
увеличивается до четырех, пяти и так далее осей, то принцип индексирования
сохраняется: мы также указываем требуемый индекс элемента в виде кортежа чисел:
(x1, x3, x3, …, xN)
где
местоположение каждого числа определяет ось, по которой берется тот или иной
индекс.
Итак, на этом
занятии мы с вами познакомились с базовыми типами данных
пакета NumPy и узнали как
создавать различные массивы с помощью функции array(). Если вам все
это понятно, значит цель этого занятия достигнута.
Видео по теме
#1. Пакет numpy — установка и первое знакомство | NumPy уроки
#2. Основные типы данных. Создание массивов функцией array() | NumPy уроки
#3. Функции автозаполнения, создания матриц и числовых диапазонов | NumPy уроки
#4. Свойства и представления массивов, создание их копий | NumPy уроки
#5. Изменение формы массивов, добавление и удаление осей | NumPy уроки
#6. Объединение и разделение массивов | NumPy уроки
#7. Индексация, срезы, итерирование массивов | NumPy уроки
#8. Базовые математические операции над массивами | NumPy уроки
#9. Булевы операции и функции, значения inf и nan | NumPy уроки
#10. Базовые математические функции | NumPy уроки
#11. Произведение матриц и векторов, элементы линейной алгебры | NumPy уроки
#12. Множества (unique) и операции над ними | NumPy уроки
#13. Транслирование массивов | NumPy уроки
Преобразование Fourier
Анализ Fourier помогает нам выразить функцию, как сумму периодических компонентов и восстановить сигнал из этих компонентов.
Давайте посмотрим на простой пример преобразования Fourier. Мы будем строить сумму двух синусов:
# Import Fast Fourier Transformation requirements
from scipy.fftpack import fft
import numpy as np

# Number of sample points
N = 600

# sample spacing
T = 1.0 / 800.0
x = np.linspace(0.0, N*T, N)
y = np.sin(50.0 * 2.0*np.pi*x) + 0.5*np.sin(80.0 * 2.0*np.pi*x)
yf = fft(y)
xf = np.linspace(0.0, 1.0/(2.0*T), N//2)

# matplotlib for plotting purposes
import matplotlib.pyplot as plt
plt.plot(xf, 2.0/N * np.abs(yf[0:N//2]))
plt.grid()
plt.show()
Python numpy random number generator
- In Python, the generator provides entry to a wide range of normal distribution and is replaced with a random state.
- It is a mathematical way that generates a sequence of nearly random numbers and the generator relies on an additional bit generator to control random bit numbers. In Python the random values are produced by the generator and originate in a Bit generator.
Syntax:
Here is the Syntax of the numpy random generator
Note: By default, the bit generator takes a value(PCG64) and if you want to initialize a bit generator then use the seed parameter in it and it will return the initialized generator object.
Example:
Here is the execution of the following given code

Python numpy random number generator