7 best free tftp server for windows (nov 2021 list)
Содержание:
- Как передавать файлы в сети TFTP
- Соображения безопасности
- Как установить TFTP-сервер на Windows
- Настроить TFTPD
- Transferring Files with TFTP
- How to Check a TFTP Server from Windows 10 Client
- Как включить TFTP Client в Windows 10, 8.1, 7
- TFTP Download/Upload File
- Что отличает FileCatalyst от других?
- WinAgents TFTP Server
- [edit] Linux
- [edit] Mac OS X
- What is TFTP?
- Test Windows TFTP Client on Windows 10 or any Other Versions
- загрузить файлы
- 💻 How does TFTP Work?
- WhatsUp TFTP Server
- TFTP Installation
- Multicasting
- Что такое TFTP?
- Как проверить работу сервера tftpd32?
- Spiceworks TFTP Server
Как передавать файлы в сети TFTP
После установки клиента и перенаправления порта перейдем к передаче файлов. Убедитесь, что сервер запущен, затем следуйте инструкциям:
Нажмите Win + R, в диалоговом окне наберите cmd для вызова командной строки. Перенесите или скопируйте файлы, которые хотите передать, в корневой каталог сервера.
Для отправки файлов нужно использовать параметр PUT, при получении GET. Синтаксис команды выглядит следующим образом:
Например, для передачи используйте команду:
Если хотите получить файл, то команда будет выглядеть:
Если хотите переслать на удаленное устройство за пределами сети, нужно указать публичный IP-адрес в командной строке, а затем порт. Примером может быть:
Соображения безопасности
TFTP не включает механизмов входа в систему или контроля доступа
Необходимо соблюдать осторожность при использовании TFTP для передачи файлов, когда требуются аутентификация, контроль доступа, конфиденциальность или проверка целостности
Обратите внимание, что эти службы безопасности могут быть предоставлены выше или ниже уровня, на котором работает TFTP
Также необходимо проявлять осторожность в правах, предоставляемых процессу сервера TFTP, чтобы не нарушать безопасность файловой системы сервера. TFTP часто устанавливается с такими элементами управления, что только файлы с общедоступным доступом для чтения доступны через TFTP
Также обычно запрещены перечисление, удаление, переименование и запись файлов через TFTP. Передача файлов по TFTP не рекомендуется, если присущие протоколу ограничения могут вызвать непреодолимую ответственность.
TFTP часто устанавливается с такими элементами управления, что только файлы с общедоступным доступом для чтения доступны через TFTP. Также обычно запрещены перечисление, удаление, переименование и запись файлов через TFTP. Передача файлов по TFTP не рекомендуется, если присущие протоколу ограничения могут вызвать непреодолимую ответственность.
Как установить TFTP-сервер на Windows
Протокол Trivial FTP, как вы уже знаете, является очень простым в реализации, и если говорить о низкоуровневой передаче файлов, при условии отсутствия жёстких требований по безопасности, то он был и остаётся весьма востребованным.
Кроме загрузки ОС на рабочие станции, он широко используется для загрузки и модификации конфигураций множества встроенных устройств, являющихся частью домашних сетей и системы «Умный дом».
В частности, этот протокол нередко можно встретить на маршрутизаторах, в мобильных телефонах, в популярных медиа-стримерах. Он используется для передачи единичных файлов на относительно небольшие расстояния. А вот в глобальных сетях, том же интернете, использование TFTP недопустимо из-за низкой защищённости. Там царствует FTP, а если требуются повышенные требования к безопасности, то SFTP.
Если при помощи FTP, требующего ввода логина/пароля, можно осуществлять целый спектр операций с файлами (передача в обоих направлениях, переименование, удаление, просмотр), то в TFTP вы можете файлы только скачивать, и только по одному. Зато здесь используется стек UDP, отличающийся простотой кода, в отличие от распространённого, но достаточно сложного TCP/IP.
У протокола TFTP низкая функциональность компенсируется надёжностью, поэтому серверная часть кода протокола занимает на диске или в памяти очень мало места, что делает его идеальным кандидатом для использования во встроенных устройствах, у которых дефицит памяти – привычное явление.
Итак, если суммировать, для чего нужен клиент TFTP, то можно утверждать, что главное преимущество протокола – простота реализации его клиентской части.
ВНИМАНИЕ. Протокол не предусматривает наличие учётных записей пользователей, поэтому всегда существует риск подключения к TFTP серверу или клиенту других лиц, в том числе и со злонамеренными целями
Поэтому использовать его нужно, если сеть защищена другим способом, например, файерволом.
Хотя TFTP-сервер чаще всего можно встретить в ОС Linux, существует немало решений, предназначенных для Windows и даже для macOS (TFTPD32/64, haneWIN, WhatsUp, WinAGents и др.).
Рассмотрим процедуру установки TFTP-сервера на примере весьма популярной утилиты TFTPD32, созданной на условиях открытого исходного кода. Кроме собственно TFTP-сервера, она включает и другие серверные протоколы (DHCP, DNS, SNTP) и позволяет управлять пулом IP-адресов. Разумеется, ситуации, когда требуется наличие всех перечисленных функций, сложно придумать даже теоретически, но дополнение TFTP одной из них вполне может оказаться полезным.
При скачивании программы можно выбрать portable-версию, если не хотите возиться с инсталляцией.
При запуске утилиты нужно будет указать пару параметров:
- каталог, куда будут скачиваться файлы (дефолтный путь – место установки программы);
- IP-адрес сервера, на который нужно будет обращаться клиентам.
Для выполнения простейших операций этого будет достаточно. Но в ряде случаев потребуется дополнительная настройка программы.
Настроить TFTPD
Теперь, когда пакеты TFTPD настроены на сервере Ubuntu (или на рабочем столе), следующим шагом будет настройка сервера для правильной работы. Первым шагом в процессе настройки является создание папки в /так далее/ каталог.
sudo mkdir -p /etc/xinetd.d/
Позаботившись о папке, создайте новый текстовый файл с трогать команда. В этом файле будут храниться все конфигурации сервера.
sudo touch /etc/xinetd.d/tftp
Не могу использовать sudo touch? Попробуйте поднять терминальную оболочку до Root с помощью sudo -s заранее.
sudo -s
touch /etc/xinetd.d/tftp
Теперь, когда файл существует в /etc/xinetd.d/, откройте его в текстовом редакторе Nano.
sudo nano -w /etc/xinetd.d/tftp
Возьмите приведенный ниже код и вставьте его в окно текстового редактора Nano.
Сохраните изменения в tftp-файле в Nano, нажав кнопку Ctrl + O комбинация клавиш. Затем нажмите Ctrl + X выйти.
Следуя файлу конфигурации TFTP, вы должны создать папку «tftpboot» в корневом каталоге (/) на вашем сервере Ubuntu или рабочем столе Ubuntu.
С использованием mkdir команда, создайте каталог.
sudo mkdir /tftpboot
Затем обновите разрешения для папки «tftpboot», используя chmod команда.
sudo chmod -R 777 /tftpboot
После того, как вы обновили информацию о разрешениях для каталога «tftpboot», пришло время использовать Chown инструмент для изменения информации о правах пользователя.
Примечание. Мы используем «никто» в Chown команда ниже по какой-то причине. Это позволит получить доступ к одинаковым разрешениям всем, кто пытается получить доступ к TFTP, а не устанавливать их для отдельных пользователей.
sudo chown -R nobody /tftpboot
Наконец, вы должны перезапустить программное обеспечение сервера TFTP, чтобы принять изменения. В Ubuntu 16.04 и новее это делается с помощью systemctl команда.
sudo systemctl restart xinetd.service
Предполагая, что указанная выше команда systemctl выполнена успешно, сервер должен быть запущен и работать. Перейдите к следующему разделу, чтобы узнать, как передавать файлы с помощью TFTP.
Transferring Files with TFTP
Now that you enabled the native TFTP client in Windows, you can use it to transfer files between the TFTP server.
As mentioned before, make sure that the files are present in the root folder and that the client and server can reach each other.
The TFTP client runs through the command line interface. The command sytax is:
tftp <Source>
Where:
- – i : Transfer in binary mode . If you don’t specify this parameter, the transfer goes in ASCII mode, which is a regular text file transfer.
- Host: Specifies the local/remote computer (server).
- Put: transfers the source file to the file on the destination . Use this command to send a file.
- Get: Downloads the file from the destination remote computer to the local computer. Use this command to receive a file.
- Source: Specifies the source file to transfer.
- Destination: specifies the destination file to get.
An example of using the TFTP command on Windows 10:
In this example, we will upload a firmware image file to the TFTP server . We will use the TFTP client in Windows and transfer the file using binary mode.
- Let’s open the Windows command prompt. Open the Windows search and type “cmd,” or press the Win + R > Open the Run and type “cmd”.
- Go to the directory where the firmware is stored (or specify the entire path).
- Type the command TFTP -i 192.168.1.20 PUT firmware.bin
How to Check a TFTP Server from Windows 10 Client
Let’s assume that the TFTP server setup is done correctly and the network security firewall is accepting incoming and outgoing TFTP traffic in the server.
Once we installed the client on Windows 10 PC, we need to allow TFTP traffic in the Windows firewall or your third-party firewall/anti-virus solution.
- You can altogether disable the Windows firewall to test it.
- Allow the TFTP program or port number in the firewall.
How to Completely switch off the Windows Defender Firewall to allow TFTP
5) Go to the control panel, enable the ‘Large Icons’ view. This will show the all Control panel icon.
6) Click on ‘Windows Defender Firewall’ and open ‘Turn Windows Defender Firewall on or off.’
7) Depending on the connectivity type, you can turn off the Windows firewall. If you are not sure, turn off both (Private and Public network settings). This will entirely off the network protection. It is highly recommended to put back the settings once the TFTP test completed. Or else, follow the next step to enable only TFTP traffic.
Как включить TFTP Client в Windows 10, 8.1, 7
В данной статье показаны действия, с помощью которых можно включить компонент TFTP Client в операционной системе Windows 10, Windows 8.1 и Windows 7
TFTP (Trivial File Transfer Protocol — простой протокол передачи файлов) используется главным образом для первоначальной загрузки по сети операционных систем бездисковых рабочих станций, для обмена файлами с удаленным компьютером, на котором запущена служба TFTP, а так же для загрузки обновлений и конфигураций сетевых устройств (модемов, маршрутизаторов, систем хранения данных и т.п.). TFTP, в отличие от FTP, не содержит возможностей аутентификации (хотя возможна фильтрация по IP-адресу) и основан на транспортном протоколе UDP.
По умолчанию компонент TFTP Client в операционных системах Windows 10, Windows 8.1 и Windows 7 отключён, но при необходимости можно легко включить его используя любой из способов, которые представлены далее в этой инструкции.
TFTP Download/Upload File
I created the following text file in “/srv/tftp”:
Linux-based network monitoring for your network.
Try it Now
netbeez.net$ cat hello_server.txt
Hello world from TFTP server!
|
1 2 |
netbeez.net$cat hello_server.txt Hello world from TFTP server! |
On the client side I start a tftp interactive session and I download it as follows:
netbeez.net$ tftp
tftp> connect 172.31.0.154
tftp> get hello_server.txt
Received 31 bytes in 0.0 seconds
tftp> quit
netbeez.net$ cat hello_server.txt
Hello world from TFTP server!
|
1 2 3 4 5 6 7 |
netbeez.net$tftp tftp>connect172.31.0.154 tftp>get hello_server.txt Received31bytes in0.0seconds tftp>quit netbeez.net$cat hello_server.txt Hello world from TFTP server! |
On the client side, I can upload a file with the following commands:
netbeez.net$ tftp
tftp> connect 172.31.0.154
tftp> put hello_client.txt
Sent 31 bytes in 0.0 seconds
tftp> quit
|
1 2 3 4 5 |
netbeez.net$tftp tftp>connect172.31.0.154 tftp>put hello_client.txt Sent31bytes in0.0seconds tftp>quit |
If you get the following error when uploading:
tftp> put hello_client.txt
Error code 1: File not found
|
1 2 |
tftp>put hello_client.txt Error code1File notfound |
It can mean one of the following:
- The file “hello_client.txt” doesn’t exist on the servers “/srv/tftp” directory
- The “- -create” option is not enabled on the server (see above)
- The file “hello_client.txt” exists on the server but it’s not publicly writable
TFTP is a handy and lightweight server which is useful to upload and download files, but it comes with some important limitations that you have to keep in mind. You may have used TFTP if you’ve ever remotely booted a machine with PXE or BOOTP.
Что отличает FileCatalyst от других?
FileCatalyst использует проприетарный протокол на основе UDP для передачи файлов, а также заимствует концепции из протоколов FTP и TFTP.
FileCatalyst против FTP
FileCatalyst использует соединение TCP Control, как и FTP, но данные отправляются через UDP, чтобы обеспечить ускорение и защиту от задержек и потери пакетов в сети. FileCatalyst использует SSL для управляющего соединения и AES для передачи данных UDP.
Подробнее: FileCatalyst против FTP: сравните скорость передачи файлов
FileCatalyst против TFTP
В отличие от TFTP, FileCatalyst отправляет сразу несколько блоков данных, чтобы максимизировать пропускную способность. Он также включает множество пользовательских команд для динамического управления пропускной способностью, перезапуска контрольной точки, проверки контрольной суммы MD5, сжатия, передачи атрибутов файлов и отправки множества небольших файлов по одному каналу данных путем автоматического архивирования небольших файлов в один архив.
FileCatalyst был разработан для массовой передачи данных и оптимизации полосы пропускания в сетях большого расстояния.
WinAgents TFTP Server
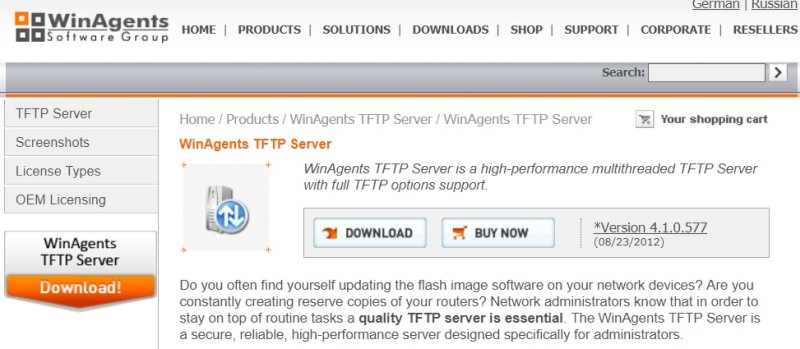
WinAgents Software Group offers free downloads of their TFTP Server. It’s a legacy software designed to run on Windows 2000, 2003, Vista, and 7, which makes it useful if you work with these older OSes on your network. It can probably work with Windows 10 as well, you just need to try it.
WinAgents TFTP Server operates as a background service and implements an IP-based access control model for some kind of network security.
It also supports sending files through firewalls by configuring a UDP port for the connections. Administrators who manage large intranets or remote sites will find the remote configuration features helpful. The cache system makes the system highly scalable compared to other free TFTP tools.
[edit] Linux
In Linux, tftp can generally be installed with whatever package manager your distribution uses.
on suse:
smart install tftp
on fedora:
yum install tftp
on ubuntu
sudo apt-get install tftp
etc.
The tftp client for Linux and OS X is very similar. When invoked, it gives the user a prompt and takes commands from the standard input.
Binary mode can be set with command-line flags — in OS X, the «-e» flag sets binary mode (among other things which are less important), and in Linux «-m binary». Binary can be set from the prompt in either (this is done below for consistency).
Typical usage looks like:
 tftp 192.168.x.x
 > binary
 > put dd-wrt.vXX_XXX.XXX
Because the transfer must be initiated in a narrow time window during the router’s bootup, tftp’s retransmit option is useful. In the following sequence of commands, tftp will retry to send the file every second for one minute. This can be issued just before the router is booted, so that it will retry to send every second while the router boots.
 tftp 192.168.x.x
 > binary
 > rexmt 1
 > timeout 60
 > put dd-wrt.vXX_XXX.XXX
If it worked, it will say something like «Sent 1769472 bytes in 9.0 seconds»
If it didn’t work, it will say «Transfer timed out.» This is often because it cannot connect to the IP address. Make sure you have manually set your computer’s IP address to one in the router’s subnet.
You can quit tftp with the ‘quit’ command or hitting ctrl+D.
Using atftp on Linux
Another way of doing this is using atftp. You can install aftp by search it in your package manager.
On Ubuntu:
sudo aptitude install atftp
On Debian (as root):
aptitude install atftp
On Fedora (as root):
yum install atftp
On Suse (as root):
smart install atftp
Then you go to the folder where you downloaded the official Linksys firmware, for instance if you downloaded it in your desktop:
cd ~Desktop
Unrar the file, for instance if the file is WRT54GL_v4.30.11_012_ETSI_EN_code.rar
unrar x WRT54GL_v4.30.11_012_ETSI_EN_code.rar
Rename the firmware to code.bin.
cp WRT54GL_v4.30.11_012_ETSI_EN_code.bin code.bin
Then you prepare this command (do not press enter yet):
atftp --option "mode octet" --option "timeout 60" --verbose --trace -p -l code.bin 192.168.1.1
Disconnect all your network cables from your router, only leaving one from the computer to the router. Then open another terminal and ping to 192.168.1.1
ping 192.168.1.1
About the atftp command: we are putting (-p) a local file (-l) called code.bin to the IP address 192.168.1.1 asking for fully information (verbose) and showing all packages (trace), also that it must be trying for one minute (timeout 60) and in octet mode. Remember, if you get «code pattern error», try with the official Linksys firmware. More information:
man atftp
atftp --help
Important: you should always try atftp with the official firmware and then flashing to DD-WRT with the HTTP webpage on Administration, «Upgrade Firmware»; specially if you get «code pattern error».
Note: if you use Gnome or KDE you can get problems while trying to put your static IP address. Most of the times, applications like NetworkManager (aka nm-applet) or knetworkmanager will try to get a dynamic IP address, so you should first kill them. For example:
sudo killall NetworkManager
or
sudo killall nm-applet
[edit] Mac OS X
OS X ships with a command-line TFTP client.
First, download the firmware file and put it in your user folder (/Users/yourusername/).
Then connect your computer directly to your router via ethernet. Go to System Preferences > Network. Click on «Ethernet» in the left panel and change «Configure IPv4» to «Manually». Then change «IP address» to 192.168.1.x (where x is any number between 2 & 255).
Then copy & paste the following text into a text editor:
 connect 192.168.1.1
 binary
 rexmt 1
 timeout 60
 put dd-wrt.vXX_XXX.XXX
Change the last line to the filename of the firmware file, which you just moved to your user folder. Copy the whole thing, including the line break after the last line.
Now open Applications > Utilities > Terminal. Enter:
tftp
A «tftp>» command prompt will appear. Now press the reset button on your router. On the tftp command line in Terminal, paste (Cmd+v) the text you copied. Since you copied the line break at the end, tftp will execute the command at the moment you paste it. Depending on your router, you may have to paste it multiple times to get the timing right.
If it works, you’ll see something like this:
 tftp> connect 192.168.1.1
 tftp> binary
 tftp> rexmt 1
 tftp> timeout 60
 tftp> put dd-wrt.vXX_XXX.XXX
 Sent 1769472 bytes in 9.0 seconds
What is TFTP?
Current FTP sessions support a lot of different commands. While logged in to an FTP server, users can usually list, delete, rename, upload, or download files and change directories. In contrast, TFTP offers only the ability to upload or download a file and uses UDP over IP instead of the more standard TCP/IP stack.
The protocol is not capable of allowing more advanced functionality but compensates by using the lockstep method of fault-tolerance that makes it extremely reliable. Due to this limited functionality, TFTP servers can have an extremely small footprint on the disk as well as in memory, making it ideal for use in embedded network devices.
Linux is far and away the most common operating system on the type of devices where you’re likely to encounter a TFTP server. But, there is also a rich ecosystem of Windows and macOS devices that run device firmware (think Apple TVs and Microsoft Surface for a few examples).
See also:
- Best SCP servers
- Best SFTP servers
Test Windows TFTP Client on Windows 10 or any Other Versions
Let’s assume that the TFTP server setup appropriately is done and files are available at the correct location. Before you download a file from the TFTP server, you must know the right file name with the extension.
In this example, I’m going to download a file called ‘tftp.zip’ from the TFTP server 192.168.1.244.
Type the below command in command prompt (you must have a working network communication with the server, the ping command is handy to confirm the connectivity)
Tftp -i GET
The below message indicates that the file transfer is successful. The file will be downloaded at the location where you are executing the command. In this case, it is C:\Users\Dinesh folder.
To upload a file using the TFTP tool, use the following command.
Tftp -i PUT
The below command shows the successful file upload to the TFTP server by Windows TFTP client. The file will be uploaded to the root of the TFTP settings on the server. We do not have any option to select the location.
As I’m using the Solarwind TFTP server in this example, the above command uploaded the file to this root location.
There you go, we learned how to install the Windows built-in TFTP client on Windows 10 and how to ensure that is working fine. We showed the simple steps to upload and download a file using the TFTP client. By the way, this method is applicable for Windows 8.1 and server versions also.
загрузить файлы
- Клиент отправляет на сервер кадр запроса на запись, сообщая серверу, какой файл нужно загрузить и какой режим использовать. Обычно используется октетный режим, и многие программы поддерживают только этот режим.
- После того, как сервер получит этот запрос на запись, он откроет другой случайный порт для последующих услуг по запросу.
- Сервер проверяет, существует ли целевой файл в рабочем каталоге, и, если он существует, возвращает кадр ошибки с кодом ошибки 6.
- Сервер отправляет клиенту кадр ответа, а номер блока начинается с 0.
- После того, как клиент получает кадр ответа сервера, он проверяет правильность порядкового номера блока, затем считывает целевой файл и отправляет сегмент данных.
- Сервер принимает фрейм данных и проверяет правильность порядкового номера блока, а затем продолжает отправлять фрейм ответа.
- Шаги 5 ~ 6 повторяются непрерывно, и если есть ошибка в середине, он отправит соответствующий кадр ошибки другой стороне и завершит эту передачу.
- Когда длина сегмента данных кадра данных, полученного сервером, меньше 512, это означает, что передача завершена.Сервер отправляет последний кадр ответа и завершает эту передачу. После того, как клиент получит последний кадр ответа, он считывает длину целевого файла как 0 и завершает эту передачу.
- Возможен крайний случай, когда размер файла точно кратен 512 байтам. В этом случае размер последнего пакета данных также составляет 512 байтов. В это время после того, как клиент отправит пакет данных, содержащий файл data, он будет. Дополнительный пакет данных, содержащий 0 байтов, отправляется как последний пакет данных, так что размер последнего пакета данных, полученного сервером, всегда может быть меньше 512 байтов. Другими словами, что касается сервера, если размер пакета данных, который он получает, составляет менее 512 байт, он считает, что передача завершена, и закрывает соединение.
Вы можете использовать программное обеспечение Wireshark для захвата кадров TFTP, чтобы подробно просмотреть процесс передачи TFTP.
💻 How does TFTP Work?
TFT severs works in following method:
- The client requires to open server socket on server’s IP address on UDP port 69 as the server depend upon port 69 which helps to establish a UDP connection with the client.
- So, when the connection gets established, the client can send the message request to the server. There are various types of message requests can be sent to the server.
- For Example, the client send a Read Request (RRQ) if any file requires to be fetched from the server or Write Request (WRQ) to transfer any file over the network.
- Then TFTP server divides the message into blocks of 512 bytes. Here, the noticeable part is the last block of every file is lesser than 512 bytes. This helps the receiver to interpret the last block from the sender.
- After that, every block should be transferred as a TFTP data message, and all the remaining blocks are assigned with a TFTP number. However, each block should be kept separately inside a UDP message.
- So each time when the size of the last block would not always be less (except if it is multiple of 512), so the sending user sends another block of zero bytes that give message to the receiver that the transfer part is over.
- TFTP also follows check and pause protocol, therefore it sends each block one after one.
- When it sends the first block, it starts a present block timer. For the sent block, when the response from the server comes it received with the block timer.
- After that, the second block of the file is sent. However, in case of response is found by the server, then the first block of the file is sent. This is method that helps TFTP to achieves flow control.
WhatsUp TFTP Server
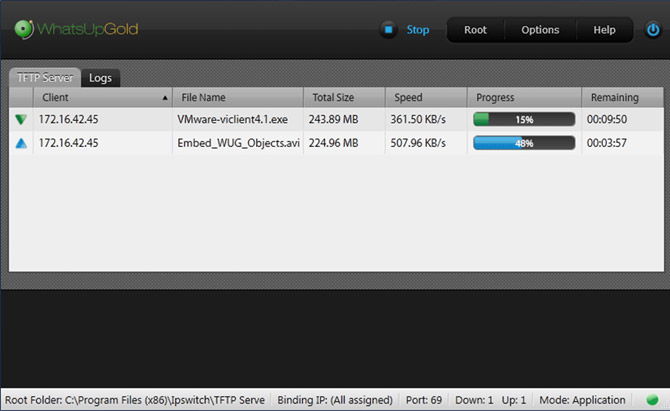
Ipswitch is a software company that specializes in file transfer and network management tools. Their WhatsUp Gold TFTP Server is a free utility they offer for network engineers to add to their toolbox.
It allows automated file transfers to be set up for multiple computers and devices on an intranet with a dedicated schedule.
Whether you need a tool to reinstall a software configuration weekly or a way to push out firmware and application patches to dozens of devices, WhatsUp Gold can make your life easier.
Like other TFTP servers, it runs as an always-on service and can even schedule file transfers during low traffic hours.
TFTP Installation
There are a few implementations of TFPT. You can search Debian repositories for TFTP packages by using the following command:
netbeez.net$ apt-cache search tftp
tftp — Trivial file transfer protocol client
tftp-hpa — HPA’s tftp client
tftp-hpa-dbg — HPA’s tftp (debug)
tftpd — Trivial file transfer protocol server
tftpd-hpa — HPA’s tftp server
|
1 2 3 4 5 6 |
netbeez.net$apt-cache search tftp tftp-Trivial file transfer protocol client tftp-hpa-HPA’s tftp client tftp-hpa-dbg — HPA’stftp(debug) tftpd-Trivial file transfer protocol server tftpd-hpa-HPA’stftp server |
This may give a long list, but you can easily identify the ones that are actual TFTP packages.
You can install the TFTP server with:
netbeez.net$ apt-get install tftpd-hpa
| 1 | netbeez.net$apt-get install tftpd-hpa |
If you are on Windows or MAC OS, you can find online TFTP clients or servers for your machine.
Multicasting
In multicast mode, a single data stream is received by multiple hosts. Standard
connections («unicast») require a separate connection for each data stream going
out of the server, but a multicast transfer needs only a single connection.
Multicasting therefore reduces the load at the server and increases the network
efficiency.
There exist two proposals for multicast TFTP: RFC 2090
and mTFTP defined in the Intel PXE specification. RFC 2090 is a fairly complex
protocol if implemented in full at both the client and the server. PXE’s mTFTP
is much simpler, but it has important limitations:
- No option negotiation is possible.
-
The client cannot ask for a specific file, it will always receive a particular
file from the server (the PXE specification suggests to use a different multicast
IP address for every file). -
When the «master client» disappears, the other clients are not signalled, meaning
that another client will only restart the transfer (and become the new master
client) after a time-out —which may be quite long.
The master client is the client that sends the acknowledgements: in a multicast
situation, several hosts receive the same data packets from a server, but only
one of these may (and must) answer.
The complexity of RFC 2090 lies in the ways that it implements partial transfers.
According to the RFC, each client should maintain a list of packets that it
has received and (if it is selected by the server as the «master client») ask the
server for the packets that it still lacks. A mTFTP client/server will always
restart the transfer with the first block, and therefore a client only has to
remember the first block number that it received. An RFC 2090 client can be
simplified accordingly (without needing to change the protocol): instead of a
map of all received packets, let it just remember a single span of consecutive
packets. Any received series packet that expands this range is accepted. Any
series of received packets that lies outside the span is ignored.
For example, assume that a client drops into an existing stream and it sees the
packets 683 to 1254 pass by. It can determine whether that last packet (1254) marks
the end of the file, by checking whether that packet is a full data block.
A next sequence of packets from 1 to 200 would be ignored, but if the client
receives packets 500 to 700, it will accept 500 to 682 and update its span to
500 .. 1254. When the client becomes the master client before seeing a complete
file, it asks the server for at most two sequences: from packet 1 to the start
of its span and from the end of its span to the end of the file.
Neither type of multicast TFTP works well with block counter roll-over. Since
mTFTP does not support option negotiation at all, data transfers are limited to
32 MiB (minus 512 bytes). A multicast TFTP host implementing RFC 2090 could
negotiate larger block sizes and it could be extended to handle the proposed
(non-standard) «toffset» option.
Что такое TFTP?
Текущие сессии FTP поддерживают много различных команд. При входе на FTP-сервер пользователи обычно могут просматривать, удалять, переименовывать, загружать или загружать файлы и изменять каталоги. Напротив, TFTP предлагает только возможность загружать или скачивать файл и использует UDP поверх IP вместо более стандартного стека TCP / IP. Протокол не способен предоставить более продвинутые функциональные возможности, но компенсирует это с помощью метода отказоустойчивости, который делает его чрезвычайно надежным. Из-за этой ограниченной функциональности серверы TFTP могут занимать очень мало места на диске и в памяти, что делает его идеальным для использования во встроенных устройствах.
Внимание: TFTP имеет нулевую безопасность. Учетных записей пользователей не существует, поэтому любой сможет подключиться к вашему TFTP-серверу
Убедитесь, что ваш сервер защищен каким-либо другим способом, например, с помощью брандмауэра или путем ограничения сетевых интерфейсов, на которых сервер слушает.
Linux, безусловно, является самой распространенной операционной системой на тех устройствах, где вы можете встретить TFTP-сервер. Но есть также богатая экосистема устройств Windows и macOS, которые работают с микропрограммой (например, Apple TV и Microsoft Surface).
Как проверить работу сервера tftpd32?
Для того, чтобы передать файл необходимо открыть cmd.exe и выполнить команду:
Для того, чтобы получить файл с tftp-сервера, есть команда:
Использовать tftpd32/tftpd64 для каких-то постоянных задач не рекомендуется, так как у него практически нет никакой защиты от несанкционированного подключений к серверу. Да, можно ограничить доступ к нему только определенным IP-адресам, но та легкость, с которой можно подменить IP-адрес, позволяет сказать, что это не относится к сетевой безопасности вообще.
Включать сервер tftp с таким «уровнем безопасности» можно только на короткое время, для выполнения каких-то сервисных работ, а лучше вообще делать это в изолированной сети.
Spiceworks TFTP Server
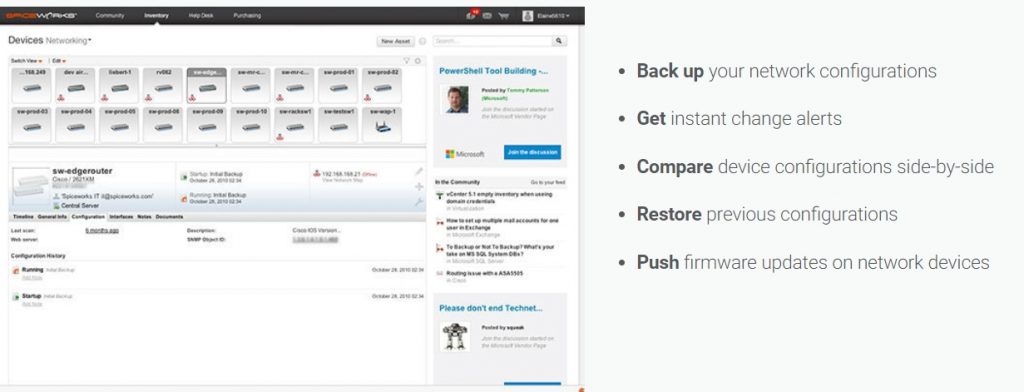
Spiceworks is a well-known networking and IT community with various relevant software tools as well.
One of their offerings include a network administration app that bundles a TFTP server for network configuration tasks.
The app includes an inventory tab that gives you a snapshot of all your network devices and workstations.
It includes an interface for scheduling file transfers like backups, configuration restore files, and firmware updates.
SpiceWorks also provides advanced features like comparing a device’s current software configuration with a backup to detect changes that have been made.
Whether you need to reset your workstations to a software configuration periodically or just want to schedule safe backups for repairing errors in the future, SpiceWorks can handle your TFTP server needs.
You will need to register and create an account in order to download.