Обзор графического редактора gimp
Содержание:
- Wider coverage of input devices thanks to Windows Ink support
- Object oriented syntax
- Better device defaults
- Paint Select tool
- Step 2
- Updated user interface and initial HiDPI support
- Other Packages
- GIMP for Unix-like systems
- Pros and cons of various images formats from a GIMP perspective
- Features and Capabilities
- Dropping thumbnail icon
- Hacking
- Добавляем надпись в GIMP
- Miscellaneous
- Features
- General questions
- Is there a company or a foundation behind GIMP?
- What’s the GIMP’s license, and how do I comply with it?
- Someone sold or tried to sell me GIMP on a 3rd party website. Is this legal?
- Are you trying to develop a Photoshop killer app?
- I don’t like GIMP’s user interface. Why can’t you just copy Adobe Photoshop?
- I don’t like the name GIMP. Will you change it?
- The Perl Server and stand-alone scripts
Wider coverage of input devices thanks to Windows Ink support
Windows Pointer Input Stack (Windows Ink) support was recently added
to GTK3 by Luca Bacci, who also made it available in GIMP and added a
new option in the Preferences dialog to switch between Wintab (older
API) and Windows Ink. You can find this option on the Input Devices page.
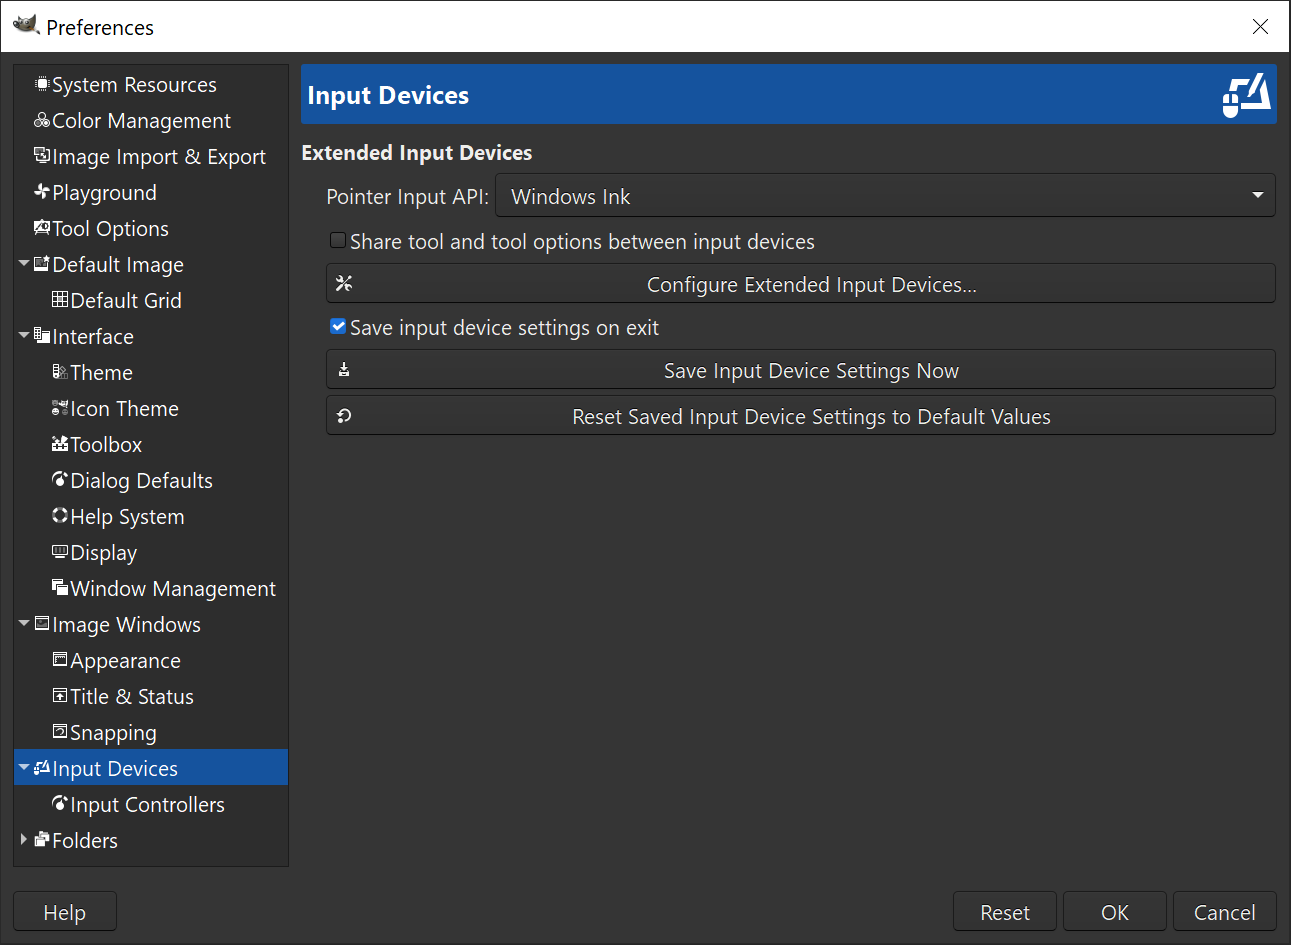 Pointer input API selection — GIMP 2.99.8
This is a huge milestone for artists using Windows since more graphics
tablets or touch devices come with Ink support as a default whereas the
legacy Wintab interface requires specific drivers.
This is even more the case with Windows 8 and newer, for which most
tablets should work out-of-the-box with Windows Ink.
Object oriented syntax
Gimp-Perl provides an alternative object-oriented syntax for the image and the drawable commands. Here is a table showing the procedural vs the object oriented syntax for a few commands:
| procedural syntax | object oriented syntax |
|---|---|
| gimp_image_insert_layer($drw,0,0); | $img->insert_layer($drw,0,0); |
| gimp_drawable_width($drw); | $drw->width; |
The substitution rule for converting a PDB into a method is as simple as erasing (or sometimes ) from the beginning of the function call and calling this method through the image object. Similarly for the gimp_drawable_... functions. See the for more detail.
Note that the object-oriented syntax appears to be only syntactic sugar that makes the calling syntax cleaner. The error messages are still given in the procedural format. What is going on is that GIMP, and the library on which it is implemented (Glib), use C in an object-oriented fashion.
Better device defaults
As explained in the ,
GIMP 3 will be coming with a much better input device detection as well
as hotplug detection. So we decided to provide reasonable defaults for when
a new device is detected. This would help people see if it works correctly.
In particular for graphics tablets, people expect pressure to work from scratch.
For these reasons, here are the tools enabled by default the first time
you plug a device:
- Pen devices (tablet styluses’ main input): Paintbrush tool;
- Eraser devices (tablet styluses’ back input): Eraser tool;
- Touch screens (finger): Smudge tool;
- All other devices: Paintbrush tool.
Moreover, the default dynamics when a new device is plugged is now
“Pressure Size“, i.e. the brush size will increase when you press harder.
This should make the first-time experience with GIMP much more enjoyable
for people using graphics tablets, as they can directly start to paint
on the canvas without having first to understand all the inner settings
of GIMP’s painting system (based on the combination of brush and dynamics).
Paint Select tool
The tool is still listed as experimental as it is not yet deemed
finished by its contributor, Thomas Manni. Nevertheless it has already
improved quite a bit and starts getting really interesting.
Several bugs were fixed and selection is now viewport-based which allows
it to be much faster already depending on the zoom. Yet this is not even
the expected optimization which is planned to make the tool work really
fast. Expect more to come!
This work has been happening both on GIMP code base and on our graphics
engine library’s code base, GEGL.
Copy-pasting Wilber in a few seconds with the Paint Select tool (realtime GIF, faster as zoomed-in) — GIMP 2.99.6
As a side note, the Paint Select tool now has its own icons, original
design by Yash Arya, with collaborative work and design finalisation by Aryeom.
New Paint Select tool icon by Yash Arya and Aryeom — GIMP 2.99.6
Step 2
Now we’re ready for the actual animation work. We will be creating a banner consisting of, say three lines of text being animated. Each frame will consist of the flower image and accompanied by some text. I don’t want to make this boring, so lets make it three frames. The first step will naturally be to copy our flattened image two times using the duplicate layer button in the layers window.
Then we’ll use the standard text tool to put a small text note on every frame. After typing the text onto the frame, GIMP will create a floating selection, that you need to position right using the move tool and anchor using Ctrl+H. The positioning might be crucial for the final animation, so you can use the following trick to make the positioning a piece of cake. Before using the text tool, set the layer (frame) transparency to a lower value, so you could see the layer below it. That way you can position the newly created text acording to the text below (on the previous frame).
Updated user interface and initial HiDPI support
One thing immediately noticeable about GIMP 2.10 is the new dark theme and
symbolic icons enabled by default. This is meant to somewhat dim the environment
and shift the focus towards content.
There are now 4 user interface themes available in GIMP: Dark (default), Gray,
Light, and System. Icons are now separate from themes, and we maintain both
color and symbolic icons, so you can configure GIMP to have System theme with
color icons if you prefer the old look.
![]()
Color, Legacy, and Symbolic icons
Moreover, icons are available in four sizes now, so that GIMP would look better
on HiDPI displays. GIMP will do its best to detect which size to use, but you
can manually override that selection in Edit > Preferences > Interface >
Icon Themes.
![]()
Icons in various sizes to adapt for HiDPI displays.
Contributors: Benoit Touchette, Ville Pätsi, Aryeom Han, Jehan Pagès,
Alexandre Prokoudine…
Other Packages
Print plug-in does not compile
Starting with version 1.2.4, the print plug-in depends on libgimpprint, which is now distributed as a separate package. The previous versions of GIMP (up to 1.2.3) included all files as part of the GIMP distribution, but you should now download and install libgimpprint 4.2.6 separately from the Gimp-Print site:
Once the lib is compiled and installed, run ldconfig as root and the print plug-in should compile.
JPEG plug-in does not compile
The jpeg plug-in requires the jpeg library. If you don’t have it installed or you have a very old version, then you need to get a recent jpeg library. The places to look are:
Once the lib is compiled and installed, run ldconfig as root and the jpeg plug-in should compile.
TIFF plug-in does not compile
The tiff plug-in requires the tiff library. See the jpeg problem mentioned above. Same deal, different lib. The places to look are at:
Once the lib is compiled and installed, run ldconfig as root and the tiff plug-in should compile.
PNG plug-in does not compile
The png plug-in requires libpng and libz (zlib). See the jpeg problem mentioned above. Same deal, different lib. The places to look are at:
Once the lib is compiled and installed, run ldconfig as root and the png plug-in should compile.
XPM plug-in does not compile
The xpm plug-in requires the xpm library. See the jpeg problem above. Same deal, different lib. The places to look are at:
GIMP for Unix-like systems
Warnings and information
-
Flatpak build available in: x86-64 and AArch64
(note: i386 and ARM-32 versions used to be published, yet
are now stuck at GIMP 2.10.14 and 2.10.22 respectively). -
If available, the official package from your Unix-like
distribution is the recommended method of installing GIMP!The flatpak build is new and has known limitations, though it
will likely provide faster updates, following GIMP releases
closely.Therefore choose your installation medium according to your
needs. -
Pssst… want to check out the GIMP 2.99.8 development release? Get it on our development downloads page .
Flatpak additional instructions
The flatpak link above should open your software installer
and prompt you to install GIMP. Yet it may not work
out-of-the-box on some platforms since the flatpak technology is
new. If that is the case, ensure flatpak is
installed and if clicking the link still does not prompt to
install GIMP, then manually install by command line:
Once installed, it will be made available exactly the same way
as other applications (menus, desktop overview, or any specific
application launch process used by your desktop).
If this is not the case, we suggest to report a bug to your
desktop or distribution asking for proper support of flatpak. In
the meantime, you can still run it by command line (not as the
recommended method, only a workaround):
This installation will also provide regular update. You don’t
have to come back on this page and install again (it will not
work!) when a new version of GIMP is released. Instead if your
distribution and/or desktop has a good support for flatpak, it
should propose to perform updates.
Once again, if your distribution does not have proper support,
you can always fall back to using the following command line:
Pros and cons of various images formats from a GIMP perspective
XCF
The Native GIMP image format. Everything is saved: layers, selections, channels, paths and more.
Cons
- Not a “display” format, even if you can find codecs to display thumbnails of XCF image in file explorers.
- Bulky.
- Color channels are coded in 8 bits (in GIMP 2.8).
Recommended uses
Saving all GIMP work.
JPG
- Compresses the files quite efficiently.
- Universally supported for display.
Cons
- Compression is “lossy” and it slightly alters the image data. In case of global changes (color, contrast…) repeated file editing will slowly degrade the image quality.
- At good quality levels, compression is invisible in photography, but can be seen (so called “artifacts”) in computer-generated graphics and text.
- Doesn’t support transparency.
- Color channels are coded on 8 bits.
Recommended uses
- Display of photography
- Storage of photography
PNG
- Lossless format, all pixels are kept.
- Supports partial transparency.
- Produces small files with most computer graphics.
- Supported by all browsers.
Cons
- Complex images (photos) are bulky.
- Color channels are coded in 8 bits.
Recommended uses
- Web page widgets: banners, buttons, frames, etc…
- Computer graphics.
- Screenshots (unless this screenshot contain mostly a photo).
GIF
Universally supported for animation.
Cons
- Only 256 colors per image, leads to blocky look.
(a modern variant supports 256 colors per frame, but GIMP doesn’t use it). - Supports transparency but only as fully transparent/fully opaque.
Recommended uses
Small animated images.
(in all other still-image uses PNG is a better alternative, and for bigger animation modern HTML supports video)
TIFF
- Lossless format, all pixels are kept.
- Color channels can be coded in 16 bits.
- Can store several images (layers).
- Supported by all image processing software.
Cons
Can be bulky on complex images.
Recommended uses
Storage and exchange of high quality images.
Cons
- Proprietary (except DNG).
- Content format can change without notice (new camera models), this can impact support by your favorite software.
- Bulky.
- Not suitable for display.
Recommended uses
Storage of camera output, but a secondary copy in some universal format could be a good idea.
There are of course many other image formats, but the formats above cover most uses.
Use them unless you know better, they can usually be converted easily to any other format should the need arise.
GIMP Tutorial — Image Formats Overview by Ofnuts is licensed under a Creative Commons Attribution-ShareAlike 3.0 Unported License.
Features and Capabilities
This is only a very quickly thrown together list of GIMP features. You can also have a look at the illustrated features overview.
- Painting
- Full suite of painting tools including Brush, Pencil, Airbrush, Clone, etc.
- Sub-pixel sampling for all paint tools for high quality anti-aliasing
- Extremely powerful gradient editor and blend tool
- Supports custom brushes and patterns
- System
- Tile based memory management so image size is limited only by available disk space
- Virtually unlimited number of images open at one time
- Advanced Manipulation
- Full alpha channel support
- Layers and channels
- Multiple Undo/Redo (limited only by diskspace)
- Editable text layers
- Transformation tools including rotate, scale, shear and flip
- Selection tools including rectangle, rounded rectangle, ellipse, free, fuzzy
- Foreground extraction tool
- Advanced path tool doing bezier and polygonal selections.
- Transformable paths, transformable selections.
- Quickmask to paint a selection.
- Extensible
- A Procedural Database for calling internal GIMP functions from external programs as in Script-fu
- Advanced scripting capabilities (Scheme, Python, Perl)
- Plug-ins which allow for the easy addition of new file formats and new effect filters
- Over 100 plug-ins already available
- Animation
- Load and save animations in a convenient frame-as-layer format
- MNG support
- Frame Navigator (in GAP, the GIMP Animation Package)
- Onion Skin (in GAP, the GIMP Animation Package)
- Bluebox (in GAP, the GIMP Animation Package)
- File Handling
- File formats supported include bmp, gif, jpeg, mng, pcx, pdf, png, ps, psd, svg, tiff, tga, xpm, and many others
- Load, display, convert, save to many file formats
- SVG path import/export
- Much, much more!
Dropping thumbnail icon
After years of discussions and bug reports, we dropped the thumbnail icon
feature. Previously, when images were opened, the application icon in
the taskbar would combine a preview of the active image and the actual
application icon (Wilber). The icon would then change whenever the
active image changed. For many people, this complicated locating GIMP’s
window among windows of other running applications.
Moreover, due to recent changes in desktop environments’ behavior, this
feature was actually working on less and less platforms. So depending
on your OS and desktop environment, it either didn’t work at all or
actively worked against you. This is why we decided to do away with it.
Hacking
GIMP uses git as its revision control system, and the GNOME Foundation hosts all of our code repositories:
- — the GIMP application itself
- — repo for this website
- — repo for the developer site at https://developer.gnome.org
- — the GIMP user manual
- plus several others
New contributors should first introduce themselves on IRC (the #gimp channel at irc.gimp.org) and/or the relevant mailing lists:
- GIMP Developers mailing list, for those who work on the core GIMP application and plugins
- GEGL Developers mailing list for developers of the GEGL library
- GIMP GUI Developers mailing list, for working on GIMP GUI
- GIMP Web Developers mailing list, for working on this website
- GIMP Documentation mailing list, for working on the user manual
This way you can announce the changes you intend to make, ask questions, and discuss which changes would be best. It’s generally better to focus on one thing at a time. Contributing to a software project for the first time is always the hardest part, which is why we’re here to help each other. There are also websites to give you a good look at how hacking is being done in GIMP.
GIMP has a complex code base, and newcomers that might not be sure where to start should have a look at our list of bugs for newcomers:
List of bugs for new contributors
The site you should keep updated with and the site that is updated all the time with new development help guides is located at https://wiki.gimp.org/. If you have GIMP installed at the moment then there are some files you should look at in the source code that might help you a little.
-
INSTALL
(Contains most up-to-date information on building GIMP from source code) -
HACKING
(Contains a lot of information that you need to know if you want to start coding) -
README
(The main README for GIMP which should be read by everyone) -
README.i18n
(The internationalization README which should be read by translators)
Once you’ve figured out what to do, though, be bold and get to work!
Добавляем надпись в GIMP
Рассмотрим работу графического редактора на примере – добавим надпись на изображение. После загрузки фотографии или картинки создаем текстовый слой, кликнув по символу «А», который расположен на панели инструментов. Далее, выбираем часть фотографии, куда требуется нанести текст.
Регулируем размер и тип шрифта на отображаемой прозрачной панели. Также используем блок инструментов в левой нижней части программы. После подбора шрифта и редактирования параметров кликаем на свободное поле – текст готов и нанесен на изображение.
Чтобы воспользоваться функциями рисования рассмотрим левую панель инструментов. Здесь расположены кисти, карандаши разных параметров. Карандаш издает резкие штрихи, кисть – плавные мазки.
После того, как разобрали базовые функции панели инструментов, приступаем к продвинутым возможностям – функционал программы позволяет добиться максимальной обработки и редактирования.
Miscellaneous
Plug-in Development
GIMP 2.8 also further enhances its scripting abilities. For example, API changes to support layer groups have been made. Here is a list of new symbols in GIMP 2.8.
GEGL
The projection code which composes a single image from layers has been ported to GEGL. This includes the layer modes, as well as support for layer groups. Also, preparations have been made for better and more intuitive handling of the floating selection.
Developers: Michael Natterer, Martin Nordholts
Roadmap
The GIMP developers now maintain a roadmap for GIMP development found here: https://wiki.gimp.org/index.php/Roadmap
Features
We switched to a dark user interface theme and a symbolic icon theme by default
in version 2.10. If you absolutely want to revert it, here is what you do:
Go to and change the theme from Dark
to System.
Then go to and change the theme
from Symbolic to Legacy.
Changes will apply immediately. Click OK to confirm.
When will GIMP support HDR imaging and processing with 16bit per color channel precision?
GIMP 2.10 was released in April 2018 and is the first version of the program
to feature processing with precision of 16-bit and 32-bit per color channel.
Will GIMP open raw (.NEF, .CR2 etc.) files from my camera?
Starting with version 2.10, GIMP features plug-ins for using
darktable and
RawTherapee to process raw images, as well as a
preference for a default raw processing plug-in.
Yes, better support for CMYK has been on our roadmap for a long time. One of the
ideas, how we want to make this work, was introduced by user interaction
architect Peter Sikking at Libre Graphics Meeting 2009 and later —
in his two-part article in his company’s blog:
,
. Please
take some time to read up on that.
We needed to finalize transition to the new image processing engine, GEGL,
before attemtping to introduce features like CMYK support. Now that it is
complete, initial work on CMYK support has been done in the babl and GEGL
libraries that GIMP relies on. This is partially
funded by the GIMP community,
you can join in, too.
Once we finish some more work on color management in GIMP, it will be a good
idea to start exposing CMYK in the user interface. We have no timeline on this.
Also, please note that we are not planning advanced features such as GCR support
for now. This will most likely require a new dedicated developer in the team.
Should a new developer join the team to specifically work on
CMYK-related features, we will do our best to help him/her to complete this
project and get it to our users as soon as possible.
We realize that some changes are disruptive to some groups of users,
especially those who got used to GIMP as an image editor for doing quick fixes
to lossy files such as JPEG, PNG etc. (i.e. files that cannot store layers,
masks, custom channels, paths).
However, adding a switch for every change we make adds numerous levels of
complexity that we’d rather avoid. Additionally, it would lead to dramatically
changing the way we mean GIMP to work. Hence we respectfully disagree to make
extra behaviour switches.
At the same time, if you don’t wish to abandon GIMP completely, we recommend
having a look at the
Saver and Save/export clean plug-ins
by Akkana Peck, as well as at various GIMP forks on GitHub, although typically
they aren’t maintained up to date with regards to bugfixes.
General questions
Is there a company or a foundation behind GIMP?
No. We are a diverse group of volunteers from around the world who work on this
project in their spare time. Code-wise most of project contributions come from
Europe where the current GIMP maintainers live. Our translators are an even
more diverse group of contributors, since GIMP is available in
80 languages/locales.
What’s the GIMP’s license, and how do I comply with it?
GIMP is distributed under terms of General Public License v3 and later. In a
nutshell, this means:
- You are free to use GIMP, for any purpose
- You are free to distribute GIMP
- You can study how GIMP works and change it
- You can distribute changed versions of GIMP
Note that once you distribute modified version of GIMP, you also must publish
your changes to the source code under GPLv3+ as well.
Someone sold or tried to sell me GIMP on a 3rd party website. Is this legal?
Yes, under terms of the General Public License this is perfectly legal,
provided that the seller also gave you the source code of GIMP and any
modifications he/she introduced. Please see
this page for more information.
Are you trying to develop a Photoshop killer app?
No. Most generic image editors look like Photoshop simply because Adobe’s
application was among the first image editors as we know them now, so
developers tend to stick to what people know — in general terms.
What we aim to do is to create a high-end image manipulation application that
is free to use and modify by everyone, ever.
Feature-wise, the proposed “high-end” status does automatically put GIMP into
direct comparison against Photoshop, but we don’t think about competition
much. We have too many ideas of our own to implement, and too many things to
improve before the notion of competition begins to make the slightest sense.
We do, however, acknowledge the fact that people will treat GIMP as Photoshop
replacement no matter what we tell them, and that’s all right with us. You
own this software, it’s up to you to decide how you make use of it.
I don’t like GIMP’s user interface. Why can’t you just copy Adobe Photoshop?
In the past, the development in the project was somewhat erratic with regards
to taking usability into consideration, which is rather typical for free
software projects, but inexcusable for a high-end image editor that GIMP aims to become.
Between 2006 and 2013, we worked with Peter Sikking of Man+Machine Works, a
professional usability architect, who helped us shape the project vision for
GIMP, interviews professional users to better understand their workflows and
demands, and wrote functional specifications for various GIMP features.
This collaboration resulted in major improvements of
GIMP’s usability, in particular: the rectangular-based selection/cropping
tools, the unified free/polyline selection tool, the single-window mode, the
upcoming unified transformation tool etc.
While working on functional specifications, Peter researched how various
features are implemented in applications with a partially matching feature set
(such as Adobe Photoshop), but the final design was made to help actual users
complete their tasks as fast as possible. This is exactly the kind of approach
to designing interfaces that we consider to be superior to merely copying user
interaction decisions.
I don’t like the name GIMP. Will you change it?
With all due respect, no.
We’ve been using the name GIMP for more than 20 years and it’s widely known.
The name was originally (and remains) an acronym; although the word “gimp” can
be used offensively in some cultures, that is not our intent.
On top of that, we feel that in the long run, sterilization of language will
do more harm than good. GIMP has been quite popular for a long time in search
engine results compared to the use of the word “gimp”. So we think we are on
the right track to make a positive change and make “gimp” something people
actually feel good about. Especially if we add all the features we’ve been
meaning to implement and fix the user interface.
Finally, if you still have strong feelings about the name “GIMP”, you should
feel free to promote the use of the long form GNU Image Manipulation Program
or exercise your software freedom to fork and rebrand GIMP.
The Perl Server and stand-alone scripts
So far the scripts have all been started from the menu structure within GIMP. But using Gimp::Fu there is another possibility, and that is to run the scripts from the command line, as a normal Perl program. When run this way the script tries to connect to the Perl-Server, and if it fails it will launch a GIMP of its own. If you plan to run several scripts this way, it is obviously much faster to run the Perl-Server since launching GIMP takes quite a bit of time. The Perl-Server may be started from the Filters/Perl menu.
When a Gimp::Fu script is run from the command line, the result is the same as when it is run through the menus, except that it may be run with the --output parameter. This will save the result to a file instead of displaying it within GIMP. This is great for batch creation of logos, etc.
The filename for the --output has some special magic that allows to set some special image saving parameters, like interlace, quality factor, etc. See the for more detail
Here are two invocations of the scripts declared above, but with output written to a jpg file and a png file.
| perl-gimp-from-shell |
|---|
uni -o /tmp/uni.png --size 100 --color purple basic-logo --font 'utopia 100' -o /tmp/bl.ppm --size 20 --text "Perl rules" |
Another important use of this interface is that it enables running the Perl debugger on the perl scripts.
10.1. A shell for Gimp-Perl
When using the Perl-Server it is not necessary to use Gimp::Fu and the podregister function. Instead you may call Gimp::on_net, which takes as a parameter a reference to a sub routine that is called when your script has connected to a GIMP (or started one up).
For a simple but powerful example of the use of the Gimp without Fu, here is a an interactive Gimp-Perl shell that may be run from the command line:
| (pg-shell) |
|---|
|
#!/usr/bin/perl # An interactive command line shell to GIMP. Gimp::on_net { exit Gimp::main; |
Here is an example of an interactive session with this shell:
| interact |
|---|
Gimp> $img = Gimp::Image->new(100,100,RGB) Gimp> $drw = $img->layer_new(100,100,RGB_IMAGE, "bg", 100, NORMAL_MODE) Gimp> $img->insert_layer($drw,-1, 0) Gimp> Gimp::Display->new($img) Gimp> $drw->edit_clear Gimp> print Gimp::Image->list Gimp::Image->existing(1) |