Как установить и защитить phpmyadmin с помощью apache в ubuntu 18.04
Содержание:
- Prerequisites
- Подготовка web сервера apache
- Step 3 — Set Up an Nginx Authentication Gateway
- Шаг 3 — Установка PHP
- Step 3 — Securing Your phpMyAdmin Instance
- Правила устройства БД в PhpMyAdmin на локальном сервере
- Step 2 — Adjusting User Authentication and Privileges
- Step 2 — Adjusting User Authentication and Privileges
- Step 1 — Installing phpMyAdmin
- Установка на nginx
- Step 2 — Adjusting User Authentication and Privileges
Prerequisites
Before you get started with this guide, make sure you’ve completed the following prerequisite steps:
- First, we’ll assume that you are using a non-root user with sudo privileges, as described in steps 1-4 of the initial server setup of Ubuntu 16.04.
- We’re also going to assume that you’ve completed a LEMP (Linux, Nginx, MySQL and PHP) installation on your Ubuntu 16.04 server. If you haven’t done this yet, you can follow the guide on installing a LEMP stack on Ubuntu 16.04. Be sure to note your MySQL database administrator password.
Finally, there are important security considerations to be aware of when using software like phpMyAdmin: it communicates directly with your MySQL installation, handles authentication using MySQL credentials, and executes and returns results for arbitrary SQL queries.
For these reasons, and because it is a widely-deployed PHP application that is frequently targeted for attack, you should never run phpMyAdmin on remote systems over a plain HTTP connection. If you do not have an existing domain configured with an SSL/TLS certificate, you can follow this guide on securing Nginx with Let’s Encrypt on Ubuntu 16.04.
Once you’ve completed these prerequisite steps, you’re ready to get started with this guide.
Подготовка web сервера apache
Далее я буду считать, что у вас уже есть установленный и настроенный сервер CentOS 7. Если это не так, то смотрите мои подробные инструкции с видео на тему установки и базовой настройки сервера CentOS 7.
Если на голом сервере выполнить:
# yum install phpmyadmin
Вы увидите полный список зависимостей, но в нем не будет самого веб сервера и интерпретатора php, только его модули. Веб сервер вам нужно предварительно установить и настроить самим. Сделем это на примере веб сервера httpd (апач). Устанавливаем его:
# yum install -y httpd
Теперь установим php, без него панель администрирования не заработает:
# yum install -y php
Запускаем веб сервер, добавляем его в автозагрузку и проверяем работу:
# systemctl enable httpd
# systemctl start httpd
Заходите по адресу http://ip-адрес-сервер. Вы должны увидеть тестовую страницу апача. Теперь проверим, работает ли php. Создаем тестовую страничку в папке /var/www/html:
# mcedit /var/www/html/index.php
<?php phpinfo(); ?>
Назначаем владельца apache на созданный файл:
# chown apache. /var/www/html/index.php
Теперь снова заходим по адресу http://ip-адрес-сервера, вы должны увидеть вывод phpinfo:
Если видите такой же вывод, значит все в порядке, веб сервер готов для работы с phpmyadmin. Приступаем к его установке.
Step 3 — Set Up an Nginx Authentication Gateway
The next feature we’ll set up is an authentication prompt that a user would be required to pass before ever seeing the phpMyAdmin login screen. Most web servers, including Nginx, provide this capability natively. We’ll just need to modify our Nginx configuration file with the details.
Before we do this, we’ll create a password file that will store the authentication credentials. Nginx requires that passwords be encrypted using the function. The OpenSSL suite, which should already be installed on your server, includes this functionality.
To create an encrypted password, type:
You will be prompted to enter and confirm the password that you wish to use. The utility will then display an encrypted version of the password that will look something like this:
Copy this value, as you will need to paste it into the authentication file we’ll be creating.
Now, create an authentication file. We’ll call this file and place it in the Nginx configuration directory:
In this file, you’ll specify the username you would like to use, followed by a colon (), followed by the encrypted version of the password you received from the utility.
We are going to name our user , but you should choose a different username. The file should look like this:
/etc/nginx/pma_pass
Save and close the file when you’re done.
Now, we’re ready to modify our Nginx configuration file. Open it in your text editor to get started:
Within this file, we need to add a new section. This will target the we chose for our phpMyAdmin interface (we selected in this guide).
Create this section within the block, but outside of any other blocks. We’ll put our new block below the block in our example:
/etc/nginx/sites-available/default
Within this block, we need to set the value of a variable called to an authentication message that our prompt will display to users. We don’t want to indicate to unauthenticated users what we’re protecting, so don’t give specific details. We’ll just use “Admin Login” in our example.
We then need to add a variable called to point our web server to the authentication file that we just created. Nginx will prompt the user for authentication details and check that the inputted values match what it finds in the specified file.
After we’re finished, the file should look like this:
/etc/nginx/sites-available/default
Save and close the file when you’re done.
To activate our new authentication gate, we must restart the web server:
Now, if you visit the phpMyAdmin URL in your web browser (if refreshing the page does not work, you may have to clear your cache or use a different browser session if you’ve already been using phpMyAdmin), you should be prompted for the username and password you added to the file:

Once you enter your credentials, you’ll be taken to the standard phpMyAdmin login page.
In addition to providing an extra layer of security, this gateway will help keep your MySQL logs clean of spammy authentication attempts.
Шаг 3 — Установка PHP
PHP это компонент, который будет обрабатывать код для отображения динамического контента. Он может запускать скрипты, подключаться к нашим базам данных MySQL для получения информации и передавать обработанный контент в наш веб-сервер для отображения.
Мы можем вновь воспользоваться менеджером пакетов для установки компонентов. Мы также добавим некоторые вспомогательные пакеты, чтобы код на PHP мог работать с нашим сервером Apache, а также обращаться к базе данных MySQL:
Данная команда должна установить PHP без каких либо проблем. Вскоре мы это проверим.
В большинстве случаев, мы захотим изменить способ, который использует Apache для поиска файлов при запросе директории. На данный момент, если пользователь запрашивает директорию с сервера, Apache в первую очередь будет искать файл с названием . Мы хотим, чтобы наш веб-сервер отдавал предпочтение PHP файлам, так что мы настроим Apache таким образом, чтобы сначала он искал файлы .
Для этого введите следующую команду, чтобы открыть файл в текстовом редакторе с привилегиями root-пользователя:
Содержимое файла будет выглядеть следующим образом:
/etc/apache2/mods-enabled/dir.conf
Мы хотим переместить PHP файл , выделенный выше, на первое место после спецификации следующим образом:
/etc/apache2/mods-enabled/dir.conf
После внесения правок сохраните и закройте файл сочетанием клавиш CTRL-X. Вам придется подтвердить операцию вводом Y и затем нажатием клавиши ENTER для подтверждения места сохранения файла.
После этого нам необходимо перезапустить Apache для применения внесенных изменений. Вы можете сделать это при помощи команды:
Мы также можем проверить статус сервиса используя :
Установка модулей PHP
Чтобы расширить функциональность PHP, мы можем установить некоторые дополнительные модули.
Для просмотра доступных опций для модулей и библиотек PHP вы можете передать результат в , которая позволит вам проматывать вывод:
Используйте клавиши стрелок вверх и вниз для промативания списка, для выхода нажмите q.
В результате вам будут показаны все опциональные компоненты, которые можно установить, сопровождаемые коротким описанием для каждого:
Чтобы получить больше информации по каждому модулю, вы можете поискать в Интернете или посмотреть полное описание пакета при помощи команды:
Ответ будет содержать много текста, среди которого есть поле . Именно оно и будет содержать расширенное описание функциональности, предоставляемой модулем.
Например, чтобы узнать назначение модуля , мы можем выполнить команду:
Помимо большого количества прочей информации, вы увидите следующее:
Если после изучение вы решили, что хотите установить пакет, вы можете сделать это используя команду как мы делали ранее при установке другого программного обеспечения.
Если мы решили, что хотим установить , мы можем ввести команду:
Для установки сразу нескольких модулей, вы можете перечислить их через пробелы следом за командой следующим образом:
Теперь ваш стек LAMP установлен и сконфигурирован. Однако нам еще предстоит протестировать PHP.
Step 3 — Securing Your phpMyAdmin Instance
Because of its ubiquity, phpMyAdmin is a popular target for attackers, and you should take extra care to prevent unauthorized access. One way of doing this is to place a gateway in front of the entire application by using Apache’s built-in authentication and authorization functionalities.
To do this, you must first enable the use of file overrides by editing your phpMyAdmin installation’s Apache configuration file.
Use your preferred text editor to edit the file that has been placed in your Apache configuration directory. Here, we’ll use :
Add an directive within the section of the configuration file, like this:
/etc/apache2/conf-available/phpmyadmin.conf
When you have added this line, save and close the file. If you used to edit the file, do so by pressing , , and then .
To implement the changes you made, restart Apache:
Now that you have enabled the use of files for your application, you need to create one to actually implement some security.
In order for this to be successful, the file must be created within the application directory. You can create the necessary file and open it in your text editor with root privileges by typing:
Within this file, enter the following information:
/usr/share/phpmyadmin/.htaccess
Here is what each of these lines mean:
- : This line specifies the authentication type that you are implementing. This type will implement password authentication using a password file.
- : This sets the message for the authentication dialog box. You should keep this generic so that unauthorized users won’t gain any information about what is being protected.
- : This sets the location of the password file that will be used for authentication. This should be outside of the directories that are being served. We will create this file shortly.
- : This specifies that only authenticated users should be given access to this resource. This is what actually stops unauthorized users from entering.
When you are finished, save and close the file.
The location that you selected for your password file was . You can now create this file and pass it an initial user with the utility:
You will be prompted to select and confirm a password for the user you are creating. Afterwards, the file is created with the hashed password that you entered.
If you want to enter an additional user, you need to do so without the flag, like this:
Then restart Apache to put authentication into effect:
Now, when you access your phpMyAdmin subdirectory, you will be prompted for the additional account name and password that you just configured:

After entering the Apache authentication, you’ll be taken to the regular phpMyAdmin authentication page to enter your MySQL credentials. By adding an extra set of non-MySQL credentials, you’re providing your database with an additional layer of security. This is desirable, since phpMyAdmin has been vulnerable to security threats in the past.
Правила устройства БД в PhpMyAdmin на локальном сервере
- Каждый столбец имеет уникальное имя;
- Все столбцы должны располагаться в определенном порядке, который задается в момент создания БД;
- В базе данных должен быть обязательно хоть один столбец. Строк может не быть;
- Каждая строка не может повторяться;
Смотреть:
Данные вставляемые в столбец, имеют уникальный ТИП_ДАННЫХ.
Наиболее распространённые следующие типы данных:
- «DECIMAL» – Десятичные числа;
- «CHAR» – Краткий текст длинной до 255 символов;
- «INT» – Числа целые;
- «LONGTEXT» – Текст до 4,294,967,295 символов;
- «TEXT» – Текст обычный до 65,535 символов;
- «Date» – Даты, формат ГГГГ-ММ-ДД;
- «DATETIME» – дата и время ГГГГ-ММ-ДД ЧЧ: ММ: СС;
- «VARCHAR» – любые символы;
- «Time» – время – формат ЧЧ:MM:СС.
Язык базы данных в PhpMyAdmin на локальном сервере
Главный язык реляционных баз данных язык SQL. На нем пишутся запросы к базе данных. Называются запросы – SQL запрос. Для отправления SQL запросов в phpMyAdmin есть вклада: SQL, в верхнем горизонтальном меню.
Это все, про phpMyAdmin на локальном сервере. В следующей статье, я подробно расскажу, как работать с базой данных в phpMyAdmin.
WebOnTo.ru
Step 2 — Adjusting User Authentication and Privileges
When you installed phpMyAdmin onto your server, it automatically created a database user called which performs certain underlying processes for the program. Rather than logging in as this user with the administrative password you set during installation, it’s recommended that you log in as either your root MySQL user or as a user dedicated to managing databases through the phpMyAdmin interface.
Configuring Password Access for the MySQL Root Account
In Ubuntu systems running MySQL 5.7 (and later versions), the root MySQL user is set to authenticate using the plugin by default rather than with a password. This allows for some greater security and usability in many cases, but it can also complicate things when you need to allow an external program — like phpMyAdmin — to access the user.
In order to log in to phpMyAdmin as your root MySQL user, you will need to switch its authentication method from to if you haven’t already done so. To do this, open up the MySQL prompt from your terminal:
Next, check which authentication method each of your MySQL user accounts use with the following command:
In this example, the root user does in fact authenticate using the plugin. To configure the root account to authenticate with a password, run the following command. Be sure to change to a strong password of your choosing:
Then, run which tells the server to reload the grant tables and put your new changes into effect:
Check the authentication methods employed by each of your users again to confirm that root no longer authenticates using the plugin:
This output indicates that the root user will authenticate using a password. You can now log in to the phpMyAdmin interface as your root user with the password you’ve set for it here.
Configuring Password Access for a Dedicated MySQL User
Alternatively, some may find that it better suits their workflow to connect to phpMyAdmin with a dedicated user. To do this, open up the MySQL shell once again:
Note: If you have password authentication enabled, as described in the previous section, you will need to use a different command to access the MySQL shell. The following will run your MySQL client with regular user privileges, and you will only gain administrator privileges within the database by authenticating:
From there, create a new user and give it a strong password:
Then, grant your new user appropriate privileges. For example, you could grant the user privileges to all tables within the database, as well as the power to add, change, and remove user privileges, with this command:
Following that, exit the MySQL shell:
You can now access the web interface by visiting your server’s domain name or public IP address followed by :
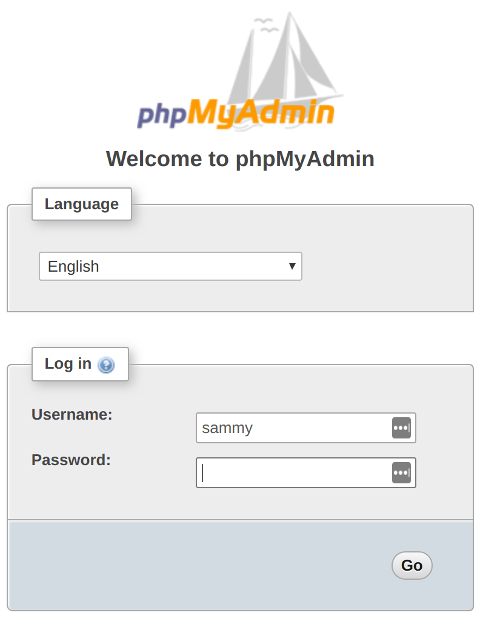
Log in to the interface, either as root or with the new username and password you just configured.
When you log in, you’ll be taken to the phpMyAdmin user interface:
Now that you’re able to connect and interact with phpMyAdmin, all that’s left to do is harden your system’s security to protect it from attackers.
Step 2 — Adjusting User Authentication and Privileges
When you installed phpMyAdmin onto your server, it automatically created a database user called which performs certain underlying processes for the program. Rather than logging in as this user with the administrative password you set during installation, it’s recommended that you log in as either your root MySQL user or as a user dedicated to managing databases through the phpMyAdmin interface.
Configuring Password Access for the MySQL Root Account
In Ubuntu systems running MySQL 5.7 (and later versions), the root MySQL user is set to authenticate using the plugin by default rather than with a password. This allows for some greater security and usability in many cases, but it can also complicate things when you need to allow an external program — like phpMyAdmin — to access the user.
In order to log in to phpMyAdmin as your root MySQL user, you will need to switch its authentication method from to if you haven’t already done so. To do this, open up the MySQL prompt from your terminal:
Next, check which authentication method each of your MySQL user accounts use with the following command:
In this example, the root user does in fact authenticate using the plugin. To configure the root account to authenticate with a password, run the following command. Be sure to change to a strong password of your choosing:
Then, run which tells the server to reload the grant tables and put your new changes into effect:
Check the authentication methods employed by each of your users again to confirm that root no longer authenticates using the plugin:
This output indicates that the root user will authenticate using a password. You can now log in to the phpMyAdmin interface as your root user with the password you’ve set for it here.
Configuring Password Access for a Dedicated MySQL User
Alternatively, some may find that it better suits their workflow to connect to phpMyAdmin with a dedicated user. To do this, open up the MySQL shell once again:
Note: If you have password authentication enabled, as described in the previous section, you will need to use a different command to access the MySQL shell. The following will run your MySQL client with regular user privileges, and you will only gain administrator privileges within the database by authenticating:
From there, create a new user and give it a strong password:
Then, grant your new user appropriate privileges. For example, you could grant the user privileges to all tables within the database, as well as the power to add, change, and remove user privileges, with this command:
Following that, exit the MySQL shell:
You can now access the web interface by visiting your server’s domain name or public IP address followed by :
Log in to the interface, either as root or with the new username and password you just configured.
When you log in, you’ll be taken to the phpMyAdmin user interface:
Now that you’re able to connect and interact with phpMyAdmin, all that’s left to do is harden your system’s security to protect it from attackers.
Step 1 — Installing phpMyAdmin
To get started, we will install phpMyAdmin from the default Ubuntu repositories.
First, update your server’s package index:
Then use to pull down the files and install them on your system:
This will ask you a few questions in order to configure your installation correctly.
Warning: When the prompt appears, “apache2” is highlighted, but not selected. To select Apache, hit , , then .
If you do not hit to select Apache, the installer will not move the necessary files during installation.
- For the server selection, choose
- Select when asked whether to use to set up the database
- You will then be asked to choose and confirm a MySQL application password for phpMyAdmin
The installation process adds the phpMyAdmin Apache configuration file into the directory, where it is read automatically. The only thing you need to do is explicitly enable the PHP extension, which you can do by typing:
Afterwards, restart Apache for your changes to be recognized:
phpMyAdmin is now installed and configured. However, before you can log in and begin interacting with your MySQL databases, you will need to ensure that your MySQL users have the privileges required for interacting with the program.
Установка на nginx
Настроим работу phpmyadmin на веб сервере nginx + php-fpm. Подробно вопрос настройки такого сервера я рассматривал ранее в статье установка и настройка веб сервера nginx + php-fpm на CentOS 7. Там речь шла именно о веб сервере и уклон был в эту сторону. Но phpmyadmin может понадобиться не только на веб серверах. Так что рассмотрим общий случай быстрой и простой настройки phpmyadmin на nginx.
Устанавливаем nginx:
# yum install -y nginx
Устанавливаем php-fpm:
# yum install -y php-fpm
Запускаем службы и добавляем в автозагрузку:
# systemctl start nginx.service
# systemctl enable nginx.service
# systemctl start php-fpm.service
# systemctl enable php-fpm.service
Заходим по адресу http://ip-адрес-сервера и проверяем. Вы должны увидеть тестовую страницу nginx:
Дальше устанавливаем phpmyadmin на web сервер с nginx:
# yum install -y phpmyadmin
Редактируем конфигурационный файл nginx для добавления установленной веб панели управления:
# mcedit /etc/nginx/nginx.conf
Приводим секцию server {} к следующему виду:
server {
         listen 80 default_server;
         listen :80 default_server;
         server_name _;
         root /usr/share/nginx/html;
         index index.php index.html index.htm;

         location ~ \.php$ {
         fastcgi_pass 127.0.0.1:9000;
         fastcgi_index index.php;
         include fastcgi_params;
         fastcgi_param SCRIPT_FILENAME $request_filename;
         fastcgi_ignore_client_abort off;
         }

         include /etc/nginx/default.d/*.conf;

         location / {
         }

         error_page 404 /404.html;
         location = /40x.html {
         }

         error_page 500 502 503 504 /50x.html;
         location = /50x.html {
         }
}
Я взял стандартные параметры и добавил несколько новых строк для корректной работы. Теперь нам нужно сделать символьную ссылку (сим линк) из папки со скриптами phpmyadmin в корневой каталог веб сервера nginx:
# ln -s /usr/share/phpMyAdmin /usr/share/nginx/html/phpmyadmin
Перезапускаем nginx:
# systemctl restart nginx
Дальше по идее все должно работать, но у меня не работало, пришлось перезагрузить весь сервер, так как не работал модуль php mbstring, хотя он установлен и подключен. Перезапуск php-fpm тоже не помогал, а перезагрузка помогла. Проверил 2 раза, оба раза воспроизвел ошибку. Разбираться не стал в чем причина такого поведения, просто перезагрузите сервер и продолжайте.
Идем по адресу http://ip-адрес-сервера/phpmyadmin. Должны увидеть стандартную страницу входа. У меня на ней было предупреждение:
Warning in ./libraries/session.inc.php#105
session_start(): open(/var/lib/php/session/sess_j0r4moac0oo7oh250e6t14rn1kfkl6ta, O_RDWR) failed: No such file or directory (2)
Это сязано с тем, что в папке /var/lib/php нет директории session. Исправляем это:
# cd /var/lib/php/
# mkdir session
# chown apache:apache session/
Обращаю внимание на то, что я назначил владельцем папки с сессиями пользователя apache, хотя у нас веб сервер nginx. Это связано с тем, что php-fpm по-умолчанию работает под пользователем apache
Логичнее изменить это и запускать его от nginx. Для этого надо отредактировать файл /etc/php-fpm.d/www.conf, изменив там параметры user и group. Я не стал этого делать сейчас для простоты. Оставляю данный параметр на ваше усмотрение.
Перезагружаем страницу, ошибка должна исчезнуть. Можно подключиться к mysql. Если сервер бд у вас не установлен, смотрите выше, как быстро его поставить и запустить. На этом установка закончена, рассматрим несколько полезных настроек phpmyadmin.
Step 2 — Adjusting User Authentication and Privileges
When you installed phpMyAdmin onto your server, it automatically created a database user called which performs certain underlying processes for the program. Rather than logging in as this user with the administrative password you set during installation, it’s recommended that you log in as either your root MySQL user or as a user dedicated to managing databases through the phpMyAdmin interface.
Configuring Password Access for the MySQL Root Account
In Ubuntu systems running MySQL 5.7 (and later versions), the root MySQL user is set to authenticate using the plugin by default rather than with a password. This allows for some greater security and usability in many cases, but it can also complicate things when you need to allow an external program — like phpMyAdmin — to access the user.
In order to log in to phpMyAdmin as your root MySQL user, you will need to switch its authentication method from to if you haven’t already done so. To do this, open up the MySQL prompt from your terminal:
Next, check which authentication method each of your MySQL user accounts use with the following command:
In this example, the root user does in fact authenticate using the plugin. To configure the root account to authenticate with a password, run the following command. Be sure to change to a strong password of your choosing:
Then, run which tells the server to reload the grant tables and put your new changes into effect:
Check the authentication methods employed by each of your users again to confirm that root no longer authenticates using the plugin:
This output indicates that the root user will authenticate using a password. You can now log in to the phpMyAdmin interface as your root user with the password you’ve set for it here.
Configuring Password Access for a Dedicated MySQL User
Alternatively, some may find that it better suits their workflow to connect to phpMyAdmin with a dedicated user. To do this, open up the MySQL shell once again:
Note: If you have password authentication enabled, as described in the previous section, you will need to use a different command to access the MySQL shell. The following will run your MySQL client with regular user privileges, and you will only gain administrator privileges within the database by authenticating:
From there, create a new user and give it a strong password:
Then, grant your new user appropriate privileges. For example, you could grant the user privileges to all tables within the database, as well as the power to add, change, and remove user privileges, with this command:
Following that, exit the MySQL shell:
You can now access the web interface by visiting your server’s domain name or public IP address followed by :
Log in to the interface, either as root or with the new username and password you just configured.
When you log in, you’ll be taken to the phpMyAdmin user interface:
Now that you’re able to connect and interact with phpMyAdmin, all that’s left to do is harden your system’s security to protect it from attackers.