Insert
Содержание:
- INSERT Statement Without Columns
- INSERT INTO TABLE using Excel
- Table of contents
- Insert Data Only in Specified Columns
- PHP Example: Insert into MySQL Table
- Дополнительное использование
- Oracle: Validating the INSERT Data with the WITH CHECK OPTION
- Get Inserted ID
- INSERT…SELECT statement
- SQL References
- SQL Учебник
- Insert Data Only in Specified Columns
- Examples
- Conclusion
- Rules:
- Practice Exercise #1:
- SQL INSERT
- Приоритет вставки INSERT LOW_PRIORITY / HIGH_PRIORITY
- Примеры SQL INSERT INTO SELECT
- Вставка из другой таблицы с условием INSERT INTO … SELECT … WHERE …
- Вставка строк, некоторые из которых уже существуют в целевой таблице
- INSERT IGNORE statement
- How to perform a simple Insert using SSMS
- Запрос на вставку строки
- Example — Using SELECT statement
- MySQL INSERT examples
- Пример INSERT INTO
- Заключение
INSERT Statement Without Columns
What happens if you have an SQL INSERT INTO statement without specifying the columns?
Earlier I mentioned that they were optional, so what happens?
1 row inserted.
| STUDENT_ID | FIRST_NAME | LAST_NAME | FEES_REQUIRED | FEES_PAID | ENROLMENT_DATE | GENDER |
| 1 | John | Smith | 500 | 100 | 01/Feb/15 | M |
| 2 | Susan | Johnson | 150 | 150 | 12/Jan/15 | F |
| 3 | Tom | Capper | 350 | 320 | 06/Mar/15 | M |
| 4 | Mark | Holloway | 500 | 410 | 20/Jan/15 | M |
| 5 | Steven | Webber | 100 | 80 | 09/Mar/15 | M |
| 6 | Julie | Armstrong | 100 | 12/Feb/15 | F | |
| 7 | Michelle | Randall | 250 | 23/Jan/15 | F | |
| 8 | Andrew | Cooper | 800 | 400 | 04/Mar/15 | M |
| 9 | Robert | Pickering | 110 | 100 | 30/Jan/15 | M |
| 10 | Tanya | Hall | 150 | 150 | 28/Jan/15 | F |
| 11 | Jarrad | Winston | 700 | 300 | (null) | (null) |
| 12 | Mary | Taylor | 500 | 100 | (null) | F |
We can see that the record was inserted. However, we could have some problems with this:
- What if we alter the table and add or remove columns? The INSERT statement may not work anymore.
- What if we put the values in the wrong order in the INSERT statement? It will also fail.
So, while it could work, it’s generally not a good idea.
INSERT INTO TABLE using Excel
In many cases, you’ll need to run multiple SQL statements based on the dataset provided to you. This stands not only for the INSERT INTO TABLE statement but also for UPDATE and DELETE statements. There is no point in typing these statements manually, but you should rather go with a smarter approach – prepare formulas (or a script) that will automate this part. In such situations, I prefer using Excel and formulas.
Note: Personally, in the context of databases, I find Excel very useful when I need to create multiple statements and when presenting results and/or creating dashboards.
Let’s take a look at these formulas:
The formula used to insert the first country (Germany) is:
| 1 | =»INSERTINTOcountry (country_name,country_name_eng,country_code)VALUES(‘» & B2 & «‘,'» & C2 & «‘,'» & D2 & «‘);» |
The formula used to insert the first city (Berlin) is:
| 1 | =»INSERTINTOcity (city_name,lat,long,country_id)VALUES(‘» & B2 & «‘,»&C2&»,»&D2&»,»&E2&»);» |
Feel free to use these formulas to automate your tasks. We’ll use a similar approach later when we are running multiple UPDATE and DELETE statements (and even when creating SELECT statements).
Table of contents
| Learn SQL: CREATE DATABASE & CREATE TABLE Operations | |
| Learn SQL: INSERT INTO TABLE | |
| Learn SQL: Primary Key | |
| Learn SQL: Foreign Key | |
| Learn SQL: SELECT statement | |
| Learn SQL: INNER JOIN vs LEFT JOIN | |
| Learn SQL: SQL Scripts | |
| Learn SQL: Types of relations | |
| Learn SQL: Join multiple tables | |
| Learn SQL: Aggregate Functions | |
| Learn SQL: How to Write a Complex SELECT Query | |
| Learn SQL: The INFORMATION_SCHEMA Database | |
| Learn SQL: SQL Data Types | |
| Learn SQL: Set Theory | |
| Learn SQL: User-Defined Functions | |
| Learn SQL: User-Defined Stored Procedures | |
| Learn SQL: SQL Views | |
| Learn SQL: SQL Triggers | |
| Learn SQL: Practice SQL Queries | |
| Learn SQL: SQL Query examples | |
| Learn SQL: Create a report manually using SQL queries | |
| Learn SQL: SQL Server date and time functions | |
| Learn SQL: Create SQL Server reports using date and time functions | |
| Learn SQL: SQL Server Pivot Tables | |
| Learn SQL: SQL Server export to Excel | |
| Learn SQL: Intro to SQL Server loops | |
| Learn SQL: SQL Server Cursors | |
| Learn SQL: SQL Best Practices for Deleting and Updating data | |
| Learn SQL: Naming Conventions | |
| Learn SQL: SQL-Related Jobs | |
| Learn SQL: Non-Equi Joins in SQL Server | |
| Learn SQL: SQL Injection | |
| Learn SQL: Dynamic SQL | |
| Learn SQL: How to prevent SQL Injection attacks |
Insert Data Only in Specified Columns
It is also possible to only insert data in specific columns.
The following SQL statement will insert a new record, but only insert data in the «CustomerName»,
«City», and «Country» columns (CustomerID will
be updated automatically):
Example
INSERT INTO Customers (CustomerName, City, Country)
VALUES (‘Cardinal’, ‘Stavanger’, ‘Norway’);
The selection from the «Customers» table will now look like this:
| CustomerID | CustomerName | ContactName | Address | City | PostalCode | Country |
|---|---|---|---|---|---|---|
| 89 | White Clover Markets | Karl Jablonski | 305 — 14th Ave. S. Suite 3B | Seattle | 98128 | USA |
| 90 | Wilman Kala | Matti Karttunen | Keskuskatu 45 | Helsinki | 21240 | Finland |
| 91 | Wolski | Zbyszek | ul. Filtrowa 68 | Walla | 01-012 | Poland |
| 92 | Cardinal | null | null | Stavanger | null | Norway |
❮ Previous
Next ❯
PHP Example: Insert into MySQL Table
The mysqli_query function is used to execute SQL queries.
The SQL insert into table function can be used to execute the following query types:
- Insert
- Select
- Update
- delete
It has the following syntax.
mysqli_query($db_handle,$query);
HERE,
“mysqli_query(…)” is the function that executes the SQL queries.
“$query” is the SQL query to be executed
“$link_identifier” is optional, it can be used to pass in the server connection link
Example
$servername = "localhost";
$username = "alex";
$password = "yPXuPT";
$dbname = "afmznf";

// Create connection
$conn = mysqli_connect($servername, $username, $password, $dbname);

// Check connection
if (!$conn) {
die("Connection failed: " . mysqli_connect_error());
}

$sql= "INSERT INTO addkeyworddata(link, keyword)VALUES ('https://www.guru99.com/','1000')";
		if (mysqli_query($conn, $sql)) {
			echo "New record created successfully".'<br>';
		} else {
		echo "Error: " . $sql. "<br>" . mysqli_error($conn);
	}
}
Дополнительное использование
Совершенно по-другому применяется кнопка Insert в различных модификациях файловых менеджеров. К последним можно отнести FAR, DOS Navigator и Norton Commander. Конечно, сейчас такое программное обеспечение крайне редко используется, но знать некоторые его особенности будет не лишним. Если курсор находится на одной из панелей такого софта, то нажатие этой кнопки на подсистеме ввода приведет к тому, что будет выделен тот элемент, на котором находится маркер. При этом указатель сместится на одну позицию вниз. Если же повторно нажать эту клавишу на ранее выделенном элементе, отменится ранее выполненное действие.
В рамках же операционной системы клавиша Insert может использоваться в различных комбинациях клавиш. Например, если зажать сначала Ctrl, а потом Insert, и после этого одновременно их отпустить, то выделенный фрагмент документа или же файл будет помещен в буфер обмена. С помощью другой комбинации можно выполнить обратную операцию. То есть извлечь информацию из буфера обмена и установить ее в место нахождения курсора. В этом случае зажимаем сразу Shift, потом Insert и после этого их отпускаем.
Oracle: Validating the INSERT Data with the WITH CHECK OPTION
When you insert data into a table, you may want to restrict data that gets inserted based on a WHERE condition.
When you run an UPDATE statement on a view, you can add a WITH CHECK OPTION clause to make sure that your updates adhere to the WHERE clause of the view.
You can do the same thing with an INSERT statement in Oracle. This does not exist in MySQL, PostgreSQL, or SQL Server.
The syntax for this is:
The sql_statement is a SELECT statement that has a WHERE clause. You can use this to insert data into.
Let’s use our student table for this example again.
Here is our student table.
| STUDENT_ID | FIRST_NAME | LAST_NAME | FEES_REQUIRED |
| 1 | John | Smith | 500 |
| 2 | Susan | Johnson | 150 |
| 3 | Tom | Capper | 350 |
| 4 | Mark | Holloway | 500 |
| 5 | Steven | Webber | 100 |
| 6 | Julie | Armstrong | 100 |
| 7 | Michelle | Randall | 250 |
| 8 | Andrew | Cooper | 800 |
| 9 | Robert | Pickering | 110 |
| 10 | Tanya | Hall | 150 |
| 11 | Jarrad | Winston | 700 |
| 12 | Mary | Taylor | 500 |
| 100 | Mark | Anderson | 860 |
| 102 | John | Rogers | 210 |
Now, let’s insert into this table, but using the SELECT statement:
1 row inserted.
Let’s see the results.
| STUDENT_ID | FIRST_NAME | LAST_NAME | FEES_REQUIRED |
| 1 | John | Smith | 500 |
| 2 | Susan | Johnson | 150 |
| 3 | Tom | Capper | 350 |
| 4 | Mark | Holloway | 500 |
| 5 | Steven | Webber | 100 |
| 6 | Julie | Armstrong | 100 |
| 7 | Michelle | Randall | 250 |
| 8 | Andrew | Cooper | 800 |
| 9 | Robert | Pickering | 110 |
| 10 | Tanya | Hall | 150 |
| 11 | Jarrad | Winston | 700 |
| 12 | Mary | Taylor | 500 |
| 100 | Mark | Anderson | 860 |
| 102 | John | Rogers | 210 |
| 120 | A | A | 500 |
The value has been inserted into the table, with NULL values where we didn’t specify column values.
Now, let’s try it with a WHERE clause.
1 row inserted.
Let’s see the results.
| STUDENT_ID | FIRST_NAME | LAST_NAME | FEES_REQUIRED |
| 1 | John | Smith | 500 |
| 2 | Susan | Johnson | 150 |
| 3 | Tom | Capper | 350 |
| 4 | Mark | Holloway | 500 |
| 5 | Steven | Webber | 100 |
| 6 | Julie | Armstrong | 100 |
| 7 | Michelle | Randall | 250 |
| 8 | Andrew | Cooper | 800 |
| 9 | Robert | Pickering | 110 |
| 10 | Tanya | Hall | 150 |
| 11 | Jarrad | Winston | 700 |
| 12 | Mary | Taylor | 500 |
| 100 | Mark | Anderson | 860 |
| 102 | John | Rogers | 210 |
| 120 | A | A | 500 |
| 121 | B | B | 500 |
The data has been inserted. Even though the values clause specifies a fees_required value of 500 and the WHERE clause specifies it should be greater than 600, it doesn’t stop the value from being inserted.
Let’s try it again, but we’ll use the WITH CHECK OPTION keywords.
SQL Error: ORA-01402: view WITH CHECK OPTION where-clause violation
Let’s see the results.
| STUDENT_ID | FIRST_NAME | LAST_NAME | FEES_REQUIRED |
| 1 | John | Smith | 500 |
| 2 | Susan | Johnson | 150 |
| 3 | Tom | Capper | 350 |
| 4 | Mark | Holloway | 500 |
| 5 | Steven | Webber | 100 |
| 6 | Julie | Armstrong | 100 |
| 7 | Michelle | Randall | 250 |
| 8 | Andrew | Cooper | 800 |
| 9 | Robert | Pickering | 110 |
| 10 | Tanya | Hall | 150 |
| 11 | Jarrad | Winston | 700 |
| 12 | Mary | Taylor | 500 |
| 100 | Mark | Anderson | 860 |
| 102 | John | Rogers | 210 |
| 120 | A | A | 500 |
| 121 | B | B | 500 |
This time, the record is not inserted. This is because the WITH CHECK OPTION causes the INSERT statement to not insert the record if the record does not comply with the WHERE clause.
This is a helpful way to validate your data before inserting into your table.
Get Inserted ID
For tables with an auto increment id field, you can get the id of the row you
just inserted by asking the result object.
Note: To be able to get the inserted id, only one row can be inserted.
Example
Insert a record in the «customers» table, and return the ID:
var mysql = require(‘mysql’);var con = mysql.createConnection({
host: «localhost», user: «yourusername», password: «yourpassword»,
database: «mydb»
});con.connect(function(err) { if (err) throw err; var sql = «INSERT INTO customers (name, address)
VALUES (‘Michelle’, ‘Blue Village 1’)»;
con.query(sql, function (err, result) { if (err) throw err; console.log(«1 record inserted,
ID: » + result.insertId); });});
Save the code above in a file called «demo_db_insert_id.js», and run the file:
Run «demo_db_insert_id.js»
C:\Users\Your Name>node demo_db_insert_id.js
Which will give you something like this in return:
1 record inserted, ID: 15
❮ Previous
Next ❯
INSERT…SELECT statement
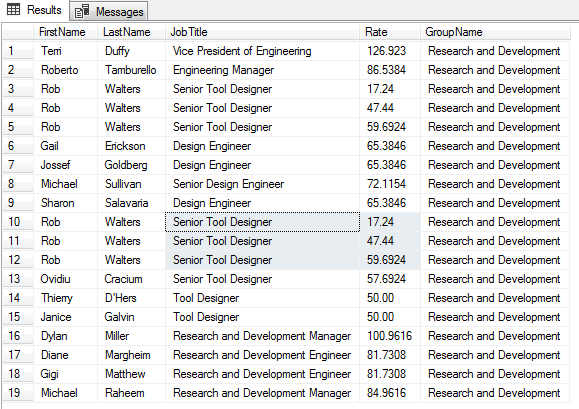
The first SQL INSERT statement uses an INSERT…SELECT statement to derive the output from the multiple source tables such as Employee, EmployeePayHistory, Department, and Person of the AdventureWorks2014 database and insert the result set into the demo table.
You can see that schema and definition is already built for the INSERT INTO SQL statement.
|
1 |
CREATETABLEDemo (FirstNameVARCHAR(25), LastNameVARCHAR(25), JobTitleVARCHAR(100), RateDECIMAL(7,4), GroupNameVARCHAR(50) ); INSERTINTODemo SELECTP.FirstName, P.LastName, EMP.JobTitle, EPH.Rate, Dept.GroupName FROMHumanResources.EmployeePayHistoryEPH INNERJOINHumanResources.EmployeeEMPONEMP.BusinessEntityID=EPH.BusinessEntityID INNERJOINHumanResources.EmployeeDepartmentHistoryHONEMP.BusinessEntityID=H.BusinessEntityID INNERJOINHumanResources.DepartmentDeptONH.DepartmentID=Dept.DepartmentID INNERJOINPerson.PersonPONP.BusinessEntityID=EMP.BusinessEntityID WHEREDept.GroupName=’Research and Development’; SELECT* FROMDemo; |
SQL References
SQL Keywords
ADD
ADD CONSTRAINT
ALTER
ALTER COLUMN
ALTER TABLE
ALL
AND
ANY
AS
ASC
BACKUP DATABASE
BETWEEN
CASE
CHECK
COLUMN
CONSTRAINT
CREATE
CREATE DATABASE
CREATE INDEX
CREATE OR REPLACE VIEW
CREATE TABLE
CREATE PROCEDURE
CREATE UNIQUE INDEX
CREATE VIEW
DATABASE
DEFAULT
DELETE
DESC
DISTINCT
DROP
DROP COLUMN
DROP CONSTRAINT
DROP DATABASE
DROP DEFAULT
DROP INDEX
DROP TABLE
DROP VIEW
EXEC
EXISTS
FOREIGN KEY
FROM
FULL OUTER JOIN
GROUP BY
HAVING
IN
INDEX
INNER JOIN
INSERT INTO
INSERT INTO SELECT
IS NULL
IS NOT NULL
JOIN
LEFT JOIN
LIKE
LIMIT
NOT
NOT NULL
OR
ORDER BY
OUTER JOIN
PRIMARY KEY
PROCEDURE
RIGHT JOIN
ROWNUM
SELECT
SELECT DISTINCT
SELECT INTO
SELECT TOP
SET
TABLE
TOP
TRUNCATE TABLE
UNION
UNION ALL
UNIQUE
UPDATE
VALUES
VIEW
WHERE
MySQL Functions
String Functions:
ASCII
CHAR_LENGTH
CHARACTER_LENGTH
CONCAT
CONCAT_WS
FIELD
FIND_IN_SET
FORMAT
INSERT
INSTR
LCASE
LEFT
LENGTH
LOCATE
LOWER
LPAD
LTRIM
MID
POSITION
REPEAT
REPLACE
REVERSE
RIGHT
RPAD
RTRIM
SPACE
STRCMP
SUBSTR
SUBSTRING
SUBSTRING_INDEX
TRIM
UCASE
UPPER
Numeric Functions:
ABS
ACOS
ASIN
ATAN
ATAN2
AVG
CEIL
CEILING
COS
COT
COUNT
DEGREES
DIV
EXP
FLOOR
GREATEST
LEAST
LN
LOG
LOG10
LOG2
MAX
MIN
MOD
PI
POW
POWER
RADIANS
RAND
ROUND
SIGN
SIN
SQRT
SUM
TAN
TRUNCATE
Date Functions:
ADDDATE
ADDTIME
CURDATE
CURRENT_DATE
CURRENT_TIME
CURRENT_TIMESTAMP
CURTIME
DATE
DATEDIFF
DATE_ADD
DATE_FORMAT
DATE_SUB
DAY
DAYNAME
DAYOFMONTH
DAYOFWEEK
DAYOFYEAR
EXTRACT
FROM_DAYS
HOUR
LAST_DAY
LOCALTIME
LOCALTIMESTAMP
MAKEDATE
MAKETIME
MICROSECOND
MINUTE
MONTH
MONTHNAME
NOW
PERIOD_ADD
PERIOD_DIFF
QUARTER
SECOND
SEC_TO_TIME
STR_TO_DATE
SUBDATE
SUBTIME
SYSDATE
TIME
TIME_FORMAT
TIME_TO_SEC
TIMEDIFF
TIMESTAMP
TO_DAYS
WEEK
WEEKDAY
WEEKOFYEAR
YEAR
YEARWEEK
Advanced Functions:
BIN
BINARY
CASE
CAST
COALESCE
CONNECTION_ID
CONV
CONVERT
CURRENT_USER
DATABASE
IF
IFNULL
ISNULL
LAST_INSERT_ID
NULLIF
SESSION_USER
SYSTEM_USER
USER
VERSION
SQL Server Functions
String Functions:
ASCII
CHAR
CHARINDEX
CONCAT
Concat with +
CONCAT_WS
DATALENGTH
DIFFERENCE
FORMAT
LEFT
LEN
LOWER
LTRIM
NCHAR
PATINDEX
QUOTENAME
REPLACE
REPLICATE
REVERSE
RIGHT
RTRIM
SOUNDEX
SPACE
STR
STUFF
SUBSTRING
TRANSLATE
TRIM
UNICODE
UPPER
Numeric Functions:
ABS
ACOS
ASIN
ATAN
ATN2
AVG
CEILING
COUNT
COS
COT
DEGREES
EXP
FLOOR
LOG
LOG10
MAX
MIN
PI
POWER
RADIANS
RAND
ROUND
SIGN
SIN
SQRT
SQUARE
SUM
TAN
Date Functions:
CURRENT_TIMESTAMP
DATEADD
DATEDIFF
DATEFROMPARTS
DATENAME
DATEPART
DAY
GETDATE
GETUTCDATE
ISDATE
MONTH
SYSDATETIME
YEAR
Advanced Functions
CAST
COALESCE
CONVERT
CURRENT_USER
IIF
ISNULL
ISNUMERIC
NULLIF
SESSION_USER
SESSIONPROPERTY
SYSTEM_USER
USER_NAME
MS Access Functions
String Functions:
Asc
Chr
Concat with &
CurDir
Format
InStr
InstrRev
LCase
Left
Len
LTrim
Mid
Replace
Right
RTrim
Space
Split
Str
StrComp
StrConv
StrReverse
Trim
UCase
Numeric Functions:
Abs
Atn
Avg
Cos
Count
Exp
Fix
Format
Int
Max
Min
Randomize
Rnd
Round
Sgn
Sqr
Sum
Val
Date Functions:
Date
DateAdd
DateDiff
DatePart
DateSerial
DateValue
Day
Format
Hour
Minute
Month
MonthName
Now
Second
Time
TimeSerial
TimeValue
Weekday
WeekdayName
Year
Other Functions:
CurrentUser
Environ
IsDate
IsNull
IsNumeric
SQL Quick Ref
SQL Учебник
SQL ГлавнаяSQL ВведениеSQL СинтаксисSQL SELECTSQL SELECT DISTINCTSQL WHERESQL AND, OR, NOTSQL ORDER BYSQL INSERT INTOSQL Значение NullSQL Инструкция UPDATESQL Инструкция DELETESQL SELECT TOPSQL MIN() и MAX()SQL COUNT(), AVG() и …SQL Оператор LIKESQL ПодстановочныйSQL Оператор INSQL Оператор BETWEENSQL ПсевдонимыSQL JOINSQL JOIN ВнутриSQL JOIN СлеваSQL JOIN СправаSQL JOIN ПолноеSQL JOIN СамSQL Оператор UNIONSQL GROUP BYSQL HAVINGSQL Оператор ExistsSQL Операторы Any, AllSQL SELECT INTOSQL INSERT INTO SELECTSQL Инструкция CASESQL Функции NULLSQL ХранимаяSQL Комментарии
Insert Data Only in Specified Columns
It is also possible to only insert data in specific columns.
The following SQL statement will insert a new record, but only insert data in the «CustomerName»,
«City», and «Country» columns (CustomerID will
be updated automatically):
Example
INSERT INTO Customers (CustomerName, City, Country)
VALUES (‘Cardinal’, ‘Stavanger’, ‘Norway’);
The selection from the «Customers» table will now look like this:
| CustomerID | CustomerName | ContactName | Address | City | PostalCode | Country |
|---|---|---|---|---|---|---|
| 89 | White Clover Markets | Karl Jablonski | 305 — 14th Ave. S. Suite 3B | Seattle | 98128 | USA |
| 90 | Wilman Kala | Matti Karttunen | Keskuskatu 45 | Helsinki | 21240 | Finland |
| 91 | Wolski | Zbyszek | ul. Filtrowa 68 | Walla | 01-012 | Poland |
| 92 | Cardinal | null | null | Stavanger | null | Norway |
❮ Previous
Next ❯
Examples
=> INSERT INTO t1 VALUES (101, 102, 103, 104);
=> INSERT INTO customer VALUES (10, 'male', 'DPR', 'MA', 35);
=> INSERT INTO retail.t1 (C0, C1) VALUES (1, 1001);
=> INSERT INTO films SELECT * FROM tmp_films WHERE date_prod < '2004-05-07';
Vertica does not support subqueries or nested expressions as the target of an statement. For example, the following query returns an error message:
=> INSERT INTO t1 (col1, col2) VALUES ('abc', (SELECT mycolumn FROM mytable));
ERROR 4821:  Subqueries not allowed in target of insert
You can rewrite the above query as follows:
=> INSERT INTO t1 (col1, col2) (SELECT 'abc', mycolumn FROM mytable);
 OUTPUT
--------
      0
(1 row)
The following example shows how to use with flex tables:
=> CREATE FLEX TABLE flex1();
 CREATE TABLE
=> INSERT INTO flex1(a,b) VALUES (1, 'x');
 OUTPUT
--------
      1
(1 row)
=> SELECT MapToString(__raw__) FROM flex1;
           MapToString
---------------------------------
{
"a" : "1",
"b" : "x"
}
(1 row)
The next example shows how to use with flex tables:
=> CREATE FLEX TABLE flex2();
 CREATE TABLE
=> INSERT INTO flex2(a, b) SELECT a, b, '2016-08-10 11:10' c,      'Hello' d, 3.1415 e, f from flex1;
 OUTPUT
--------
      1
(1 row)
=> SELECT MapToString(__raw__) FROM flex2;
           MapToString
---------------------------------
{"a" : "1","b" : "x","c" : "2016-08-10","d" : "Hello","e" : 3.1415,"f" : null}(1 row)
Was this topic helpful?
Yes
No
Conclusion
There are many ways to insert data into SQL Server, but not all were created equal. Picking the right syntax can have a significant impact on performance, documentation, and maintainability. This article provides a comparison of a variety of syntaxes, as well as the pros, cons, and demos of each one.
Always consider your application when writing code and adjust your style based on how often schema and code are expected to change. Schema and applications that are static and rarely changed can afford to have hard-coded INSERT statements with columns, aliases, and/or reference documentation to make them easy to read and maintain.
For schema or business needs that changes often, SELECT INTO or the omission of the column list from an INSERT may allow for more fluidity in places where code would greatly benefit from it.
Having a variety of options at our disposal allows us to make better decisions when smart choices are needed and will help us write better code that will make future developers appreciate us that much more as it is updated and maintained!
Rules:
- Typically we don’t always provide data for every single column. In some cases, the columns can be left blank and in some other provide their own default values.
- You also have situations where some columns are automatically generating keys. In such cases, you certainly don’t want to try and insert your own values in those situations.
- The columns and values must match order, data type and number
- If the column is of strings or date time or characters, they need to be enclosed in the in the single quotes. If they’re numeric, you don’t need the quotes.
- If you do not list your target columns in the insert statement then you must insert values into all of the columns in the table, also, be sure to maintain the order of the values
Practice Exercise #1:
Based on the contacts table, insert a contact record whose contact_id is 1000, last_name is Smith, first_name is Jane, and address is 10 Somewhere St.:
CREATE TABLE contacts
( contact_id number(10) not null,
  last_name varchar2(50) not null,
  first_name varchar2(50) not null,
  address varchar2(50),
  city varchar2(50),
  state varchar2(20),
  zip_code varchar2(10),
  CONSTRAINT contacts_pk PRIMARY KEY (contact_id)
);
Solution for Practice Exercise #1:
The following Oracle INSERT statement would insert this record into the employees table:
INSERT INTO contacts
(contact_id, last_name, first_name, address)
VALUES
(1000, 'Smith', 'Jane', '10 Somewhere St.');
SQL INSERT
Команда INSERT добавляет строки в таблицу или представление основной таблицы.
Синтаксис команды Sql INSERT
Синтаксис команды Insert
Основные ключевые слова и параметры команды INSERT
- schema — идентификатор полномочий, обычно совпадающий с именем некоторого пользователя
- table view — имя таблицы, в которую строки должны быть вставлены; если указано представление, то строки вставляются в основную таблицу представления
- subquery_1 — подзапрос, который сервер обрабатывает тем же самым способом как представление
- column — столбец таблицы или представления, в который для каждой вставленной строки вводится значение из фразы VALUES или подзапроса; если один из столбцов таблицы опускается из этого списка, значением столбца для вставленной строки является значение по умолчанию столбца, определенное при создании таблицы. Если полностью опускается список столбца, предложение VALUES или запрос должен определить значения для всех столбцов в таблице
- VALUES — определяет строку значений, которые будут вставлены в таблицу или представление; значение должно быть определено в предложении VALUES для каждого столбца в списке столбцов
- subquery_2 — подзапрос, который возвращает строки, вставляемые в таблицу; выборочный список этого подзапроса должен иметь такое же количество столбцов, как в списке столбцов утверждения INSERT
Утверждение INSERT с фразой VALUES добавляет одиночную строку к таблице. Эта строка содержит значения, определенные фразой VALUES.
Утверждение INSERT с подзапросом вместо фразы VALUES добавляет к таблице все строки, возвращенные подзапросом. Сервер обрабатывает подзапрос и вставляет каждую возвращенную строку в таблицу. Если подзапрос не выбирает никакие строки, сервер не вставляет никакие строки в таблицу.Подзапрос может обратиться к любой таблице или представлению, включая целевую таблицу утверждения INSERT. Сервер назначает значения полям в новых строках, основанных на внутренней позиции столбцов в таблице и порядке значений фразы VALUES или в списке выбора запроса. Если какие-либо столбцы пропущены в списке столбцов, сервер назначает им значения по умолчанию, определенные при создании таблицы. Если любой из этих столбцов имеет NOT NULL ограничение то сервер возвращает ошибку, указывающую, что ограничение было нарушено и отменяет утверждение INSERT.
При выдаче утверждения INSERT включается любой INSERT — триггер, определенный на таблице.
INSERT INTO
INSERT INTO Пример 1
INSERT INTO Пример 2
Нижеприведенная команда копирует данные сотрудников фирмы, комисионные которых превышают 25% от дохода в таблицу bonus:
INSERT INTO Пример 3
Если нужно вставить NULL-значение, необходимо указать его как обычное значение следующим образом:
INSERT INTO Пример 4
Команду INSERT можно применить для того, чтобы извлечь значения из одной таблицы и разместить их в другой, воспользовавшись для этого запросом. Для этого достаточно заменить предложение VALUES на соответствующий запрос:
Приоритет вставки INSERT LOW_PRIORITY / HIGH_PRIORITY
Установление приоритета нужно для решение проблем с конкурентными вставками. При вставках происходит блокировка строк и если 2 INSERT запроса требуют блокировки одних и тех же строк, для своего выполнения, то иногда может потребоваться повысить или понизить приоритет некоторых запросов, по отношению к другим. Это можно сделать указав приоритет LOW_PRIORITY или HIGH_PRIORITY
Наш запрос будет выглядеть так для LOW_PRIORITY:
INSERT LOW_PRIORITY INTO table1 (a, b, c) VALUES(1, 2, 3);
HIGH_PRIORITY:
INSERT HIGH_PRIORITY INTO table1 (a, b, c) VALUES(1, 2, 3);
Помогла ли Вам эта статья?
Да
Нет
Примеры SQL INSERT INTO SELECT
Следующая инструкция SQL копирует «Suppliers» в «Customers» (столбцы, которые не заполнены данными, будут содержать NULL):
Пример
INSERT INTO Customers (CustomerName,
City, Country)
SELECT SupplierName, City, Country FROM Suppliers;
Следующая инструкция SQL копирует «Suppliers» в «Customers» (заполните все столбцы):
Пример
INSERT INTO Customers (CustomerName, ContactName, Address, City, PostalCode,
Country)SELECT SupplierName, ContactName, Address, City, PostalCode,
Country FROM Suppliers;
Следующая инструкция SQL копирует только немецких поставщиков в раздел «Customers»:
Пример
INSERT INTO Customers (CustomerName,
City, Country)
SELECT SupplierName, City, Country FROM SuppliersWHERE Country=’Germany’;
Вставка из другой таблицы с условием INSERT INTO … SELECT … WHERE …
А теперь представим, что нам нужно вставить только те строки из table1, у которых столбец «c» равен 333. Тогда наш запрос будет выглядеть так
INSERT INTO table2 (a, b, c)
    SELECT a, b, c FROM table1
    WHERE c = 333;
То есть мы просто вставляем данные в таблицу, которые выбрали из другой таблицы при помощи обычного SELECT запроса
Теперь представим, что у нас в таблице table2 — 4 столбца, а в table1 — 3. При этом четвертый столбец в table2 обязательный. Чтобы выйти из этой ситуации, нужно передать какое-нибудь подходящее значение в этот лишний столбец. У нас чисто абстрактная задача, поэтому давайте передадим туда просто единицу.
INSERT INTO table2 (a, b, c, d)
    SELECT a, b, c, 1 FROM table1
    WHERE c = 333;
Теперь в столбец d у нас записалась единица и проблема решена.
Вставка строк, некоторые из которых уже существуют в целевой таблице
Существование строк определяется по значению уникальных ключей. В зависимости от ситуации мы можем выбрать разные способы поведения при совпадении значений уникальных столбцов.
Игнорирование INSERT IGNORE INTO
Например если мы вставляем строку с PK = 1, и при этом в таблице уже есть PK = 1 то MySQL выдаст ошибку:
/* ERROR 1062 (23000): Duplicate entry '1' for key 'PRIMARY' */
Выполнение запроса на этом прервется, однако нам в некоторых случаях хотелось бы просто вставить данные, игнорируя ошибки. В этом нам поможет INSERT IGNORE INTO:
INSERT IGNORE INTO table1 (a, b, c) VALUES
    (1, 222, 333),
    (2, 555, 666),
    (3, 555, 333);
Просто добавляем IGNORE в наш запрос и ошибки будут игнорироваться
Вставка с заменой существующих значений REPLACE INTO
REPLACE работает также INSERT, но если совпадают уникальные ключи, то старая строка (или строки!) удаляется до вставки новой.
В таком случае наш пример выглядит следующим образом:
REPLACE INTO table1 (a, b, c) VALUES
    (1, 222, 333),
    (2, 555, 666),
    (3, 555, 333);
Обновление некоторых полей, при существовании строк ON DUPLICATE KEY UPDATE
При совпадении ключей, мы можем также заменить некоторые или все поля в строке.
Наш запрос будет выглядеть так:
INSERT INTO table1 (a,b,c) VALUES (1,2,3)
ON DUPLICATE KEY UPDATE c=VALUES(c);
В данном примере если у нас какой-то уникальный ключ совпадает, то мы не производим вставку, а обновляем существующую строку или строки путем присваивания столбцу «c» значения, которое у нас перечислено в VALUES.
Иными словами, если ключ совпадает, то мы просто обновим данные столбца «с» а остальные столбцы трогать не будем.
Иногда нам нужно при совпадении ключей обновить все значения. Этом можно сделать просто перечислив все столбцы:
INSERT INTO table1 (a,b,c) VALUES (1,2,3)
ON DUPLICATE KEY UPDATE a=VALUES(a), b=VALUES(b), c=VALUES(c);
При обновлении столбцов мы также можем использовать разные выражения, например:
INSERT INTO table1 (a,b,c) VALUES (1,2,3),(4,5,6)
ON DUPLICATE KEY UPDATE c=VALUES(a)+VALUES(b);
Подробнее про ON DUPLICATE KEY UPDATE
INSERT IGNORE statement
INSERT IGNORE is a very interesting keyword. When we insert multiple records in the using INSERT statement or INSERT INTO SELECT keyword, and sometimes the INSERT query failed due to an error, the entire INSERT query gets terminated. Suppose we are inserting thousands of records in a table, and due to error, the entire INSERT query fails and we must re-run the entire query. To avoid such issues, we can use the INSERT IGNORE statement.
If you are using the INSERT IGNORE statement to insert data in tables, even though the query encounters an error, the INSERT query does not fail.
To demonstrate, I have created a table named tbldepartment. The following is the table definition:
|
1 |
createtabletbldepartment ( department_idvarchar(10)primarykey, department_namevarchar(500) ) |
Here, Department_ID column is a primary key so you cannot insert a duplicate value in it. Now, let’s insert a few rows by executing the following query:
|
1 |
insertignoreintotbldepartment (department_id,department_name)values (‘DEP00001′,’IT’),(‘DEP00001′,’Sales’),(‘DEP00002′,’MARKETING’); |
When you insert the record, you will receive the following warning.

Here, we have used the INSERT IGNORE statement; hence two rows must be inserted in the table. To verify that, execute the following SELECT query.
| 1 | Select*fromtbldepartment; |
Below is the output:

As you can see, instead of three values, only the DEP00001 and DEP00002 have been inserted.
When we use INSERT INTO IGNORE keyword, the MySQL will issue the warning, but it will try to adjust the value in the column. To understand that, insert another row in the tbldepartment table. The length of the department_id column is 10 characters. In the table, let us try to insert the department_id. The length of the value is higher than the defined length. Execute the following query:
| 1 | insertignoreintotbldepartment(department_id,department_name)values(‘DEP000000001′,’Human Resource’); |
The query will give the following warning:

As you can see, the query generates a warning. Now, run the SELECT query to view the data.
| 1 | Select*fromtbldepartment; |
Below is the output:

As you can see, that the row has been inserted, but MySQL has trimmed the value of the department_id column.
How to perform a simple Insert using SSMS
Inserting data into a table can be accomplished either using SQL Server Management Studio (SSMS), a GUI, or through Data Manipulation Language in the SQL Editor. Using GUI in SSMS is a quick and easy way to enter records directly to the table.
Let’s go ahead and browse department table and right-click and go to edit top 200 rows.
This will bring up an editor window where we can interact directly with the data. To type in the new values, come down to the bottom and start typing the values.
It is very useful in some case to familiarize yourself with what data that you’re about to enter into the table.
|
1 |
SELECT* FROMdepartment; |
Запрос на вставку строки
Простой запрос, который вставляет строку со столбцами 111, 222 и 333 выглядит так:
INSERT INTO table1 (a, b, c) VALUES (111, 222, 333);
Еще один способ сделать то же самое:
INSERT INTO table1 SET a=111, b=222, c=333;
Столбцы, которые вы не перечислите заполняются значениями по умолчанию, которые вы предусматриваете при создании таблицы, даже если это просто NULL.
У таблиц обычно есть поле с первичным ключом (PRIMARY KEY) таблицы. Если этому полю установлено значение AUTOINCREMENT т.е. оно заполняется автоматически, то в таком случае вы не должны его перечислять в списке столбцов оператора INSERT.
Вставка без перечисления столбцов
Если количество значений, которые мы вставляем = количеству столбцов в таблице, то можно не перечислять столбцы, и наш запрос может выглядеть так:
INSERT INTO table1 VALUES (111, 222, 333);
Этот способ крайне не рекомендуется. Дело в том, что со временем вы можете менять таблицы, например добавлять в них новые столбцы, а это значит, что все запросы записанные таким способом просто перестанут работать и вам придется менять их по всему вашему приложению.
Поэтому, навсегда забываем этот способ. Я его привел, только чтобы вы так не делали.
Example — Using SELECT statement
You can also create more complicated SQL Server INSERT statements using SELECT statements.
For example:
INSERT INTO contacts
(contact_id, last_name, first_name)
SELECT employee_id, last_name, first_name
FROM employees
WHERE employee_id <= 100;
By placing a SELECT statement within the INSERT statement, you can perform multiples inserts quickly.
With this type of insert, you may wish to check for the number of rows being inserted. You can determine the number of rows that will be inserted by running the following SQL Server SELECT statement before performing the insert.
SELECT count(*)
FROM employees
WHERE employee_id <= 100;
MySQL INSERT examples
Let’s create a new table named for practicing the statement.
1) MySQL – simple example
The following statement inserts a new row into the table:
MySQL returns the following message:
It means that one row has been inserted into the table successfully.
This query returns data from the table:
Here is the output:
In this example, we specified the values for only and columns. For other columns, MySQL uses the default values.
The column is an column. It means that MySQL generates a sequential integer whenever a row is inserted into the table.
The , , and columns use as the default value, therefore, MySQL uses to insert into these columns if you don’t specify their values in the statement.
2) MySQL – Inserting rows using default value example
If you want to insert a default value into a column, you have two ways:
- Ignore both the column name and value in the statement.
- Specify the column name in the clause and use the keyword in the clause.
The following example demonstrates the second way:
In this example, we specified the column and the keyword.
Because the default value for the column is 3 as declared in the table definition:
MySQL uses the number 3 to insert into the column.
The following statement returns the contents of the table after the insert:
3) MySQL – Inserting dates into the table example
To insert a literal date value into a column, you use the following format:
In this format:
- represents a four-digit year e.g., 2018.
- represents a two-digit month e.g., 01, 02, and 12.
- represents a two-digit day e.g., 01, 02, 30.
The following statement inserts a new row to the table with the start and due date values:
The following picture shows the contents of the table after the insert:
It is possible to use expressions in the clause. For example, the following statement adds a new task using the current date for start date and due date columns:
In this example, we used the function as the values for the and columns. Note that the function is a date function that returns the current system date.
Here are the contents of the table after insert:
4) MySQL – Inserting multiple rows example
The following statement inserts three rows into the table:
In this example, each row data is specified as a list of values in the clause.
MySQL returns the following message:
It means that the three rows have been inserted successfully with no duplicates or warnings.
The table has the following data:
In this tutorial, you have learned how to use the MySQL statement to add one or more rows into a table.
Пример INSERT INTO
Следующая инструкция SQL вставляет новую запись в таблице «Customers»:
Пример
INSERT INTO Customers (CustomerName, ContactName, Address, City, PostalCode, Country)
VALUES (‘Cardinal’, ‘Tom B. Erichsen’, ‘Skagen 21’, ‘Stavanger’, ‘4006’, ‘Norway’);
Выбор из таблицы «Customers» теперь будет выглядеть следующим образом:
| CustomerID | CustomerName | ContactName | Address | City | PostalCode | Country |
|---|---|---|---|---|---|---|
| 89 | White Clover Markets | Karl Jablonski | 305 — 14th Ave. S. Suite 3B | Seattle | 98128 | USA |
| 90 | Wilman Kala | Matti Karttunen | Keskuskatu 45 | Helsinki | 21240 | Finland |
| 91 | Wolski | Zbyszek | ul. Filtrowa 68 | Walla | 01-012 | Poland |
| 92 | Cardinal | Tom B. Erichsen | Skagen 21 | Stavanger | 4006 | Norway |
Вы заметили, что мы не вставили ни одного числа в поле CustomerID?
Столбец CustomerID является полем auto-increment создается автоматически при вставке в таблицу новой записи.
Заключение
В рамках этой познавательной статьи была рассмотрена клавиша Insert. Раньше она достаточно часто использовалась в процессе работы на персональном компьютере. Ее применяли и при наборе текстовой информации, и при обработке каталогов и файлов в файловых менеджерах, и при копировании или же вставке данных в операционной системе. Сейчас же такой острой необходимости в активной ее эксплуатации нет. Более удобной и практичной альтернативой ей является мышка. Использование манипулятора на сегодняшний день позволяет существенно повысить скорость работы на персональном компьютере. Поэтому некоторые производители уже исключают из состава клавиатуры рассматриваемую клавишу. Скорее всего, в обозримом будущем она начнет исчезать на новых клавиатурах, а через несколько лет вообще станет крайне редким явлением.